
How to Build a Better Shower Niche
A tile and stone pro offers detailed instructions for designing and installing a beautiful, custom niche with any type of tile.
Synopsis: Remodeler Joshua Oduin walks through the process of building a shower niche that successfully blends with the surrounding tile and acts as an accent to bring the bathroom together. He explains the importance of location, outlines the differences in using a premade or custom niche box, and walks step by step through the process of installing the niche: first installing the box, then setting the wall tile and mitering the edges, then setting the tile in the niche starting at the bottom before installing the shelf and the upper tile. Detailed photographs and illustrations demonstrate the process.
Bonus: See additional tips for cutting mitered tiles here: Mitered Joints Make a Tiled Shower Niche Shine
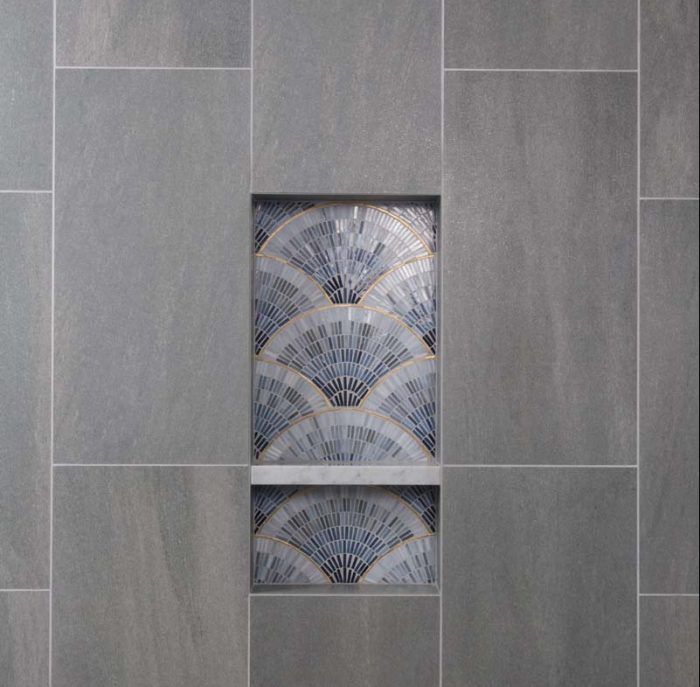
Niches add a very functional element to any shower enclosure. They can also add beauty. Unfortunately, most lack attention to detail. Too often the placement is off, the wall tile meets the niche awkwardly, or the outside edges are rough and unfinished looking. This is a missed opportunity.
After a decade of building niches many different ways, I’ve developed a set of techniques that ensure the niche blends cleanly with the surrounding wall tile and acts as an accent to bring the bathroom together. The approach can be adapted to any tile style by varying the techniques for finishing the edges. Subway tile, for example, can usually be purchased with factory bullnose edging that aligns nicely with the exterior of the box. For porcelain and marble, on the other hand, I create my own edging elements, as shown here.
In any case, the front end of my technique— integrating the niche box into the surrounding wall tile—is always the same, and starts with a careful layout.
Design considerations
It’s important to think about location and design early in the process. The size of the niche should be driven by the needs of the occupants, and there should be no plumbing, ducting, electrical fixtures, or structural/ load-bearing members in the niche location. If possible, the niche should not be placed in an exterior wall, which could interfere with insulation.
You should also consider the aesthetics of the niche size and location, how it relates to finished plumbing fixtures in the shower, and, most importantly, how it ties into the surrounding tile layout.
A shower niche is an opportunity to create cohesion and consistency in the bathroom design. For example, if you’ve selected a solid-surface material for your bathroom vanity, you can use the material for the shelves in the niche. Or, as I’ve done here, you can use the niche as a playful accent.
The niche box: premade or custom?
The tile and shelf for a custom shower niche are installed in a niche box, which sits between the wall studs. This box can be either a premade model that is compatible with your chosen shower waterproofing system, or one made on site using backerboard and that same chosen waterproofing system.
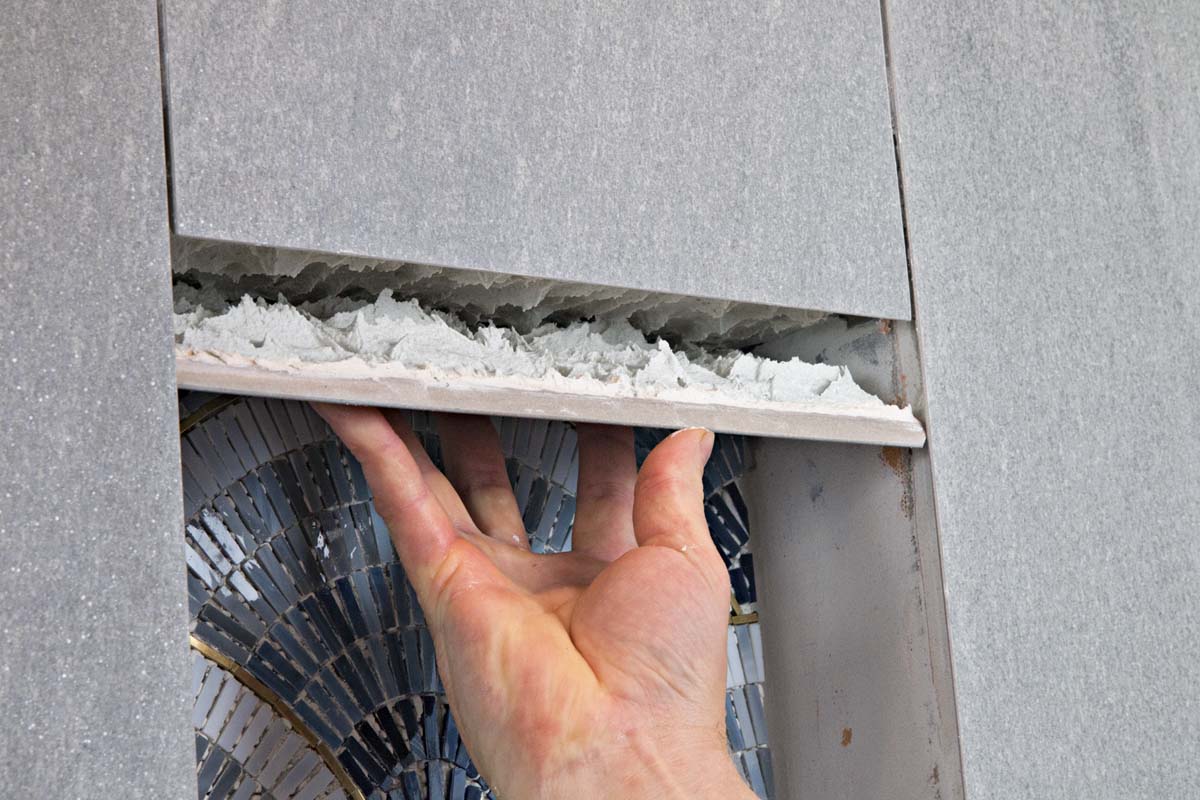
Usually, to save time and cost, I use a premade box. But when a client wants a very tall niche with multiple shelves, I build it—usually using DensArmor Plus backerboard. Premade niche boxes typically come in 1-ft. increments, such as 12 in. by 12 in. or 12 in. by 24 in., to match the dimensions of frequently used tiles. If you have a nonstandard-size box, like the one shown here, which is too tall to match up with the 24-in. porcelain wall tiles, you can still often make it work. Here I solved the issue by relocating the premade shelf to the top of the box to reduce the height of the interior to 24 in. (see photo facing page). Everything lined up perfectly.
One common mistake is locking in the niche location during the framing stage without considering how the surrounding tile will meet it. This results in oddly sized wall tiles, custom-cut where they meet the niche. That’s why I like to have control over the framing. With the general tile layout in mind, I frame the niche opening a few inches larger than needed to allow for some play when installing the box. Also, I don’t cut the hole into the wallboard until I install some of the wall tile around it. This way, I know where my grout lines will fall, so the niche aligns with them. The goal is to have all full tiles bordering the niche.
After I mark the niche, I cut the hole in the wallboard and add blocking at the top and bottom of the box. At this point, the box can go in and be waterproofed, and then I’m ready for tile.
The sequence is important
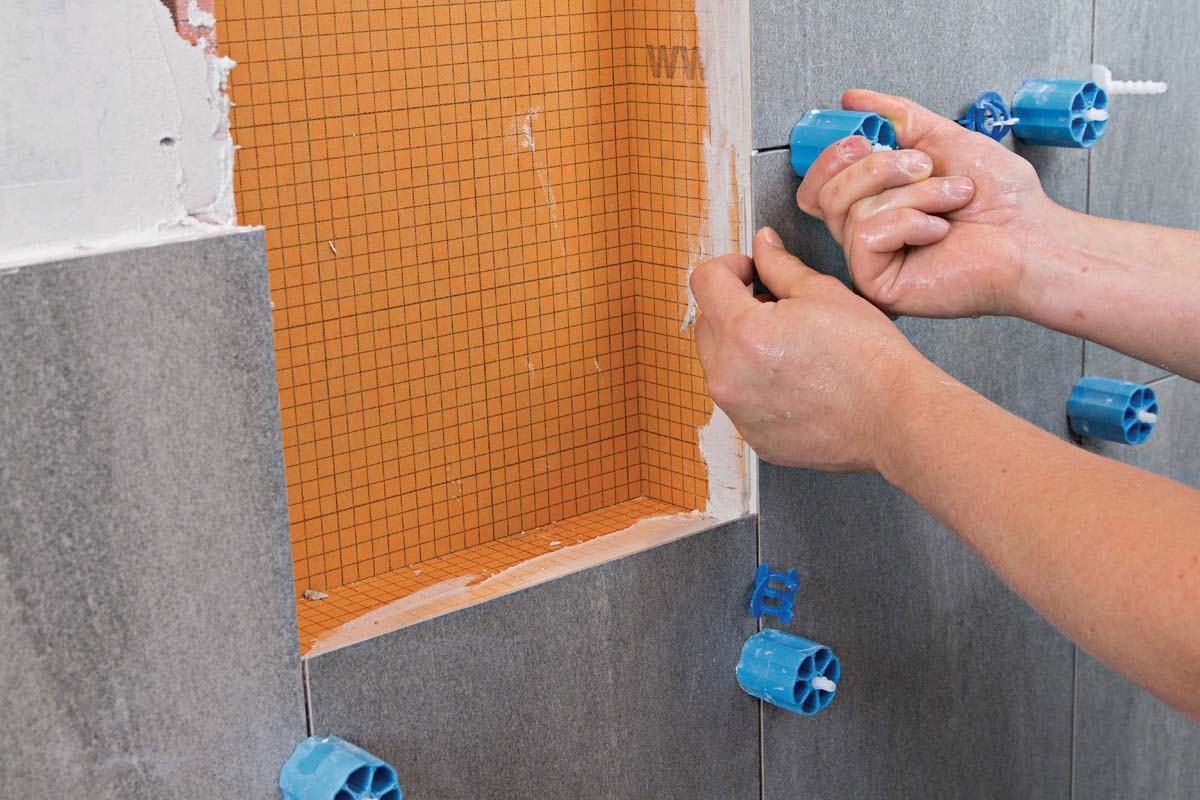
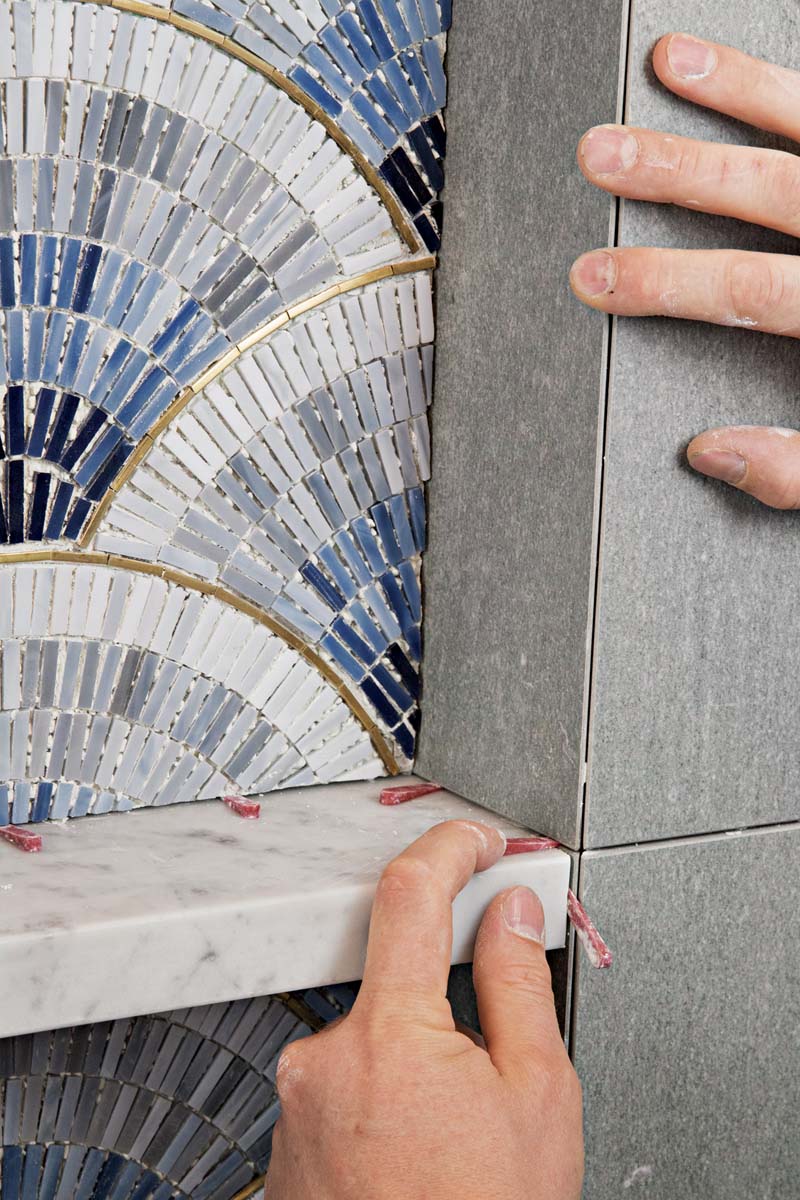
If you’re using a bullnose or premade edging profile, set the wall tiles flush to the inside edges of the niche box. If you’re mitering the joints between the wall tiles and niche tiles, as I am here, the wall tiles must protrude into the niche box by the thickness of the tile and thinset, and be mitered before you install them. It’s better that the wall tiles protrude into the opening too much than too little, since you can always put more thinset on the niche tiles to move them inward.
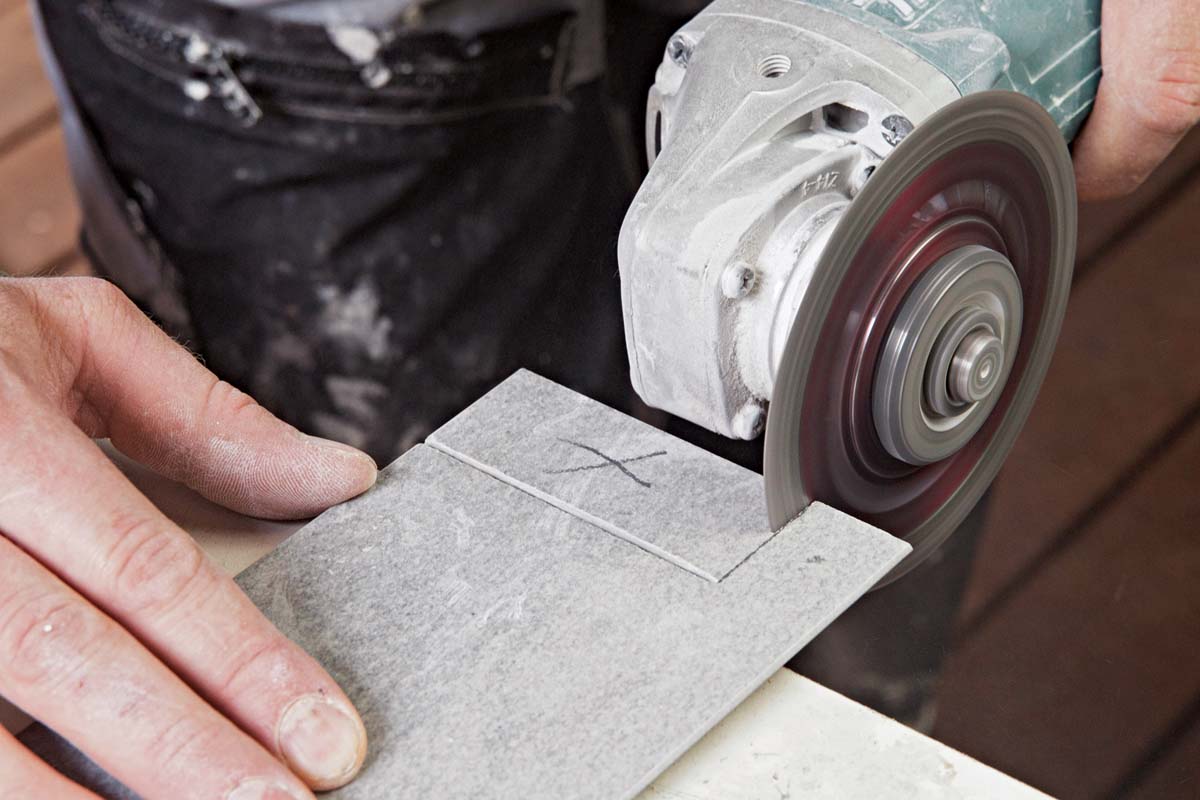
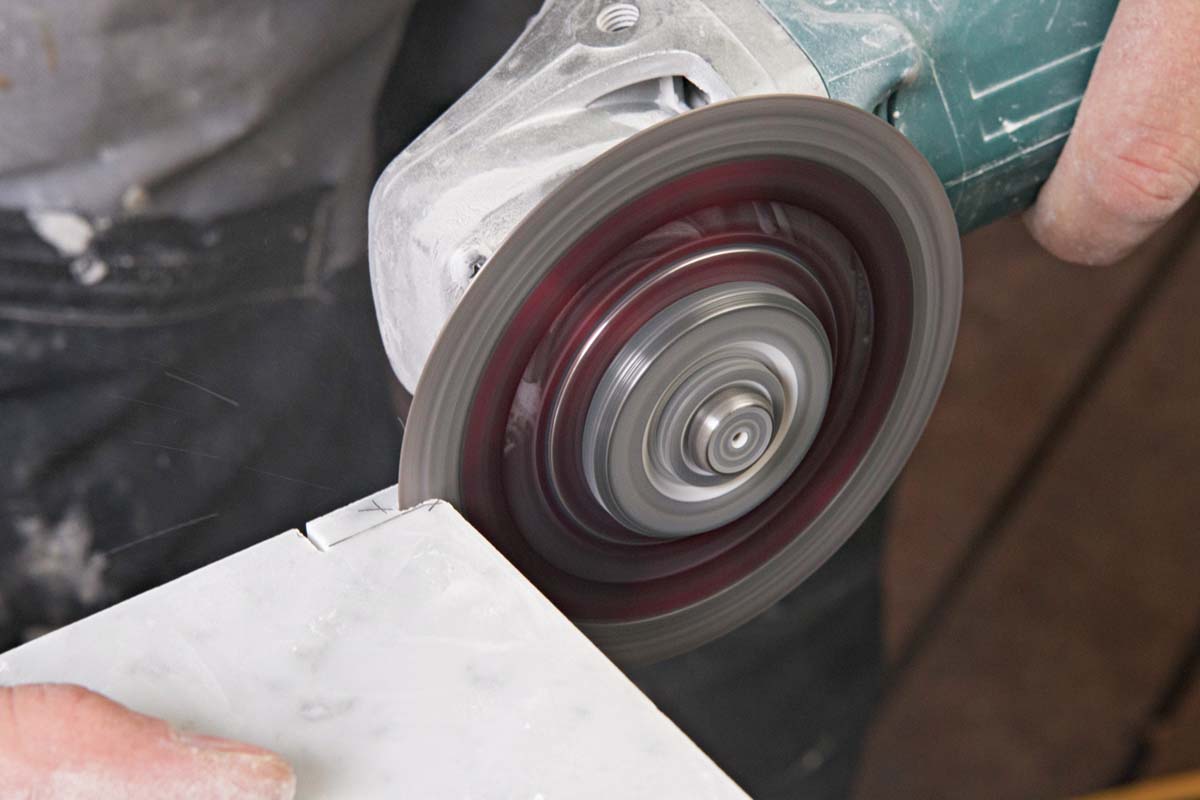
It might seem counterintuitive, but I’ve found it easier to grind these miters by hand than cut them with a tile saw. Tile-saw blades tend to deflect, especially on today’s dense porcelain tiles, and this often causes chipping along the cut edges.
Instead, I use a cordless grinder armed with a diamond cutting blade. The key is using the factory edge as your guide, working your way up to a blunt edge as you form the miter—but stopping just short of it to avoid a brittle knife edge. If the thin line formed by the blunt edge is consistent, you’ll have a consistent miter. The other trick is grinding the miter a little steeper than 45° to be sure the all-important outside edge will come together cleanly.
After I get the miter close with the diamond blade, I switch to a 200-grit polishing pad, which offers more control. Last, I hit all the cut surfaces and sharp corners with a 60-grit diamond hand pad.
Putting all the pieces together
I build the niche from the bottom up, so the elements support each other. To keep the grout gaps thin and consistent throughout, I install little wedge spacers as I go.
For the bottom, sides, and top of the niche, if you are going with the mitered-joint technique, you’ll need to miter the front edge to mate with the wall tile. If not, you’ll combine them with some sort of edging to finish off the front edge. Either way, make sure to slope the bottom tile of the niche (and later, the shelf) to shed water outward—about 1⁄16 in. for every 3 in.
With the mitered edges and the notched shelf, it helps to cut all of the lower pieces of the box (bottom, back, sides, and shelf) before the thinset goes on. You can always add water to the thinset and whip it up a bit to extend its working time, but it’s nice to be able to install the bottom of the niche without having to pause for a lot of cutting, grinding, and fitting.
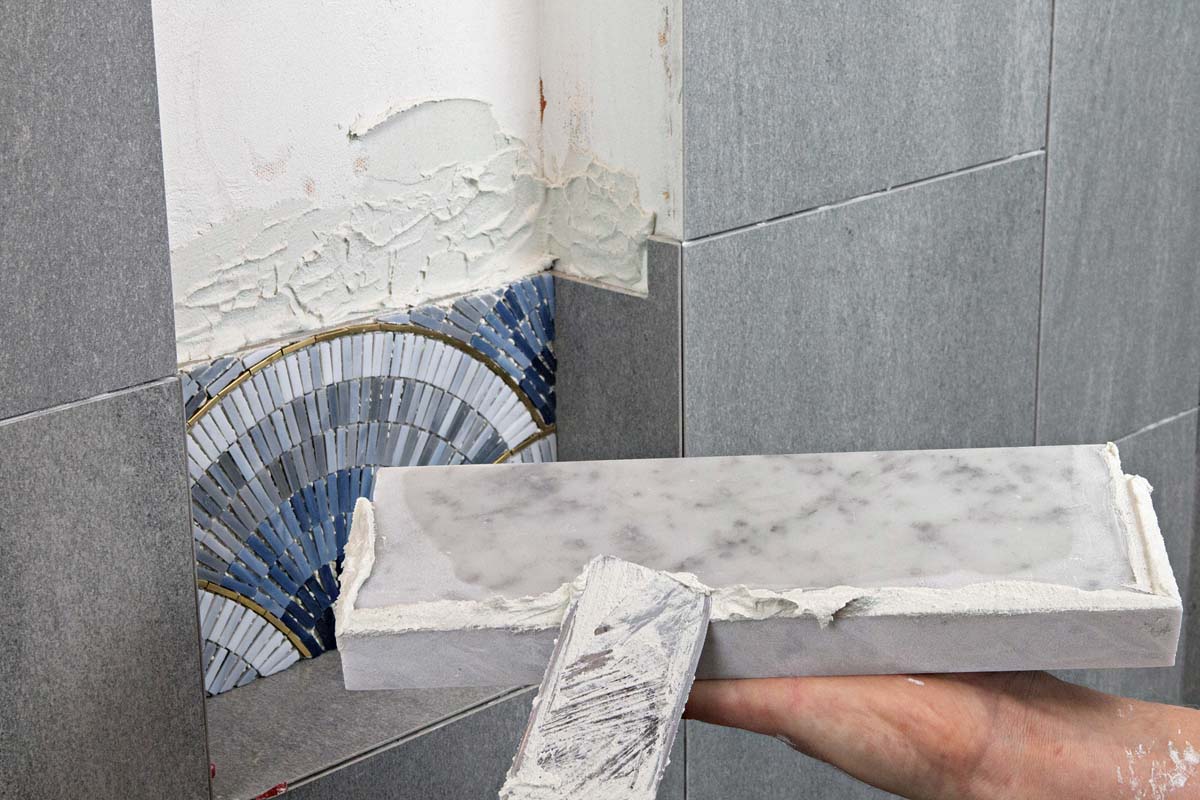
After the bottom is installed, the lower side pieces go in. Because they usually interlock with a shelf, it’s a good idea to think about both of these elements now. In most of my niches, I use a 12-in. by 24-in. premade box and put a shelf in the middle. This gives the niche two tall spaces for storage, and it also adds a visual accent. I most often use solid, 3-cm (1-3⁄16-in.) slab material for
the shelf—the same material I use for the vanity countertop.
The best way to install the shelf is to notch it into the lower pieces of tile in the sides of the niche, with a mating notch cut into the ends of the shelf. The upper side pieces go in next, positioned just slightly above the installed shelf.
I cut the clean, accurate notches I need with the same grinder and blade I use for mitered edges. I just draw pencil layout lines and follow them.
Once the bottom is in, the lower sides and lower back can be installed—in whatever order you like—so the shelf is supported on three edges. This works because the top edge of the back panel is flush with the bottom of the notches in the side pieces (see drawing left). In this case, the back is a piece of fan-shaped mosaic glass tile, but any size or style can work. Next the shelf drops in, angled slightly forward like the bottom of the niche to shed water.
The key throughout is to adjust the amount of thinset mortar so all of the elements are square to each other and the gaps are thin and consistent.
For a niche like this one, with mitered edges, the upper side parts go in first. If you put the other parts in first, the intruding edges of the wall tile could prevent you from installing the last pieces.
To keep the top piece from hanging by thinset for more than a few minutes without support, you should have all upper parts cut to fit before installing them, just like the lower parts.
Finishing the niche
After all the tile is installed, carefully clean your grout lines in preparation for grout. Be aware that porous stone and some ceramic tiles require a sealer before grouting. Wherever a tiled surface changes plane, the Tile Council of North America (TCNA) recommends using color-matched caulk instead of grout to allow for expansion and contraction of the framing. When using one-piece, premade niche boxes, however, I’ve found it safe to use standard sanded grout everywhere but the outermost edges. When I miter those joints, I like to leave fine gaps that are too narrow for sanded grout. Caulk works perfectly and adds a measure of safety.
After allowing the grout and caulk to properly cure (72 hours, typically), apply sealer, and the niche is ready for use.
Location is critical
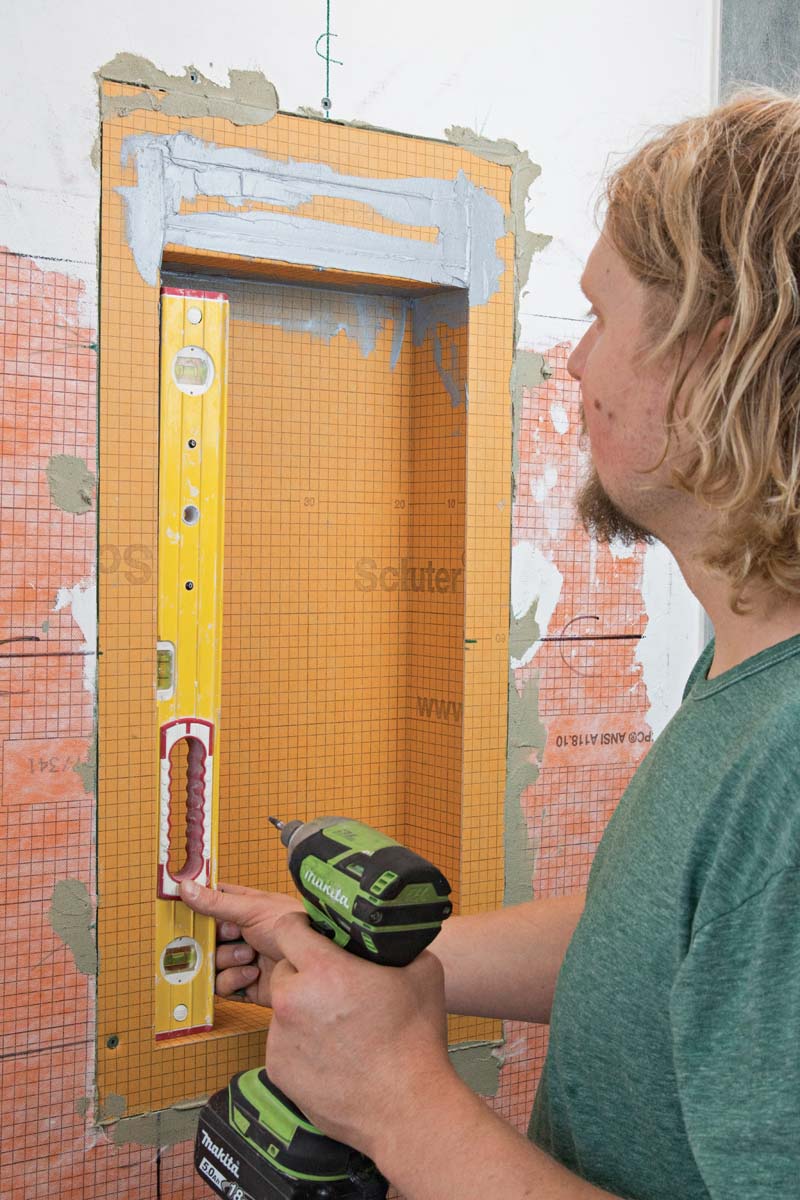
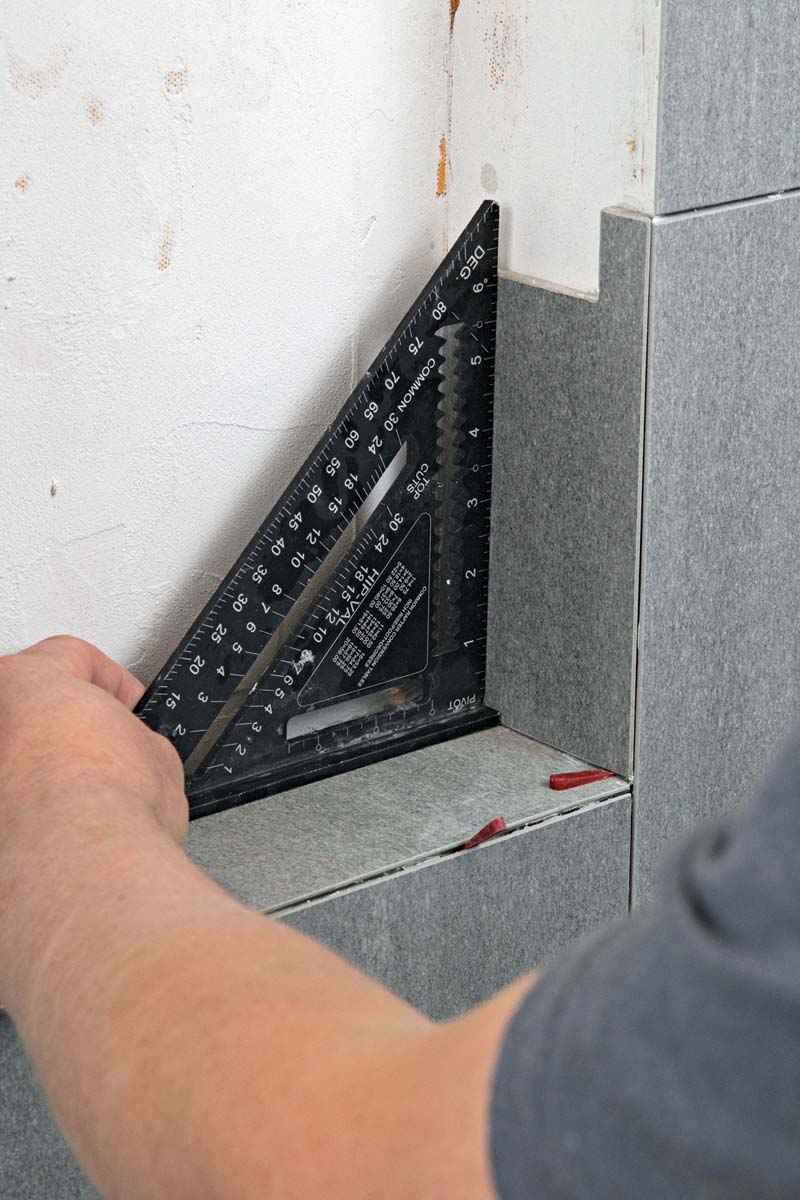
To eliminate excess grout joints, you need to precisely locate the framing so that the niche box lines up with the grout lines on the wall and is surrounded by full tiles. To be safe, I leave a couple extra inches of space between the studs.
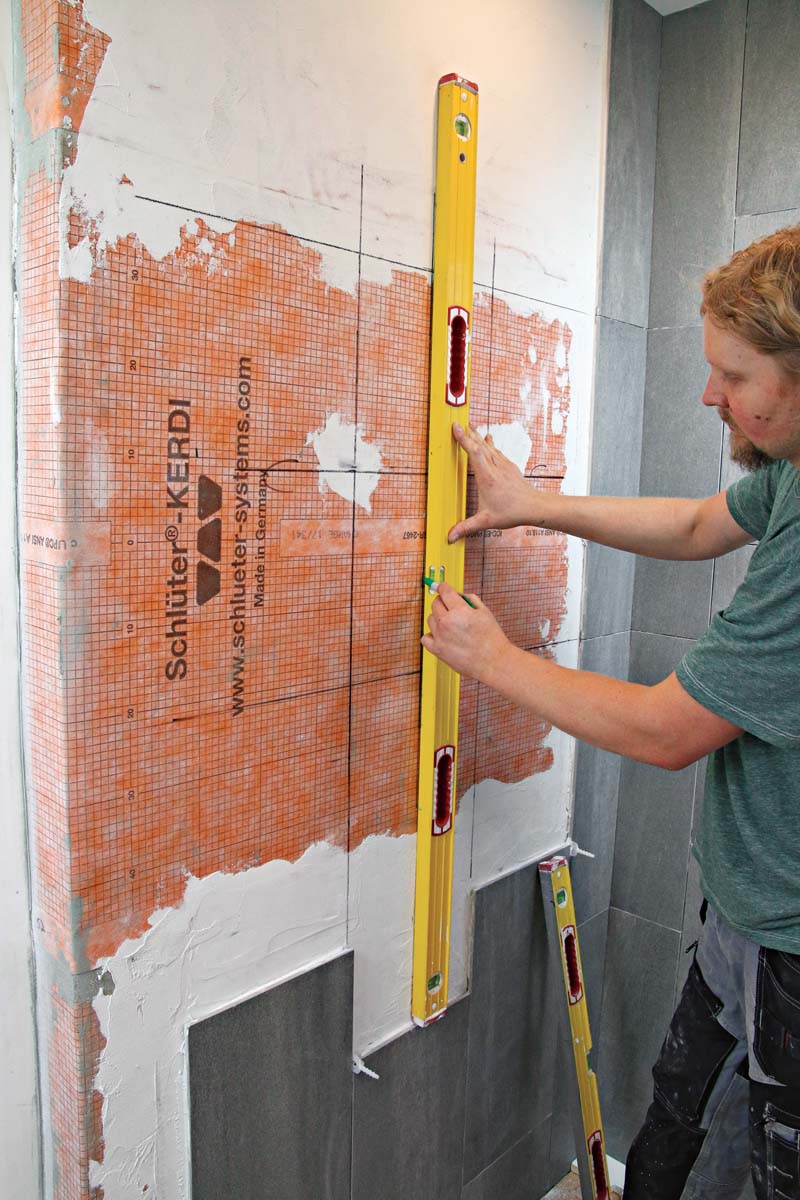 |
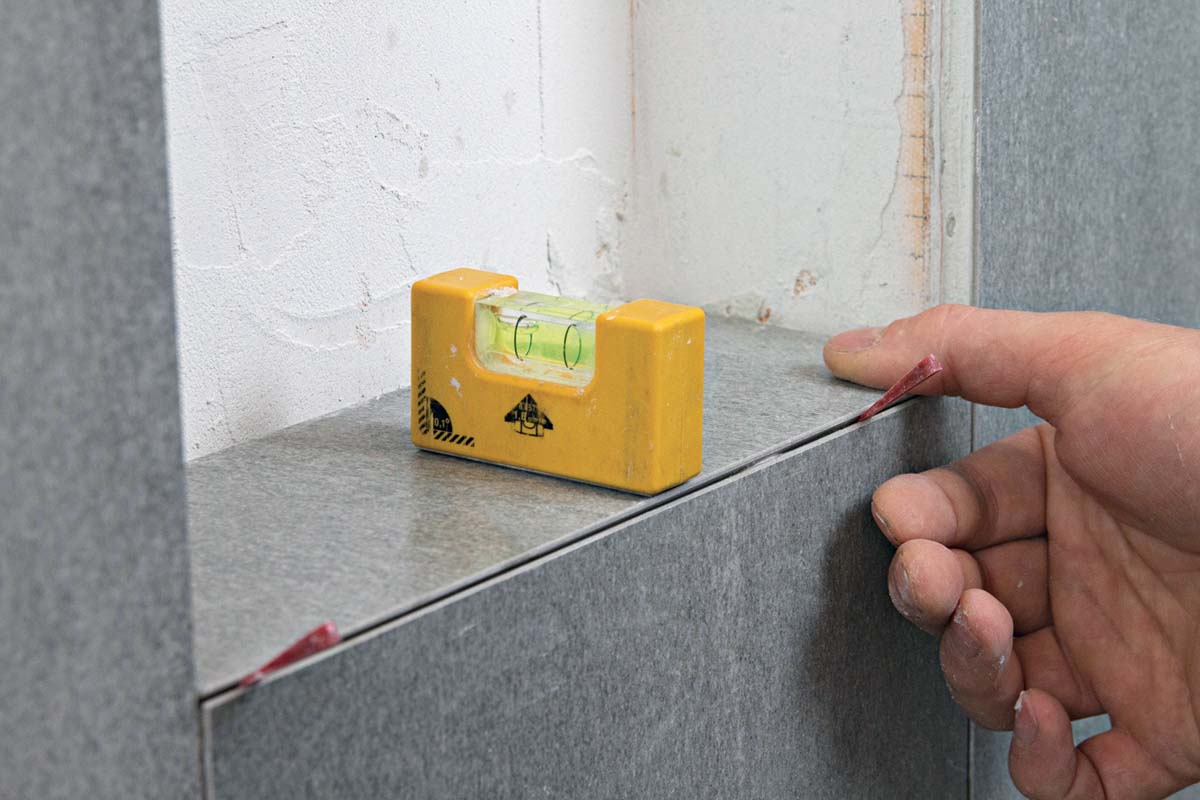
Extend the grout lines. After installing wall tile below and alongside the niche location, use a level to extend the vertical and horizontal grout lines to locate the cutout for the box. |
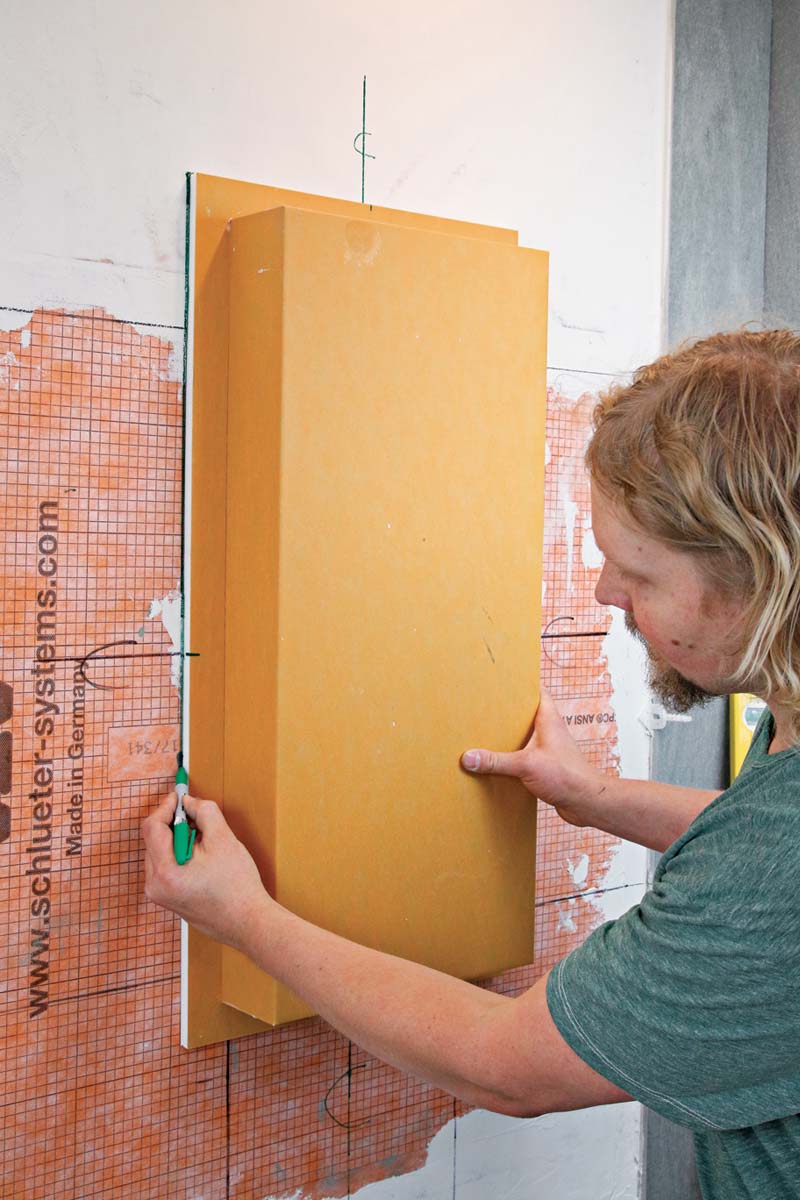 |
Flip and trace. The cutout has to include the flange on the front of the niche box, so flip it to trace the perimeter, using centerlines to aid in alignment. |
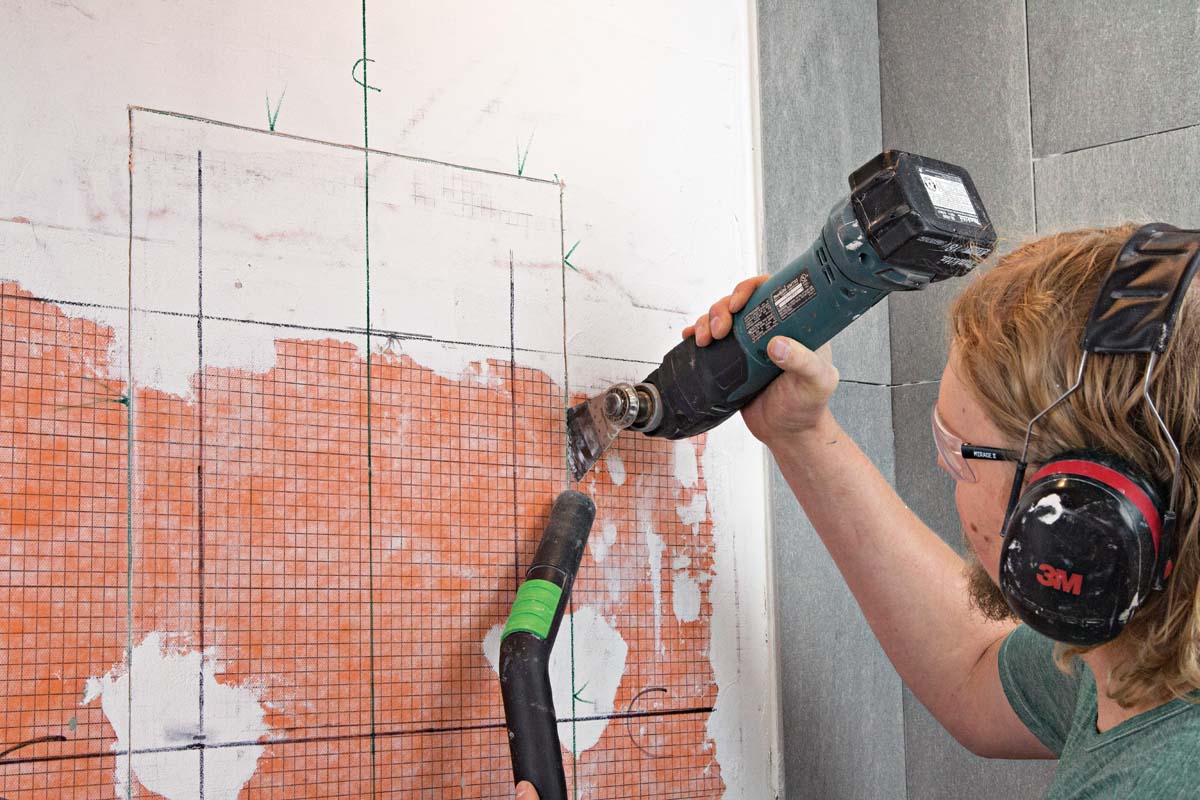 |
Cut the wallboard. An oscillating multitool makes short work of wallboard cuts, and a vac hose tames the dust. |
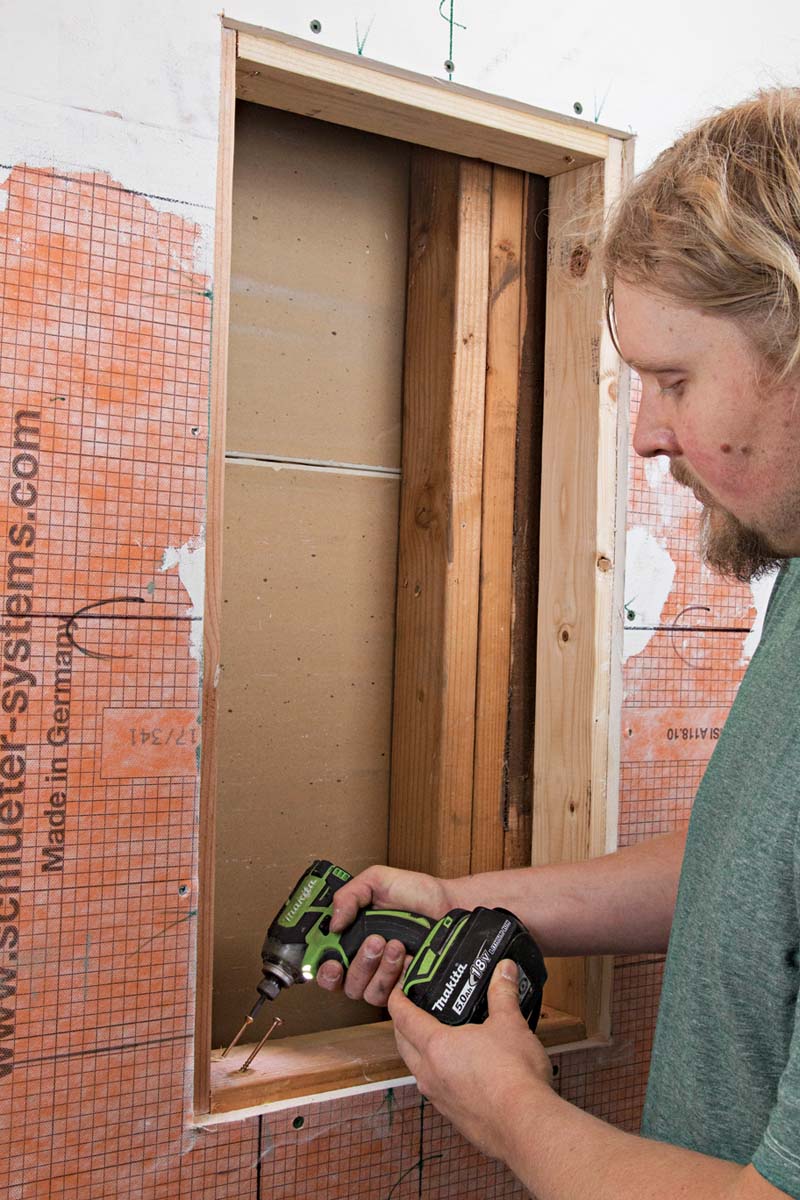 |
Add blocking. To simplify the box installation, toe-screw 2xs at the top and bottom of the opening, protruding into the opening. |
Install the niche box
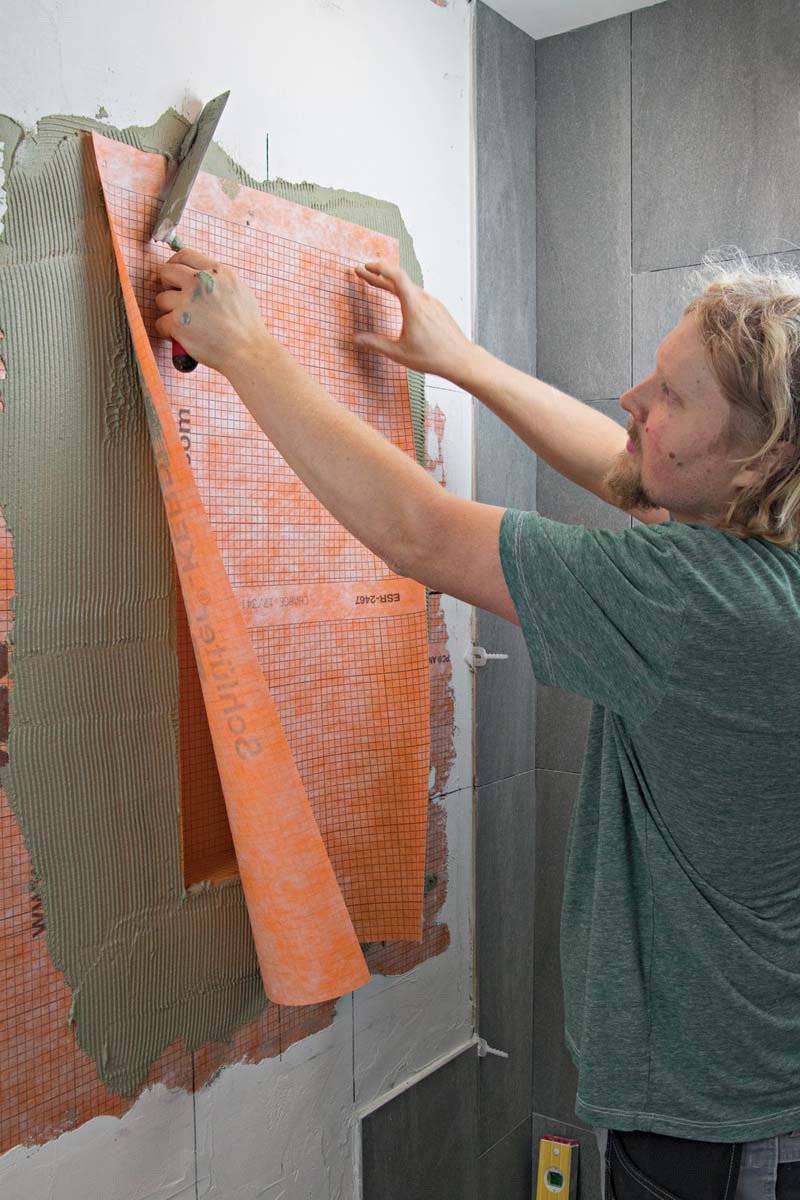
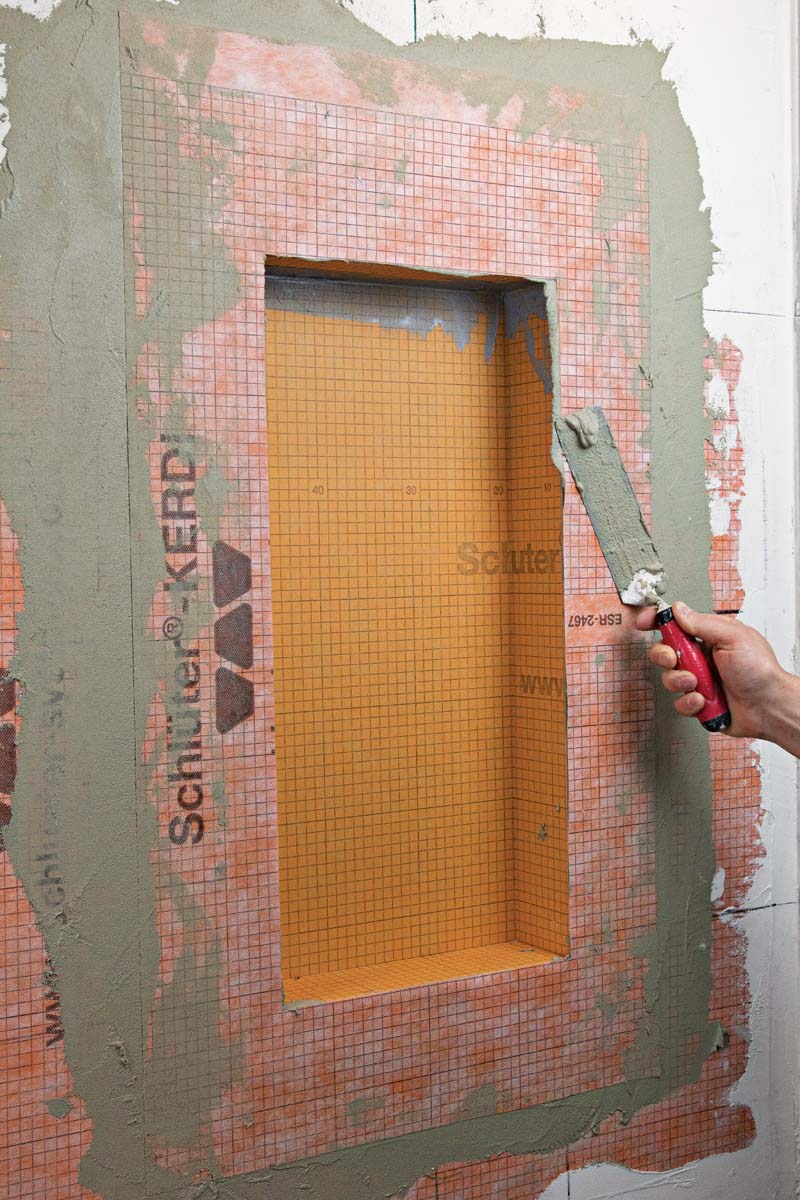
With the opening prepped, fasten the niche with screws, double-checking for level and plumb. Once fastened, the niche must be waterproofed using the same system chosen for the rest of the shower—in this case, Schluter-Kerdi.
 |
 |
 |
Seal the seams. I cover the seams and opening in a single sheet, then trim away the waste and squeeze out excess thinset. |
Set the wall tile first
If you’re using ceramic tile with premade edging pieces, you can set the wall tile flush with the inside of the niche box. To create more streamlined edges, you need to miter the surrounding wall tile, sizing each piece so that it protrudes into the niche box. The amount the wall-tile miters protrude into the box should be equal to the thickness of the niche tile and the thinset layer. You can always add more thinset behind the niche tiles, so it’s better that the wall tile protrudes too much than too little.
 |
Clean lines aren’t by accident. To ensure even grout lines, perfectly flush tiles, and tight joints, cut and miter carefully, apply the right amount of thinset, and use a tile-leveling system. I prefer the Proleveling spacer system shown here. |
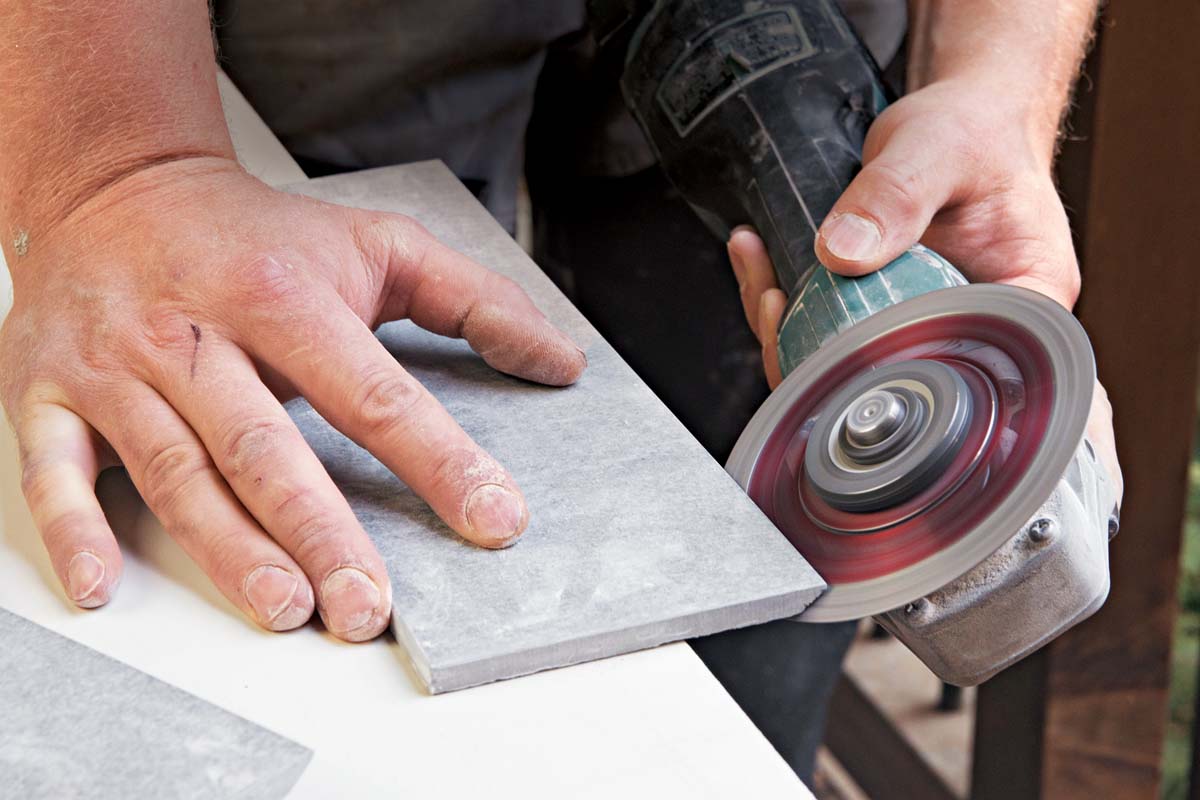 |
Grind miters by hand. I find that grinding by hand is cleaner and more accurate than using a tile saw. Use a diamond cutting blade and leave a little of the flat factory edge, which acts as a visual guide as you grind and makes the edge safer and more robust than a sharp edge. |
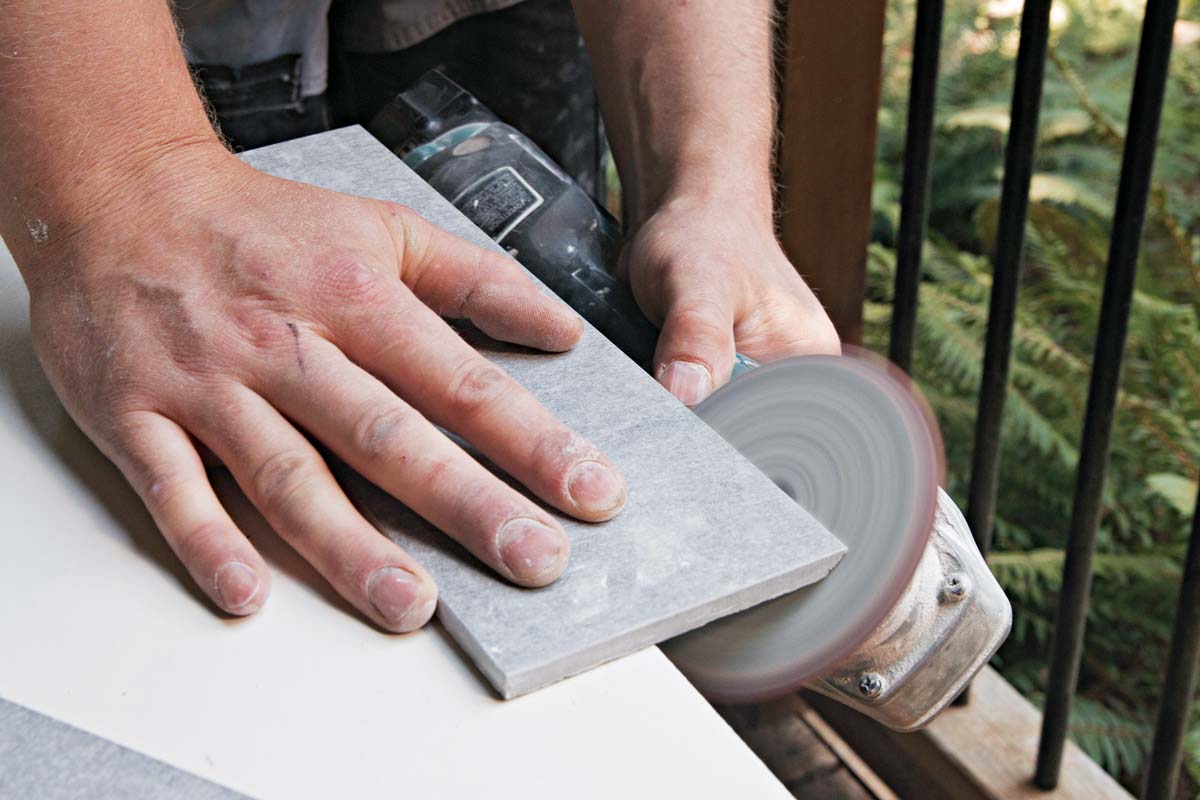 |
Polish the miters. A 200-grit polishing pad offers more control as you sneak up on the perfect miter. I also like to grind the angles a little steeper than 45° to be sure they come together cleanly at the all-important outside edges. |
 |
Break the edges. All cuts are followed by a 60-grit diamond hand pad, which smooths surfaces and blunts sharp edges. |
Start at the bottom
After checking their fit, set the tile for the bottom, sides, and back of the niche, stopping where the shelf will be installed.
 |
Back butter and scratch coat. All tile—wall and niche—gets thinset on its back side and a layer where it will sit to ensure a good bond. |
 |
Pitch the bottom. Build up the thinset under the back edge of the bottom tile to establish a slope of roughly 1⁄16 in. over |
 |
Notch the sides. Use a diamond cutting blade to create a notch in the side pieces that matches the thickness of the shelf but stops short of the full shelf depth. |
 |
Angles must be accurate. Set the lower side tiles, checking them for square against the bottom tile and ensuring an even gap along the entire bottom edge. |
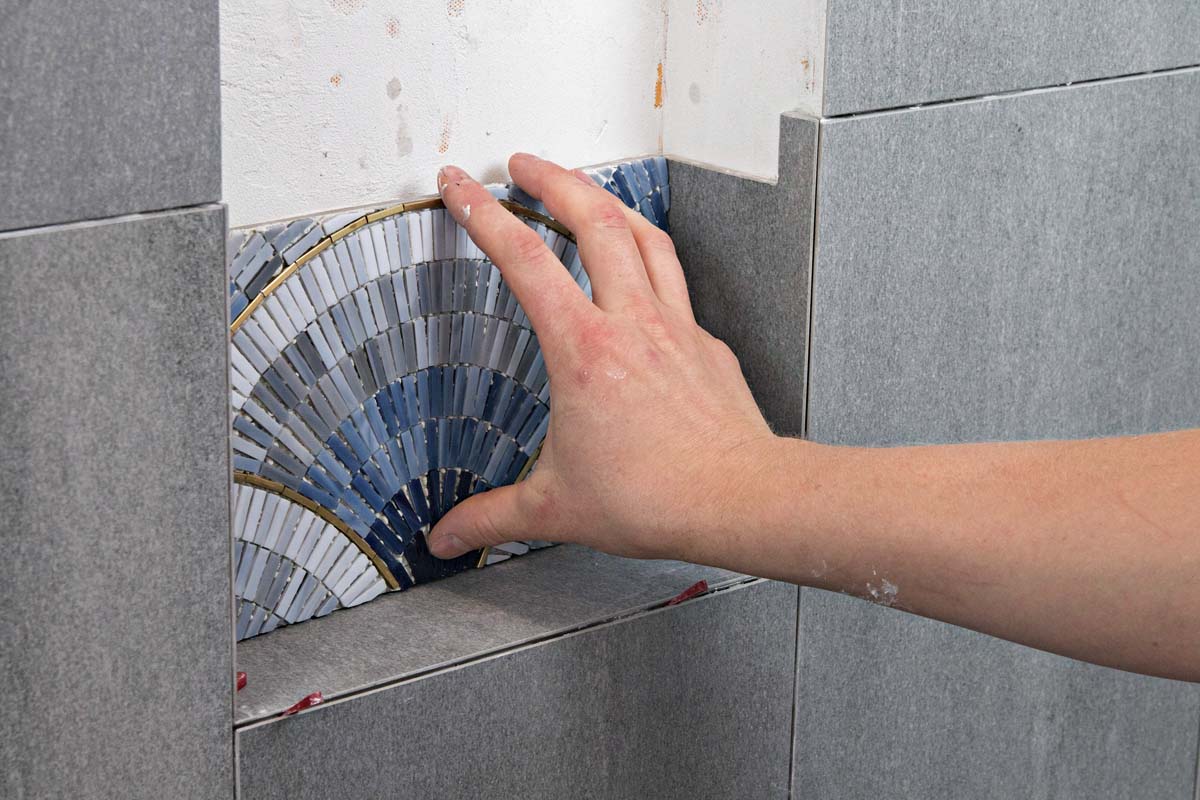 |
Infill the back. Cut the lower back tiles—in this case a mosaic of glass—to fit with an even gap at either side and along the bottom. It’s crucial that the top edge of this piece be aligned with the top edges of both lower side pieces. |
Install the shelf
For a clean look and durable connection, notch and assemble the back, sides, and shelf to lock the shelf in place. The fit is critical, so be sure to dry-fit all these pieces before installing them.
 |
Notch the shelf. Use the same method for notching the sides to notch the shelf’s leading edges. |
 |
Butter the back edges. As always, to ensure a good bond, all mating surfaces get thinset. |
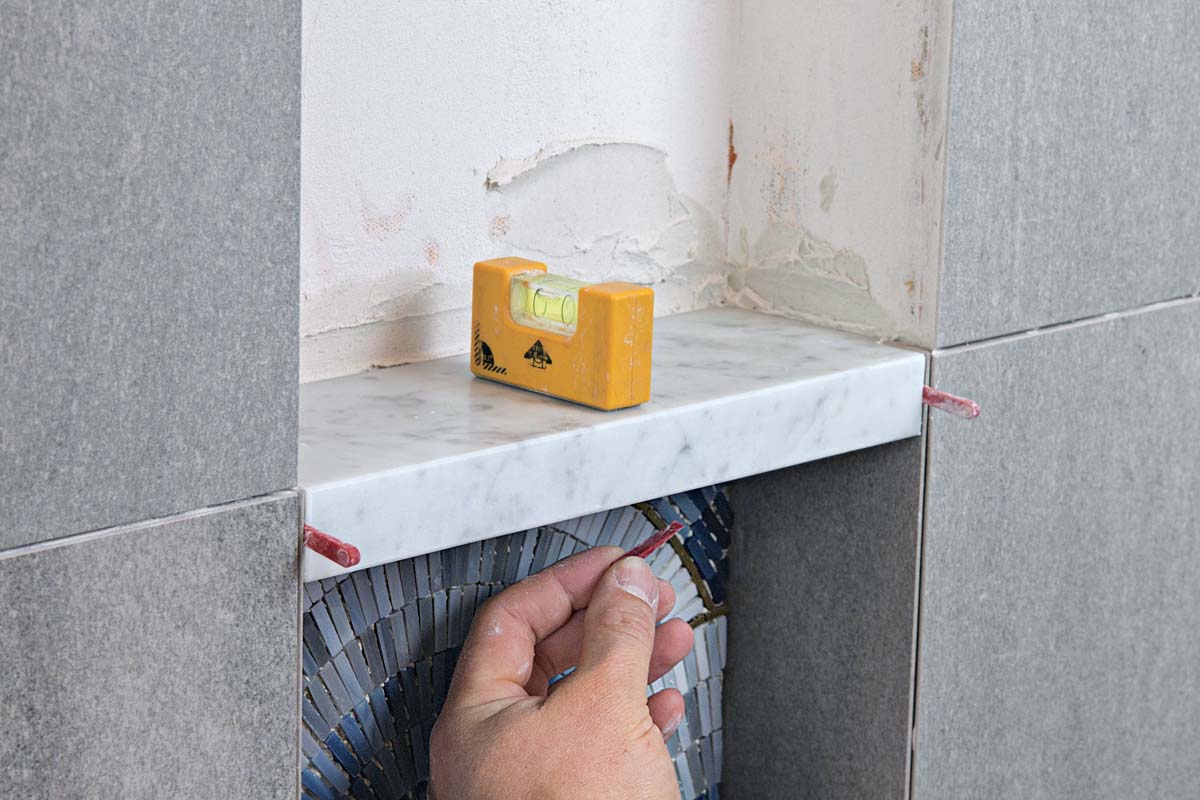 |
Slope it and gap it. The shelf needs the same subtle downward slope as the bottom of the niche, and wedge spacers ensure thin, even grout lines at the side and bottom edges. |
Tile above the shelf
Because of the way the mitered wall tiles intrude into the niche, the side pieces have to go in last. As before, it pays to dry-fit all these pieces so you have only minimal adjustments to do after applying the thinset.
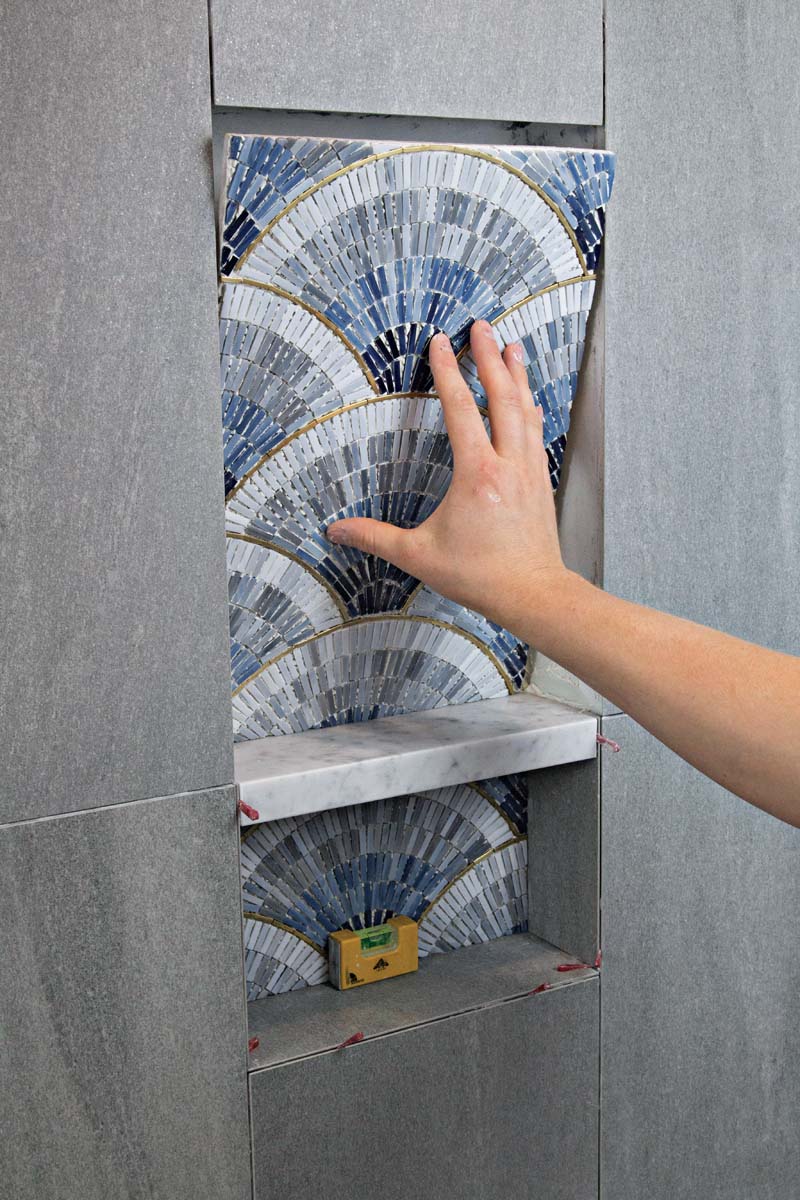 |
Back first. For the upper half, the back comes first, but you still have to cut it narrow enough to allow the side pieces to slide in next to it. |
 |
Top next. Again, the front edge is mitered where it meets the wall tile. As with the sides and bottom of the niche, add as much thinset as it takes to position this tile square to the others while leaving a thin, even gap. |
 |
Last pieces of the puzzle. The upper side pieces complete the assembly. As always, use spacers to ensure even gaps for grout so that the joints look clean and consistent. |
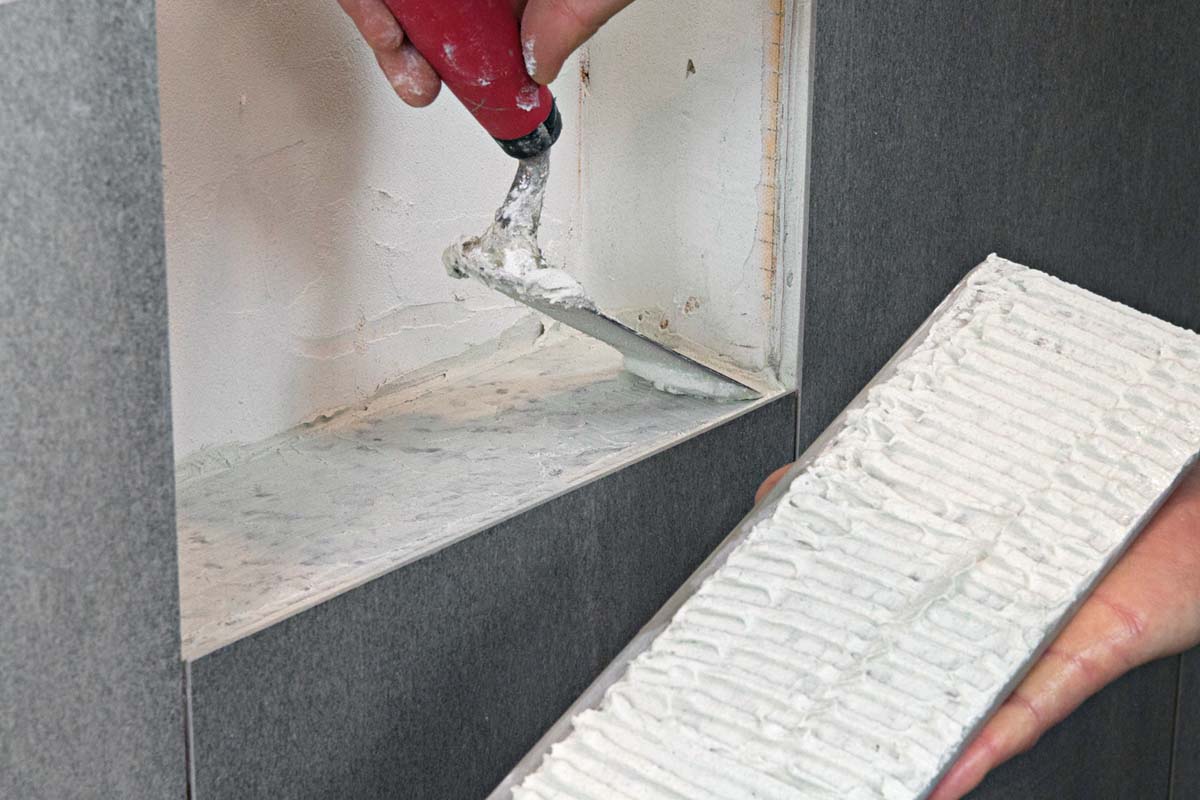
Grout and caulk
For a site-built niche box, I use flexible, color-matched caulk anywhere that the tile changes planes, to avoid cracks from any wall movement. With a one-piece, premade box, I just use caulk at the front edge.
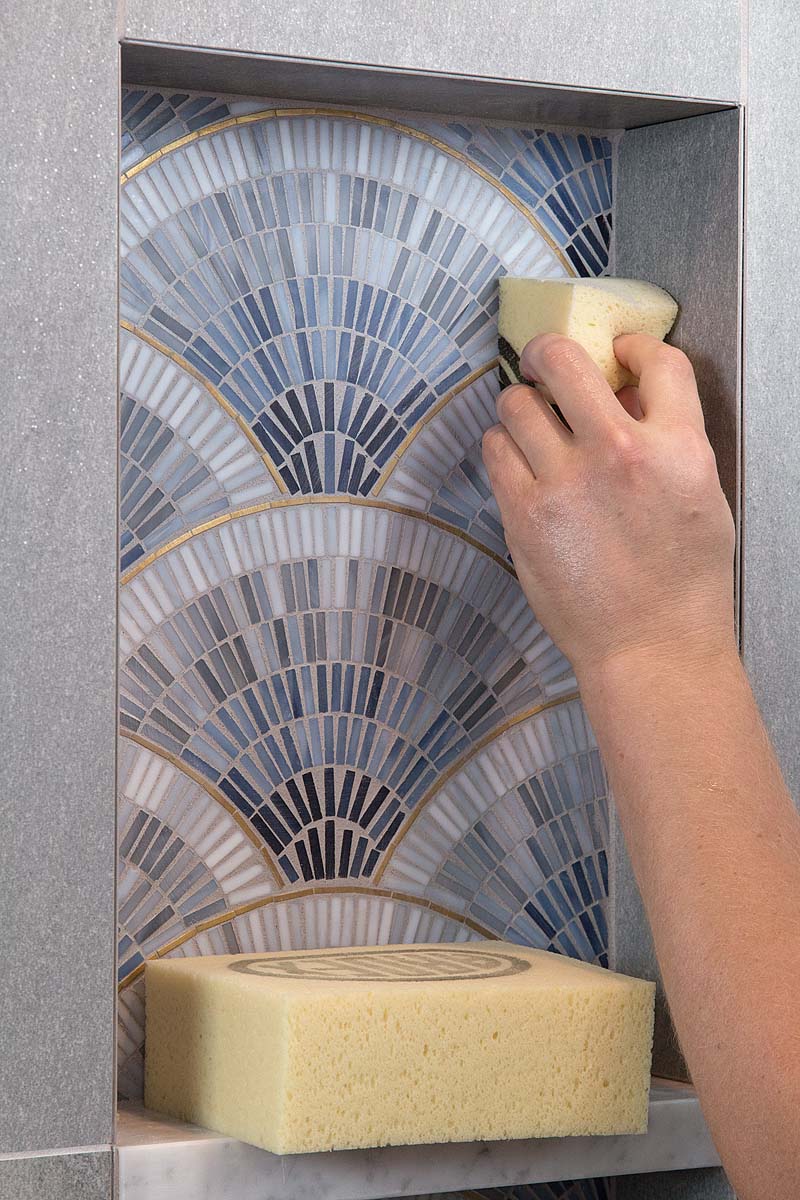 |
Wipe it clean. After grouting, wipe away the haze. I like to use a square-edged sponge cut-off to reach into the corners and avoid leaving behind rounded inside corner joints. |
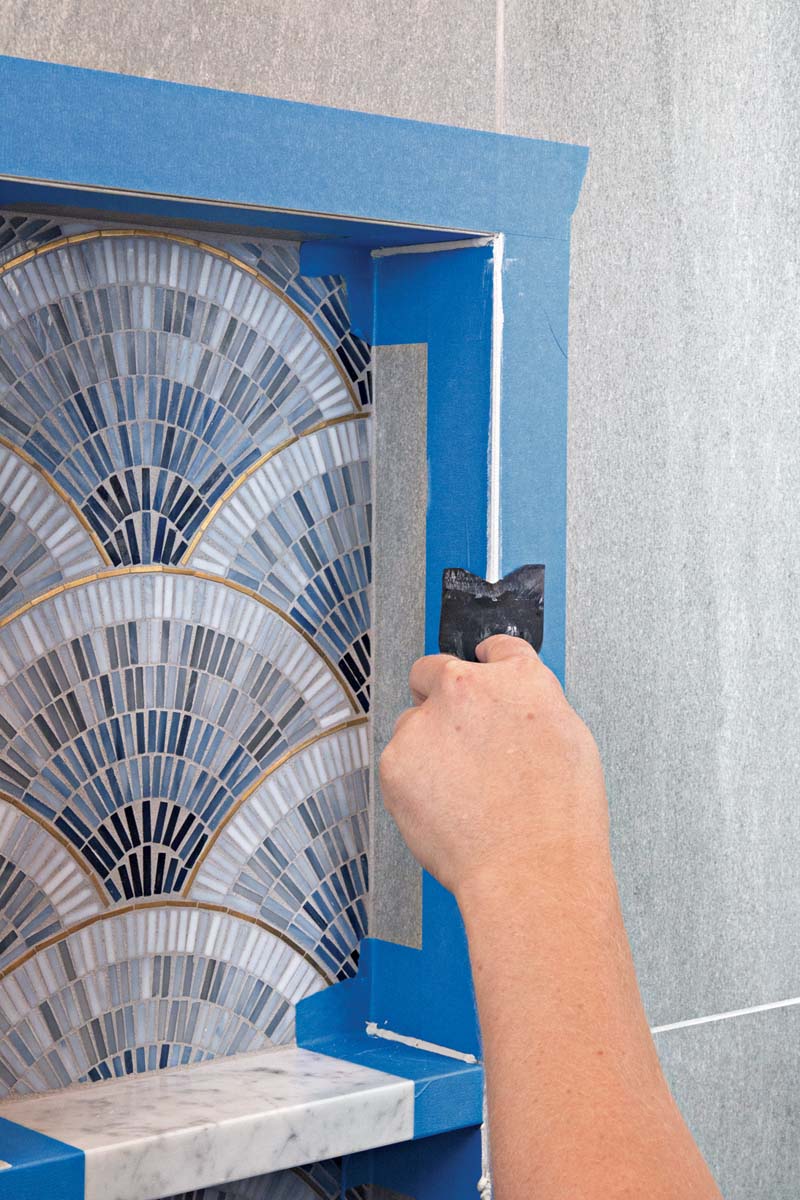 |
Clean caulk joints. After applying wide painter’s tape to either side of the joints to be caulked, I squeeze in enough sanded caulk to slightly overfill the gap, then use a plastic putty knife with a site-cut notch to get a crisp corner. |
To view the entire article, please click the View PDF button below.
