
The Laundry Wall Laundry List
With the complicated arrays of wires, ducts, and plumbing pipes they conceal, laundry room walls are common places for building code violations.
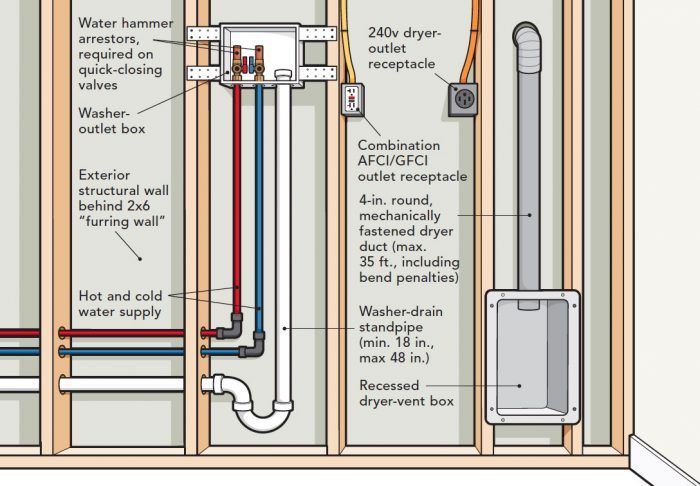
Synopsis: With pipes, water supply lines, ducting, and electrical cables all concealed within the laundry wall, there are a number of applicable codes that involve the building, plumbing, mechanical, and electrical trades. Code expert Glenn Mathewson details common issues in the laundry wall, such as the incompatibility of a 4-in.-dia. dryer duct in a 3-1/2-in. wall cavity, and specific code requirements for duct length and protrusions, receptacle outlets, energy conservation, and more. The column includes a detailed drawing of the ducts, receptacles, and boxes in a common laundry wall.
Interior walls do a lot of things, from defining spaces to providing a landscape for receptacle outlets and family photos. There are some special walls, however, that contain and conceal the conduits for the systems that make our homes more than simple shelters. The laundry wall is one of them.
Drain and vent pipes, water supply lines, exhaust ducting, and electrical cables all share the space inside laundry walls, while receptacle outlets, recessed washer boxes, and dryer-vent-connection housings penetrate the real estate on the surface. The codes that address these various things are organized across many chapters and pages, and the hands that have a part in making it all work include the top four trades— building, plumbing, mechanical, and electrical. If the laundry wall happens to be an exterior wall, energy-conservation codes get dragged into the mix as well. It’s no surprise that this wall is a common place for inspection failure.
Mechanical issues
In modern homes, most interior walls are framed with 2x4s, which aren’t actually 2 in. by 4 in.—they’re 1-1/2 in. by 3-1/2 in. This creates something of a geometry problem when it comes to installing the code-minimum 4-in.-diameter dryer-exhaust ducts—something that’s been in model residential codes since 1995. A common solution to the incompatibility of a 4-in.- diameter round duct in a 3-1/2-in. wall cavity is to simply squish the duct to fit. It took code writers a couple decades to catch on to this practice, and in 2018 the International Residential Code (IRC) added a sentence to the section on dryer-duct installation (M1502.4.2) to kill the practice: “Where dryer exhaust ducts are enclosed in wall or ceiling cavities, such cavities shall allow the installation of the duct without deformation.”
The argument that landed this in the code involves the mathematical certainty that an oval duct with the same circumference as a round duct is always smaller in cross-sectional area. Though some don’t believe the math, it remains true that squishing ductwork out of round reduces its performance. This can be avoided by simply attaching 1x furring strips to the face of the studs, but the plumbing may supersede that idea (we’ll get to that).
Geometry arguments aside, there’s a reason codes specify round dryer-exhaust ducts: They move air more efficiently than any other duct shape. Other shapes may be allowed, but they have to be upsized to perform as well as round ducts. The maximum duct lengths specified in codes are derived using round, metal ducts with smooth interiors (not flex duct). They take into consideration the minimum amount of pressure necessary to push lint, heat, and moisture past the backdraft damper and away from the building, and the losses from friction and turbulence in these smooth, round ducts. That maximum length—35 ft.— does not include the transition duct from dryer to wall (which can be up to 8 ft. long), but instead is measured from where the duct starts in the wall to the point it exits the building. (Note: Manufacturer instructions, if different, should be followed, but must be provided to the code inspector; otherwise, duct requirements default to table M1502.4.5.1 in the IRC). You also have to figure in penalties from fittings, which can eat up many feet of allowable duct length. For instance, a single 4-in. 90° mitered elbow is equivalent to 5 ft. of straight round duct—and gets counted as 5 ft. of the allowable 35 ft.
To gain that 5 ft. back, builders often eliminate the first 90° fitting at the wall behind the dryer and attach the transition duct directly to the straight portion of the duct through a boxed recess in the wall. If that straight 4-in. duct is compressed in a 2×4 wall, it can be difficult to connect the round transition duct to it. Even if local code jurisdictions haven’t yet adopted the prohibition on squished ducts, it just doesn’t make sense to squeeze something in where it doesn’t fit. And depending on how you orient the fasteners in the duct joints, the outer diameter of a 4-in. duct could increase. What’s that? Fasteners in the dryer duct? Yeah, that’s a thing.
The decades-long prohibition of screws or fasteners protruding into a dryer exhaust was turned completely around in 2012, when the IRC began requiring that dryer ducts be mechanically fastened. This essentially mandates some kind of penetration into the duct, though the protrusion of these fasteners—either sheet-metal screws or rivets—is limited to 1⁄8 in. This abrupt change may come off as a major correction, but it’s really more of a concession necessitated by the need to balance competing hazards.
Though some don’t believe the math, it remains true that squishing ductwork out of round reduces its performance.
Protrusions inside dryer ducts capture lint from the air stream, which reduces the internal diameter of the duct, increasing friction and turbulence, and raising the risk of fire. But over the decades when protrusions into ducts were prohibited, we learned that dryer ducts get full of lint anyway. Because of that, it’s generally recommended that dryer ducts be cleaned periodically. The abrasive scrubbing, combined with jamming cleaning rods through the sharp bends in fittings, puts duct connections to the test. The taped and mastic connections of the past are notorious for failing inside the walls during vigorous cleaning. The choice to mandate fasteners and merely limit the protrusion length recognizes that a dirty duct can be cleaned, but a broken duct must be repaired—if and when it is finally discovered—so it doesn’t keep dumping hot, moist air into the wall.
Related to the subject of lint collection inside a duct, recent code editions have also added the requirement for nail-plate protection when the duct is less than 11⁄4 in. from the nailing surface, such as when passing through top or bottom wall plates of 2×6 walls. I don’t think it’s worth building a laundry wall out of 2x8s just to avoid using nail plates.
Those who want to avoid dryer-exhaust ducting altogether do have an option: Get a condensing dryer. The exhaust system can be omitted if the appliance is installed prior to occupancy (at final inspection). If it’s not there yet, though, a duct system must be provided wherever a space is provided for a dryer—even a small laundry closet designed with plumbing for a stackable unit. Exceptions to general code provisions that affect permanent construction based on a choice of a temporary and movable appliance, however, are ones to be cautious of. They are indeed “code minimum.”
Plumbing and building compatibility
In 1967, the Uniform Plumbing Code increased the minimum diameter of a clothes-washer drain and trap to 2 in., and that standard still holds today. Beginning in 1973, the notching of nonbearing wall studs was limited to 60% of the stud width—this also remains in effect. Removing 60% of a 2×4 leaves you with a maximum hole diameter of 2-3/32 in. A common 2-in. schedule 40 PVC pipe has an outside diameter of about 23⁄8 in. Unless an approved stud shoe is installed or an engineered repair is designed, a 2×6 stud is the minimum required for the horizontal passage of a 2-in. drain. In other words, 2×4 walls are effectively prohibited from acting as laundry walls unless all the drain plumbing runs vertically in a single-stud bay.
Electrical anomalies
Electrical codes for the laundry wall have also evolved. Chapter 39 of the IRC and Article 210 of the National Electrical Code (NEC) state that where there is an “area designated for laundry equipment,” a receptacle outlet must be “installed within 6 feet of the intended appliance location.” This is meant to prevent the use of extension cords to bring power to washers and dryers. More recently, codes have begun requiring all 125v, single-phase, 15-amp and 20-amp receptacles located in laundry areas to have both GFCI (ground-fault circuit interruptor) and AFCI (arc-fault circuit interruptor) protection. One protects people from electrocution; the other protects them from fire. There are various acceptable devices and methods for providing this dual protection, but the protection devices must be readily accessible. “Readily accessible” is defined in the code and includes a prohibition on having to remove obstacles—like a washer full of wet clothes— for access. These protection devices can also be installed at the electrical service panel, but when installed at the receptacle they must be installed above or beside the appliances or in an otherwise accessible location.
Energy conservation
Considering all these features and rules for the laundry wall, I don’t recommend having it be an exterior wall, even though that’s commonly done because it allows for a direct and simple exhaust duct. IRC sections P2603.5 and P3001 allow water distribution and drain/waste/vent pipes in an exterior wall, but only if you “protect them from freezing by insulation or heat or both.” This is generally translated to requiring insulation between the pipes and the exterior side of the wall cavity, but then minimizing the insulation between the pipes and the heated interior.
Some will argue the full R-value of the thermal envelope is not being realized when pipes, ducts, and washer boxes take up space meant for insulation, and they’re correct. However, the code accepts this reduction, as implied in table N1102.4.1.1, which states that insulation batts shall be cut to fit around plumbing and blown insulation blown behind plumbing. The intent here is to intentionally bleed heat into a reduced thermal envelope in order to keep the pipes warm.
The better (above code) design is to construct a clean thermal envelope filled with insulation and, if the insulation is air-permeable, covered on the inside with an air barrier (taped drywall, for instance). In front of that assembly, construct a 2×4 wall for the service lines. As long as the dryer-exhaust duct runs straight through the two walls, larger studs or furring aren’t necessary. As for drilling holes for plumbing, do not let your eyes deceive you. This is not a wall; it is merely furring in front of a wall. The drilling limitations are meant for walls that have to resist lateral loads. Being adjacent to an exterior structural wall, that concern is no more. Go ahead and overdrill the 2×4 furring strips—but don’t forget your nail plates.
Glenn Mathewson is a consultant and educator with buildingcodecollege.com.
Drawing: Kate Francis
From Fine Homebuilding #291
More about laundry rooms
Laundry Closet Design Ideas – Designer Mike Maines details 3 types of laundry closets that make the most of a compact space.
Laundry Alcove Does Double Duty – This multifunctional set of built-in cabinets serves as a convenient serving station for the adjacent dining area when the homeowners aren’t washing or drying clothes.
Add a Laundry Chute – Learn how to plan, fabricate, and install a chute to conveniently send your dirty clothes from an upstairs bathroom or hallway to your laundry room below.
Fine Homebuilding Recommended Products
Fine Homebuilding receives a commission for items purchased through links on this site, including Amazon Associates and other affiliate advertising programs.
Loctite Foamboard Adhesive
Respirator Mask
Great Stuff Foam Cleaner
