FHB Logo Facebook LinkedIn Email Pinterest Twitter X Instagram Tiktok YouTube Plus Icon Close Icon Navigation Search Icon Navigation Search Icon Arrow Down Icon Video Guide Icon Article Guide Icon Modal Close Icon Guide Search Icon Skip to content
Subscribe
Log In
  • How-To
  • Design
  • Tools & Materials
  • Restoration
  • Videos
  • Blogs
  • Forum
  • Magazine
  • Members
  • FHB House
  • Podcast
Log In

Fine Homebuilding Project Guides

Plumbing

Guide Home
  • Plumbing Basics
  • Bathrooms
  • Kitchens
  • Roughing In
  • Water Heaters, Washers, and More
  • Maintenance and Repair
How-To

Tapping into Drain and Supply Lines

Learn how to tie new plumbing fixtures into existing drain and supply lines when remodeling.

By Steve Cory

For most modest to moderate remodel jobs, you will tap into an existing drain/vent line rather than run new pipes all the way from the main drain and out through the roof. Consult with a plumber or with your building department to make sure that your new project will be drained and vented properly. The following pages show some of the main methods for tying into existing lines.

T-ing in

T fittings are commonly used to tap into an existing drain and vent pipe. If the new plumbing will use smaller pipes than the existing plumbing, you can use a reducer T or install a reducer bushing in the T. Measure for cutting into the pipe carefully, so the new lines will be at the correct heights and can be sloped correctly. An important con­sideration is whether there is sufficient leeway for the existing pipe to be moved up or down—or side to side—to permit you to install the T. If it is solidly in position, you may need to use flexible fittings. Flexible fittings are also often the best solution when changing materials—for example, when tapping into steel pipe with PVC.

ASSEMBLE THE TIE-IN PLUMBING
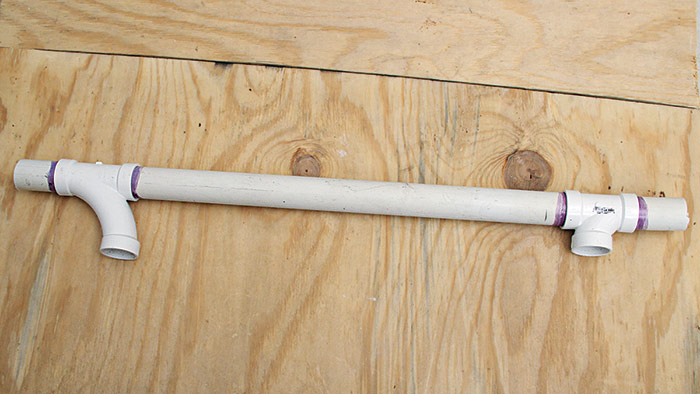
1. ASSEMBLE THE TIE-IN PLUMBING. In many tie-in situations you need to tap in for both the drain and the vent. If you are tapping into a stack that acts as both a drain and a vent, start by assembling a section of plumbing with a sweep T at the bottom for the drain line and a sanitary (or vent) T at the top. Note that the sanitary T for the vent is installed upside down, to help air flow smoothly upward. Glue carefully, so both tees are facing exactly the same direction.


MARK FOR CUTTING THE EXISTING PIPE
2. MARK FOR CUTTING THE EXISTING PIPE. Hold the new pipe section in place, making sure the drain and vent fittings are at the correct height. (A piece of tape helps keep it from moving.) Mark the pipe for cutting.


SUPPORT HEAVY PIPE
3. SUPPORT HEAVY PIPE. If the existing pipe is cast iron or steel, it will be heavy and may be in danger of falling after it is cut. Support with a piece of blocking and a tightly screwed strap.


CUT THE PIPE
4. CUT THE PIPE. Cut steel pipe with a reciprocating saw that has a metal-cutting blade. Cast iron is more difficult to cut: Use a circular saw or a grinder equipped with a metal-cutting blade if possible; cutting with a reciprocating saw is very slow work.


INSTALL THE TIE-IN SECTION
5. INSTALL THE TIE-IN SECTION. Use flexible fittings to attach the new section. Tighten all the clamps firmly.


IF THERE IS ROOM TO MANEUVER
IF THERE IS ROOM TO MANEUVER. Often, especially in the case of plastic pipe, the existing pipe can be moved up and down and back and forth after it has been cut. In that case, you can simply install a T fitting. The cement hardens quickly, so first install it in a dry run, check that the Ts outlet is facing in the right direction, and make a reference mark on the pipe and the fitting. Then disassemble, apply cement, and reassemble.


Working in tight quarters

Sometimes you need to tie into a pipe that is in a tight spot, as in this case where a new drain line must be installed for a whirlpool tub. Here you may have a choice: tear open a wall, floor, or ceiling to give yourself plenty of room, or work more surgically.

REMOVE THE EXISTING PIPE
1. REMOVE THE EXISTING PIPE. Cut the existing pipe with a reciprocating saw and then unscrew the old pipe stub using a pipe wrench.


TORCH IF NEEDED
2. TORCH IF NEEDED. If the pipe refuses to budge, spray with penetrating oil and wait a few minutes before unscrewing. Or, heat the joint with a torch, then unscrew.


SCREW IN A NEW FITTING
3. SCREW IN A NEW FITTING. In most cases, a new threaded PVC fitting can be screwed into an old metal fitting. Here a male adapter is installed, so PVC pipe can be cemented from there on. Apply plenty of plumber’s tape or TFP paste to the threads, screw on by hand, then use slip-joint pliers or a pipe wrench to tighten the fitting.


Tapping into supply lines

When supplying water to a new fixture, you need to tap into the existing pipe, usually with a T fitting. Don’t forget to shut off water to the existing pipes before cutting or unscrewing them to tap in. If the pipes are movable after cutting, you can often simply install a T fitting. But if they are solidly in place, you will need to use repair couplings as well.


A SIMPLE T-IN.
A SIMPLE T-IN. If you can move the cut pipes far enough, you can just pull them apart and then press them into each side of the T in a dry run. Pull the pieces apart, apply plenty of flux to the fitting and the pipe, and then solder.


MARK AND CUT
1. MARK AND CUT. If the pipe will not move from side to side, assemble a T with two short nipples and hold it in place to mark for cutting the existing pipe.
Cut the pipe at each end.


Dielectric FittingsDielectric Fittings

If you are transitioning from galvanized pipe to copper, codes often require that you install a dielectric union, which has plastic innards that prevent ionization that can corrode the joint.


FLUX AND SOLDER
2. FLUX AND SOLDER. Apply flux to two repair couplings (which do not have stops, and so can be slid all the way onto the pipe), and slide them onto the two cut ends.
SOLDER
Position the new section and slide the repair couplings over to make the joints. Make sure the T is facing in the right direction, and solder the joints.


SNAKING AROUND
SNAKING AROUND. Where a supply pipe needs to cross another pipe or other obstruction, you may need to snake it around. Use a series of fittings that make as neat a route as possible. Often you’ll find that 45° street elbows (which are male at one end and female at the other) are your best friends. Assemble all the parts and check that they are facing in the right direction. Disassemble, apply flux to all the insides and outsides, reassemble, and do a bunch of soldering.

Sign up for eletters today and get the latest how-to from Fine Homebuilding, plus special offers.

Signing you up...

This site is protected by reCAPTCHA and the Google Privacy Policy and Terms of Service apply.
See all newsletters
See all newsletters
Previous: Plumbing a Basement Bathroom Next: Running Pipes through Walls, Ceilings, and Floors

Guide

Plumbing

Chapter

Roughing In

Log in or create an account to post a comment.

Sign up Log in

Become a member and get full access to FineHomebuilding.com

Plumbing

Plumbing

Trusted, comprehensive guidance from the pros for tackling any plumbing project

View Project Guide

View All Project Guides »

Become a member and get unlimited site access, including the Plumbing Project Guide.

Start Free Trial

Plumbing Basics
  • Plumbing Systems
  • Materials
  • Plumbing Tools
Bathrooms
  • Sinks
  • Showers & Tubs
  • Toilets
Kitchens
  • Kitchen Sinks
  • Water Filtration
  • Appliances
Roughing In
  • Layout
  • Installation
  • Copper Pipe
  • PEX Tubing
  • PVC Drainpipe
Water Heaters, Washers, and More
  • Water Heaters
  • Whole-House Filters
  • Sump Pumps
  • Washers
  • Sprinkler Systems
Maintenance and Repair
  • Sinks
  • Toilets
  • Showers & Tubs
  • Systems

Fine Home Building

Newsletter Sign-up

  • Fine Homebuilding

    Home building tips, offers, and expert advice in your inbox.

  • Green Building Advisor

    Building science and energy efficiency advice, plus special offers, in your inbox.

  • Old House Journal

    Repair, renovation, and restoration tips, plus special offers, in your inbox.

Signing you up...

This site is protected by reCAPTCHA and the Google Privacy Policy and Terms of Service apply.
See all newsletters

Follow

  • Fine Homebuilding

    Dig into cutting-edge approaches and decades of proven solutions with total access to our experts and tradespeople.

    Start Free Trial Now
    • Facebook
    • Instagram
    • X
    • LinkedIn
  • GBA Prime

    Get instant access to the latest developments in green building, research, and reports from the field.

    Start Free Trial Now
    • Facebook
    • YouTube
  • Old House Journal

    Learn how to restore, repair, update, and decorate your home.

    Subscribe Now
    • Facebook
    • Instagram
    • X

Membership & Magazine

  • Online Archive
  • Start Free Trial
  • Magazine Subscription
  • Magazine Renewal
  • Gift a Subscription
  • Customer Support
  • Privacy Preferences
  • About
  • Contact
  • Advertise
  • Careers
  • Terms of Use
  • Site Map
  • Do not sell or share my information
  • Privacy Policy
  • Accessibility
  • California Privacy Rights

© 2025 Active Interest Media. All rights reserved.

Fine Homebuilding receives a commission for items purchased through links on this site, including Amazon Associates and other affiliate advertising programs.

X
X
This is a dialog window which overlays the main content of the page. The modal window is a 'site map' of the most critical areas of the site. Pressing the Escape (ESC) button will close the modal and bring you back to where you were on the page.

Main Menu

  • How-To
  • Design
  • Tools & Materials
  • Video
  • Blogs
  • Forum
  • Project Guides
  • Reader Projects
  • Magazine
  • Members
  • FHB House

Podcasts

  • FHB Podcast
  • ProTalk

Webinars

  • Upcoming and On-Demand

Podcasts

  • FHB Podcast
  • ProTalk

Webinars

  • Upcoming and On-Demand

Popular Topics

  • Kitchens
  • Business
  • Bedrooms
  • Roofs
  • Architecture and Design
  • Green Building
  • Decks
  • Framing
  • Safety
  • Remodeling
  • Bathrooms
  • Windows
  • Tilework
  • Ceilings
  • HVAC

Magazine

  • Current Issue
  • Past Issues
  • Magazine Index
  • Subscribe
  • Online Archive
  • Author Guidelines

All Access

  • Member Home
  • Start Free Trial
  • Gift Membership

Online Learning

  • Courses
  • Project Guides
  • Reader Projects
  • Podcast

More

  • FHB Ambassadors
  • FHB House
  • Customer Support

Account

  • Log In
  • Join

Newsletter

Get home building tips, offers, and expert advice in your inbox

Signing you up...

This site is protected by reCAPTCHA and the Google Privacy Policy and Terms of Service apply.
See all newsletters
See all newsletters

Follow

  • X
  • YouTube
  • instagram
  • facebook
  • pinterest
  • Tiktok

Join All Access

Become a member and get instant access to thousands of videos, how-tos, tool reviews, and design features.

Start Your Free Trial

Subscribe

FHB Magazine

Start your subscription today and save up to 70%

Subscribe

We hope you’ve enjoyed your free articles. To keep reading, become a member today.

Get complete site access to expert advice, how-to videos, Code Check, and more, plus the print magazine.

Start your FREE trial

Already a member? Log in