FHB Logo Facebook LinkedIn Email Pinterest Twitter X Instagram Tiktok YouTube Plus Icon Close Icon Navigation Search Icon Navigation Search Icon Arrow Down Icon Video Guide Icon Article Guide Icon Modal Close Icon Guide Search Icon Skip to content
Subscribe
Log In
  • How-To
  • Design
  • Tools & Materials
  • Restoration
  • Videos
  • Blogs
  • Forum
  • Magazine
  • Members
  • FHB House
  • Podcast
Log In

Fine Homebuilding Project Guides

Foundations and Masonry Work

Guide Home
  • Concrete & Masonry Basics
  • Building Foundations
  • Waterproofing Foundations
  • Retrofits and Add-ons
  • Masonry in the Landscape
  • Brick
How-To

Placing and Finishing a Heated Concrete Floor

Learn how to pour a concrete floor for a post-frame building, including radiant tubing for warmth and steel reinforcement for strength.

By Andrew Grace Issue 317 - Aug/Sept 2023

In the genesis of a post-frame building, placing the concrete floor is always a milestone. My new building, which was on its way to becoming our roofing and remodeling company’s headquarters, had been under construction in my “free time” for 10 months when we placed and finished its concrete slab.

I was anxious to get the slab placed and finished because I had several uses planned for this building. It would act as material and equipment storage; as a woodworking and metal shop; and, most importantly, as a place to separate my professional and private life. For two decades my business has shared a small house with my wife and family. With the floor placed, I suddenly felt like my dream of having a dedicated building for work had become real, and I was approaching the finish line.
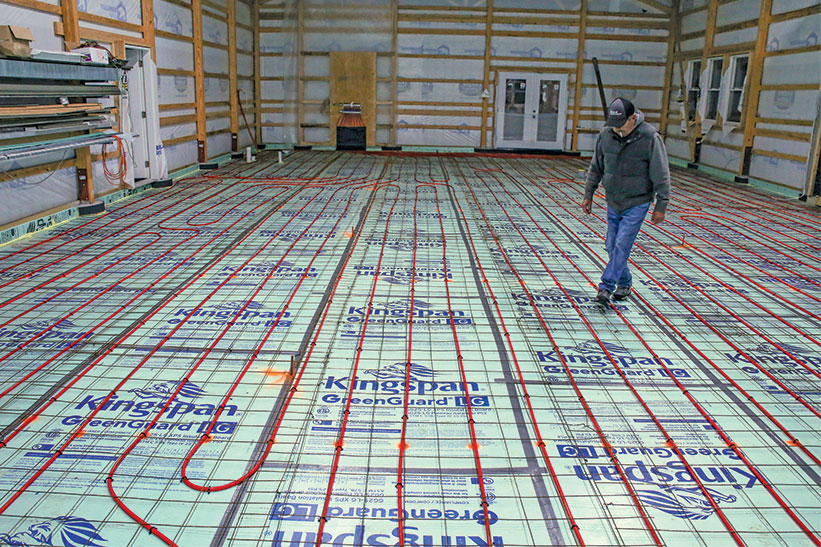
Placing and Finishing a Heated Slab
Drawing: Christopher Mills

Before the pour

Extra time spent securing the tubing and tying the reinforcement saves time and headaches during placement.

Tie mesh together.
Tie mesh together. Rebar twist ties hold the sheets of highway mesh together during the concrete placement. Forget this step and the mesh panels may become misaligned within the slab, reducing their effectiveness at adding tensile strength.
Monitor pressure
Monitor pressure. A test tee with a Schrader valve and dial air-pressure gauge is connected to the radiant manifold. As the concrete is placed, a stream of air from the tubing or a drop-in pressure at the gauge will indicate damage to the tubing that must be fixed before the pour can continue.

Walking the area before the slab is placed on top
Walk the area. Just before the first concrete truck is scheduled to arrive, the entire floor area should be inspected to ensure that nothing will complicate the pour. This includes fixing loose radiant tubing, tenting mesh reinforcement, and any gaps that could allow concrete under the insulation, causing it to float.

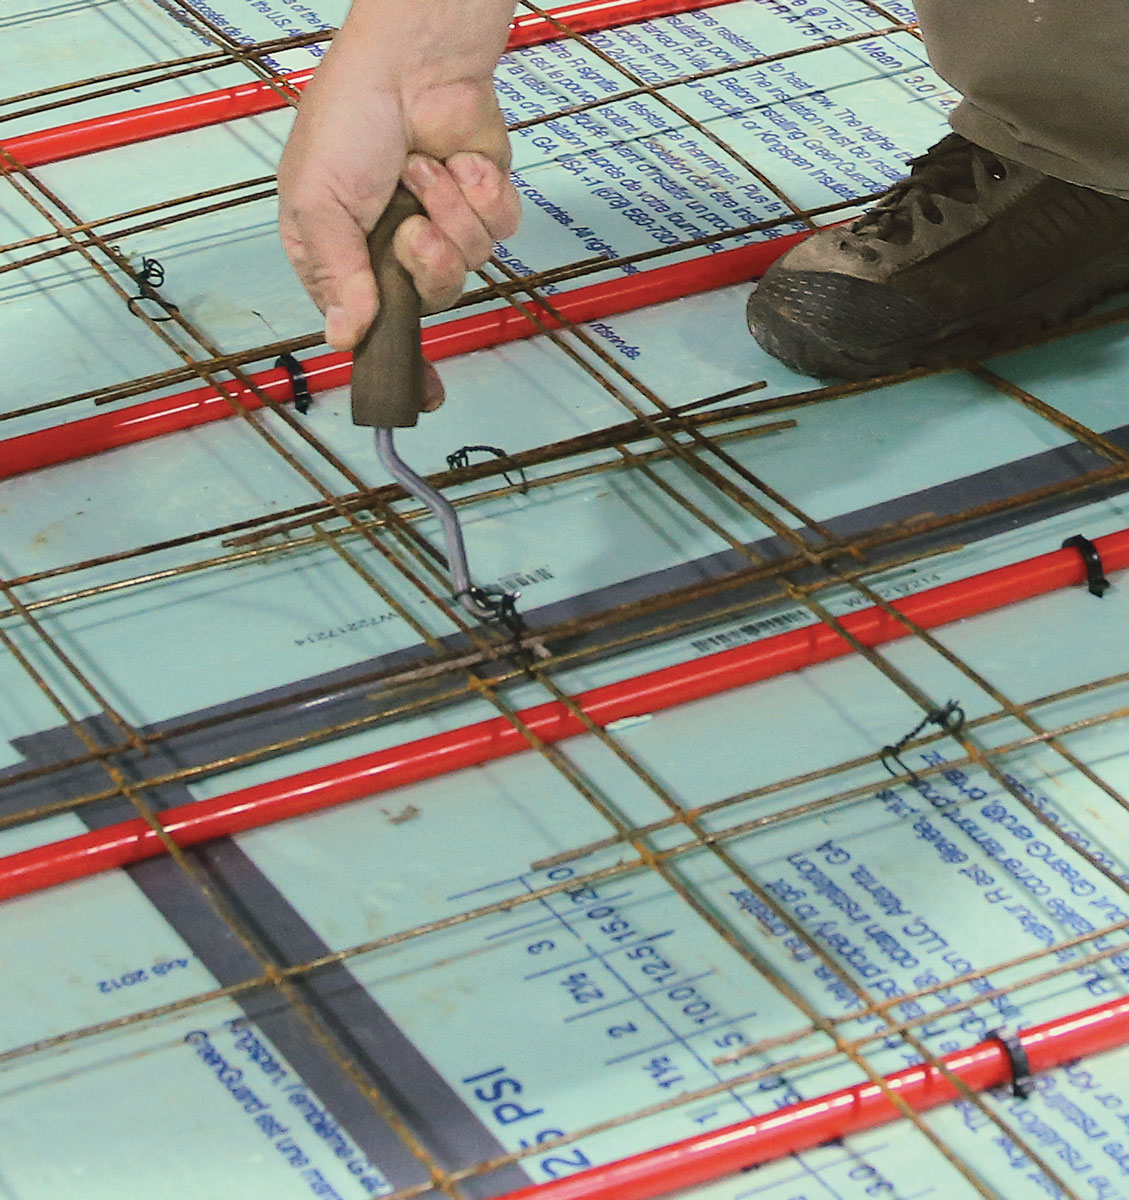
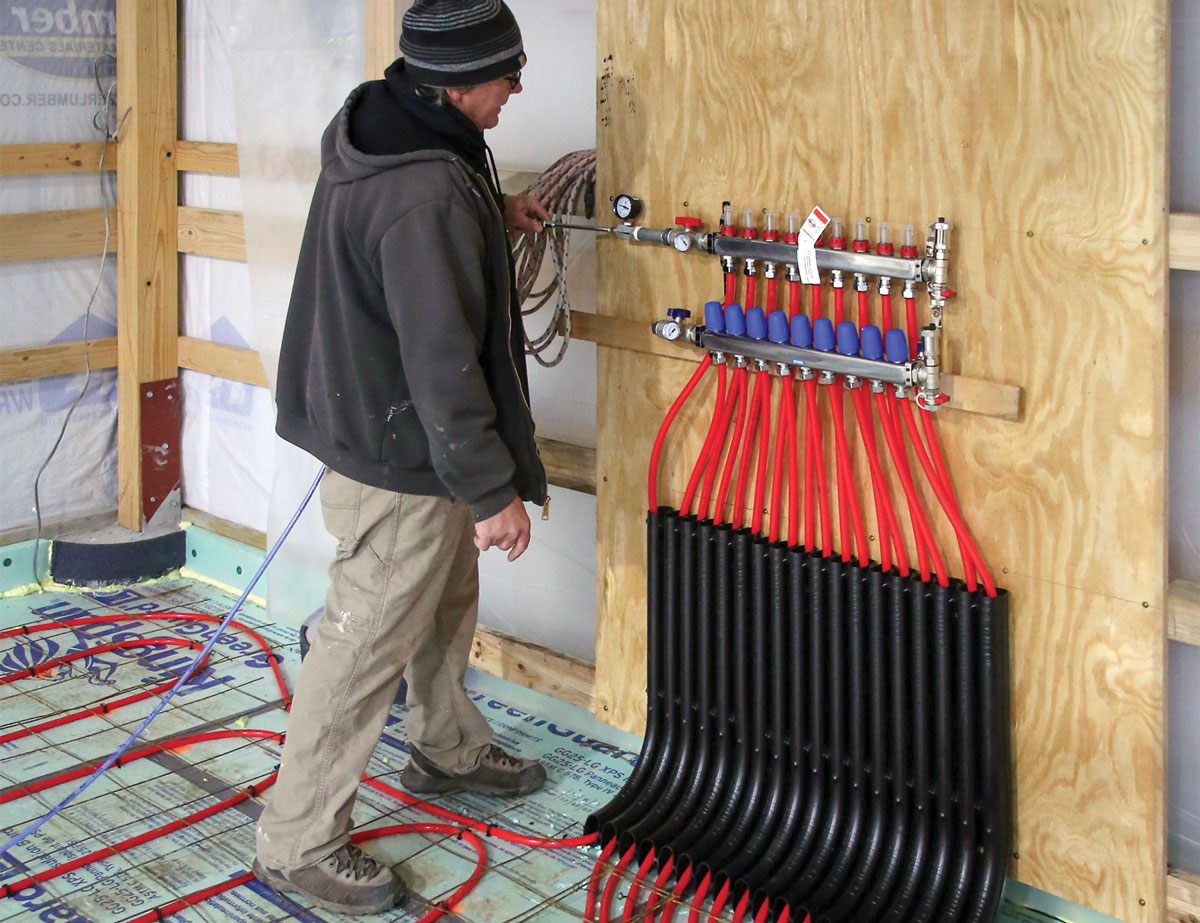
Start with a level base

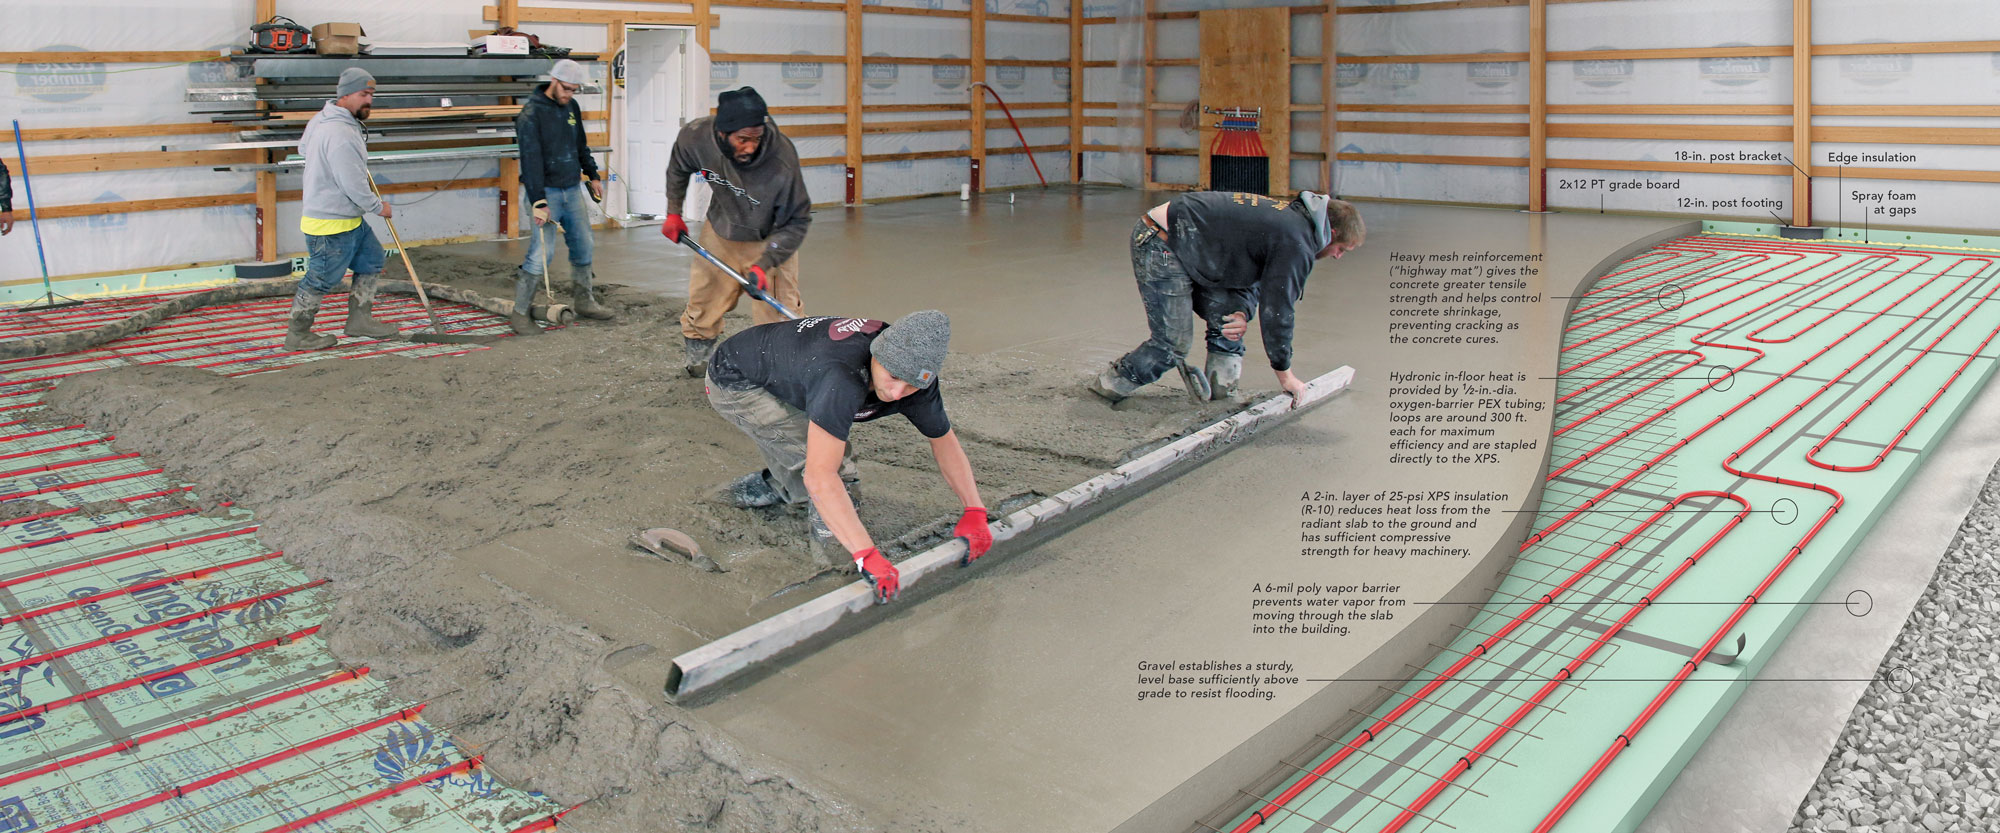
To prepare the site ahead of raising the frame (See “Raising a Post Frame,” FHB #307), we stripped the topsoil from the building’s footprint and created a gravel pad with 2B crushed limestone. Post-frame buildings can flood if they aren’t sufficiently raised above the surrounding grade. This gently sloping lot wasn’t prone to flooding, so we placed 6 in. on the uphill side and 18 in. on the low side, high enough above the surrounding grade even in the case of a flash flood. Had we been in a low-lying area and wanted to keep the building’s contents dry, we might have raised it higher. We didn’t compact the gravel with a tamper or roller because the gravel is mostly self-compacting; plus, we ran a tracked skid loader and telehandler over the gravel for six months as we constructed the building, further compacting the gravel layer.

Under the concrete is an XPS insulation layer with the pieces fit tightly together and the seams taped. The insulation slows heat flow toward the soil and directs it upward into the slab. Before laying the insulation, we leveled the gravel base with rakes and a laser level to prevent any voids under the foam. A 6-mil plastic vapor barrier prevents water vapor moving into and through the slab from the soil. This is the residential requirement in the International Residential Code (IRC) for my climate (zone 5), which I chose to use so that the heating system would be more effective and efficient.
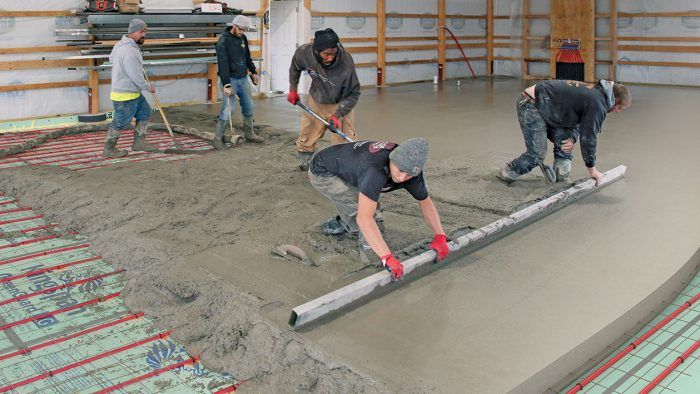
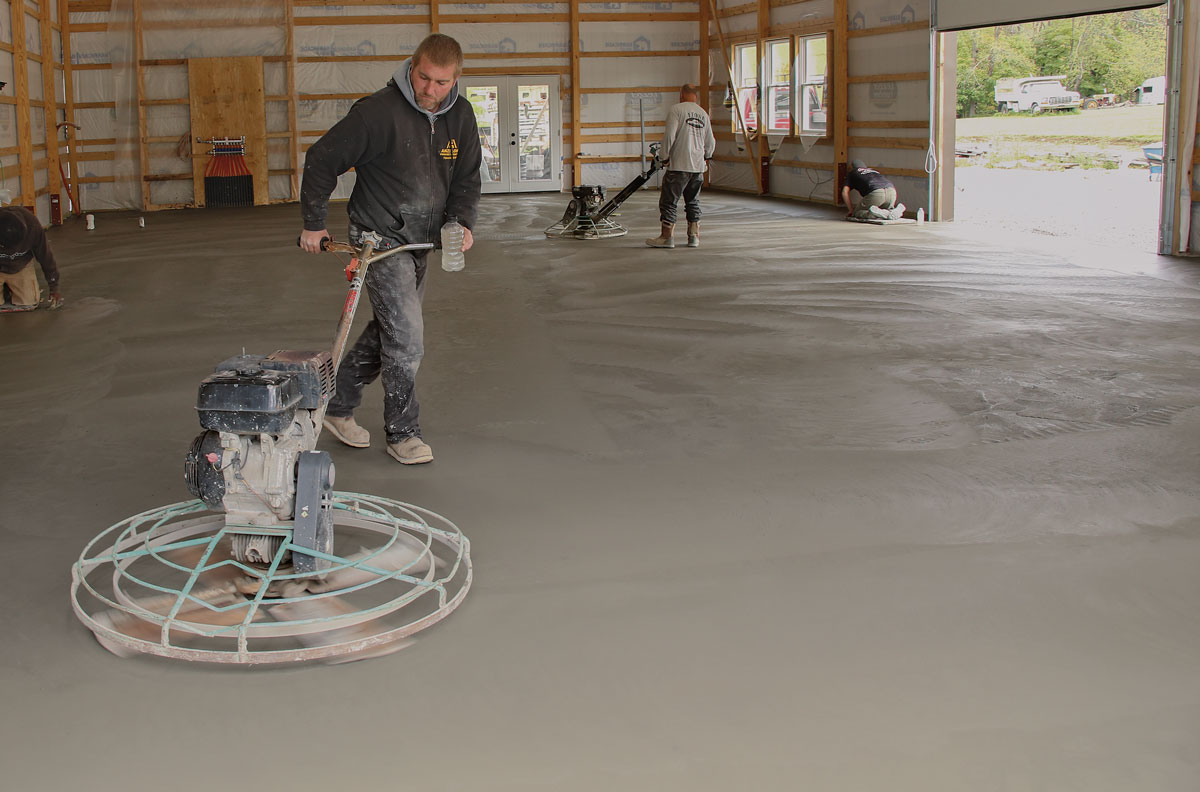
Pour planning

Before the concrete starts flowing, all tools and workers should be assembled, and everyone should know who is pumping, who is spreading, and who is screeding the concrete. The work takes place in approximately 16-ft. by 20-ft. sections.

Make room for big rigs Both the concrete pump, which is pulled by a dually flatbed, and the front-discharge mixer are more than 30 ft. long, so you’ll need space for them to park. Also, consider road and bridge weight limits, as a loaded mixer weighs 73,000 lb.
Make room for big rigs. Both the concrete pump, which is pulled by a dually flatbed, and the front-discharge mixer are more than 30 ft. long, so you’ll need space for them to park. Also, consider road and bridge weight limits, as a loaded mixer weighs 73,000 lb.
 Once the concrete starts flowing, the pumping crew will try to maintain a 16-ft.-wide strip of concrete with uniform depth that matches the planned slab thickness. The pumping crew is helped by the finishing crew, which uses placement tools to spread the wet concrete to the right depth.
Let it flow. Once the concrete starts flowing, the pumping crew will try to maintain a 16-ft.-wide strip of concrete with uniform depth that matches the planned slab thickness. The pumping crew is helped by the finishing crew, which uses placement tools to spread the wet concrete to the right depth.
Screed sections level The screeding process levels the concrete to the right thickness, and the rapid back-and-forth sliding helps push down the stone aggregate.
Screed sections level. The screeding process levels the concrete to the right thickness, and the rapid back-and-forth sliding helps push down the stone aggregate.
Bull-float sections smooth Shortly after screeding a 16-ft.-wide strip, the finishing crew uses a bull float to flatten the small ridges and valleys created by screeding. The float’s long handle can manage sections up to 20 ft. long.
Bull-float sections smooth. Shortly after screeding a 16-ft.-wide strip, the finishing crew uses a bull float to flatten the small ridges and valleys created by screeding. The float’s long handle can manage sections up to 20 ft. long.
Right tool for placing The broad blade of the concrete placer moves concrete better than a garden hoe, a mortar mixer, or the tines of a garden rake. Opposite the blade is a hook for raising the reinforcing mesh. The mesh should be at the top of the bottom third of the slab thickness, or about 1-5⁄8 in. from the bottom for this 5-in.-thick slab.
Right tool for placing. The broad blade of the concrete placer moves concrete better than a garden hoe, a mortar mixer, or the tines of a garden rake. Opposite the blade is a hook for raising the reinforcing mesh. The mesh should be at the top of the bottom third of the slab thickness, or about 1-5⁄8 in. from the bottom for this 5-in.-thick slab.
Fill low spots A shovelful or two of concrete fills low spots. Areas near door openings and around pipes and support columns are common low spots because these jogs and interruptions interfere with the screeding process.
Fill low spots. A shovelful or two of concrete fills low spots. Areas near door openings and around pipes and support columns are common low spots because these jogs and interruptions interfere with the screeding process.

Work toward the exit The crew continues placing, screeding, and bull-floating 16-ft. by 20-ft. sections, moving closer to the concrete pump. As less length is needed, the crew removes sections of the hose to make it lighter and more manageable.
Work toward the exit. The crew continues placing, screeding, and bull-floating 16-ft. by 20-ft. sections, moving closer to the concrete pump. As less length is needed, the crew removes sections of the hose to make it lighter and more manageable.

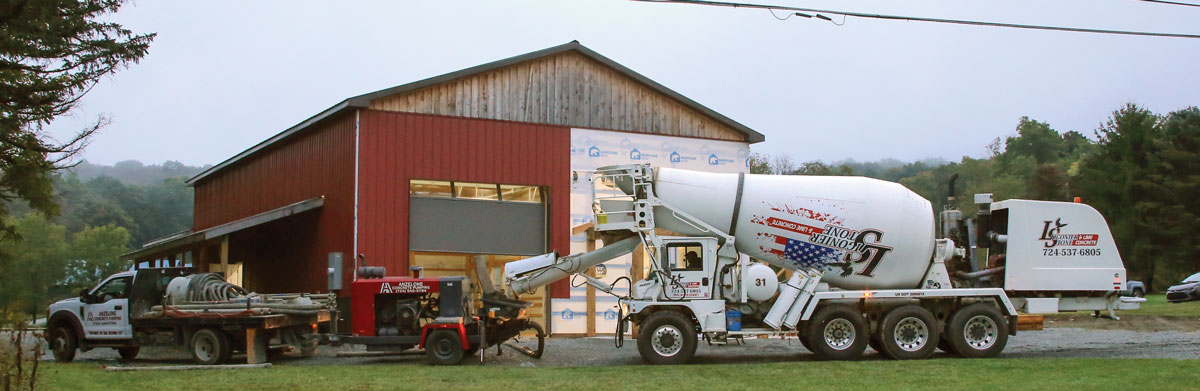
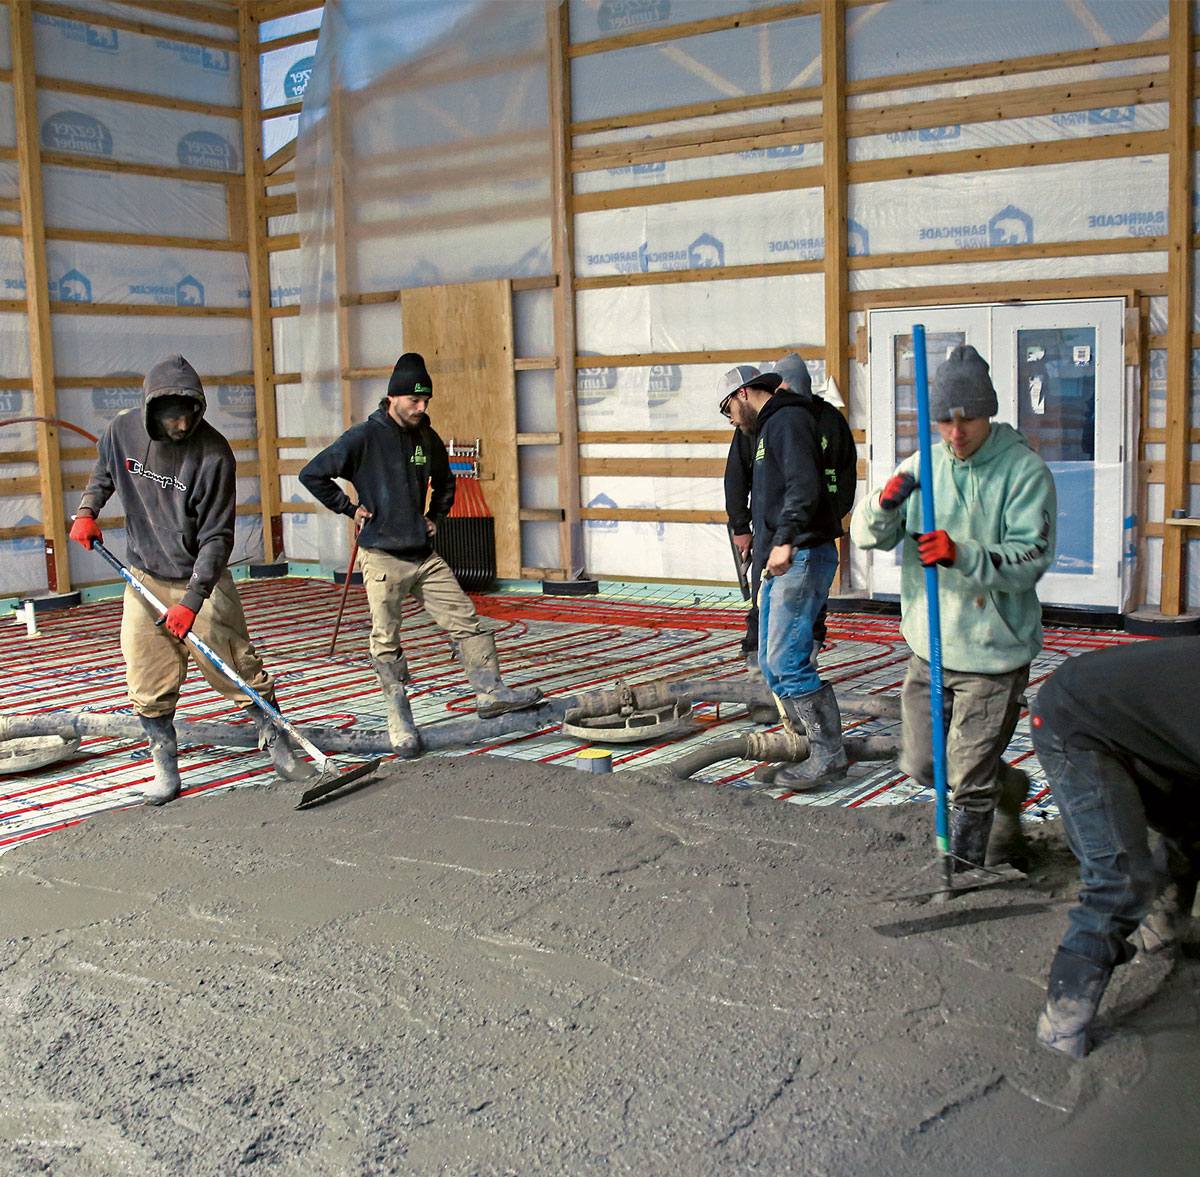
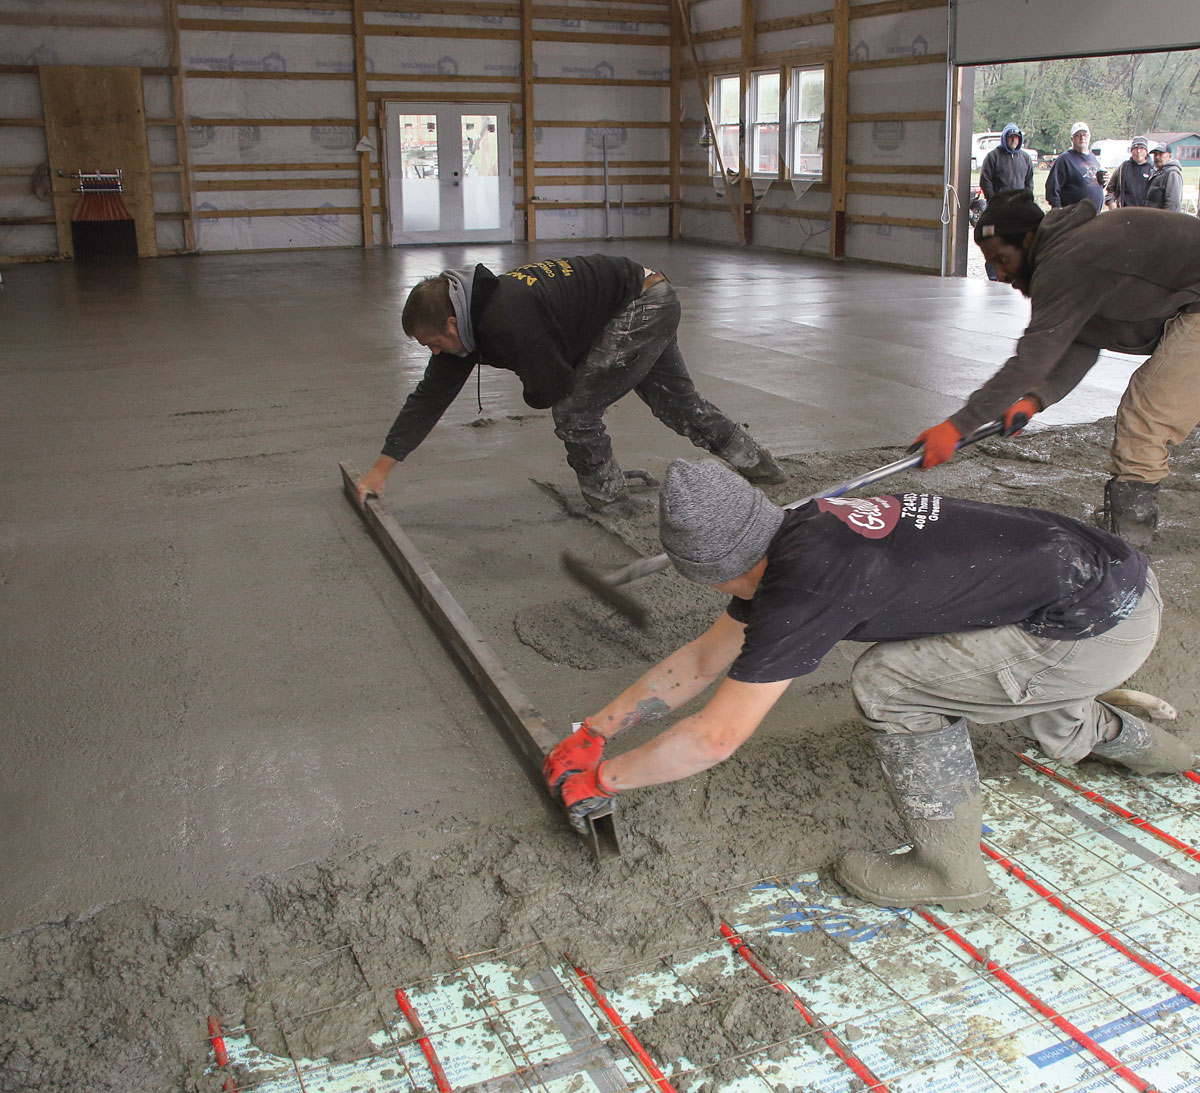
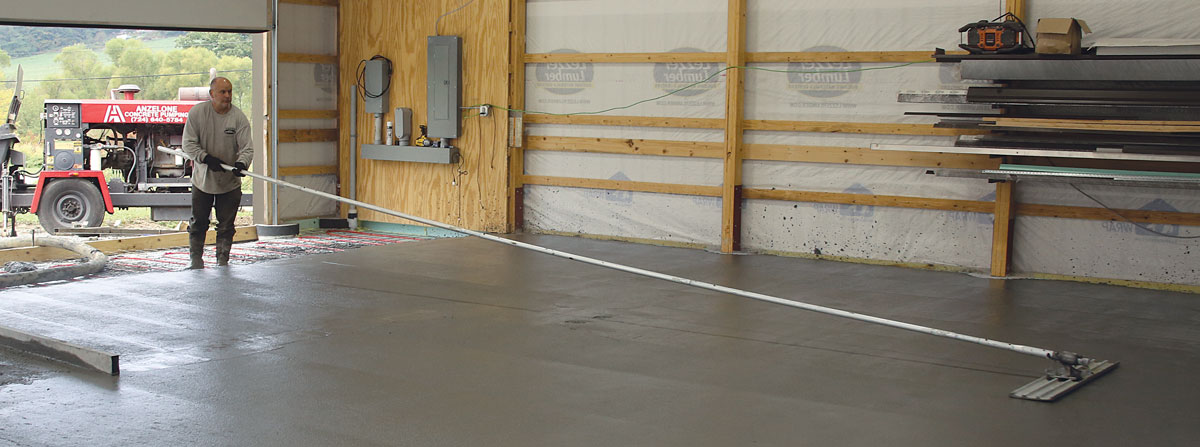
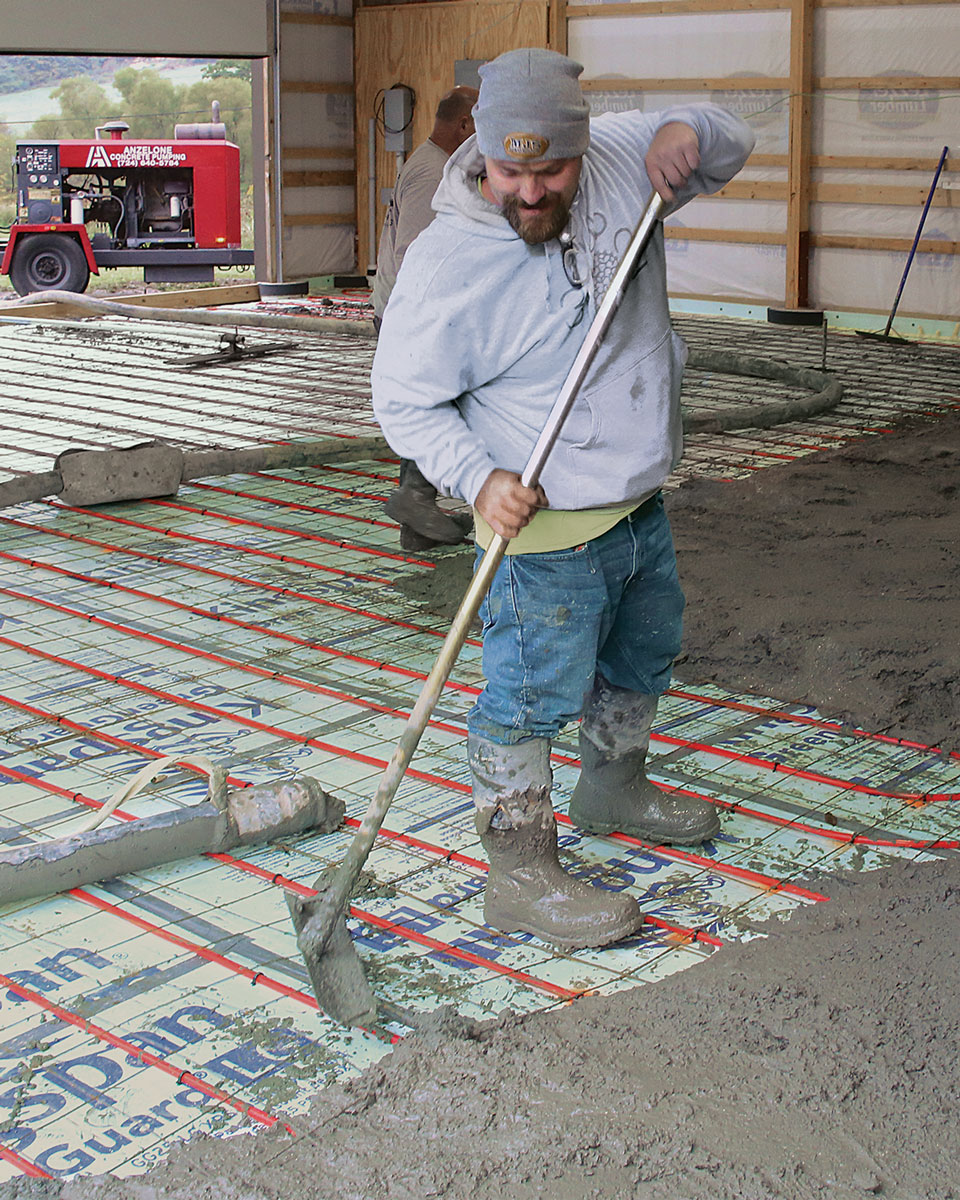
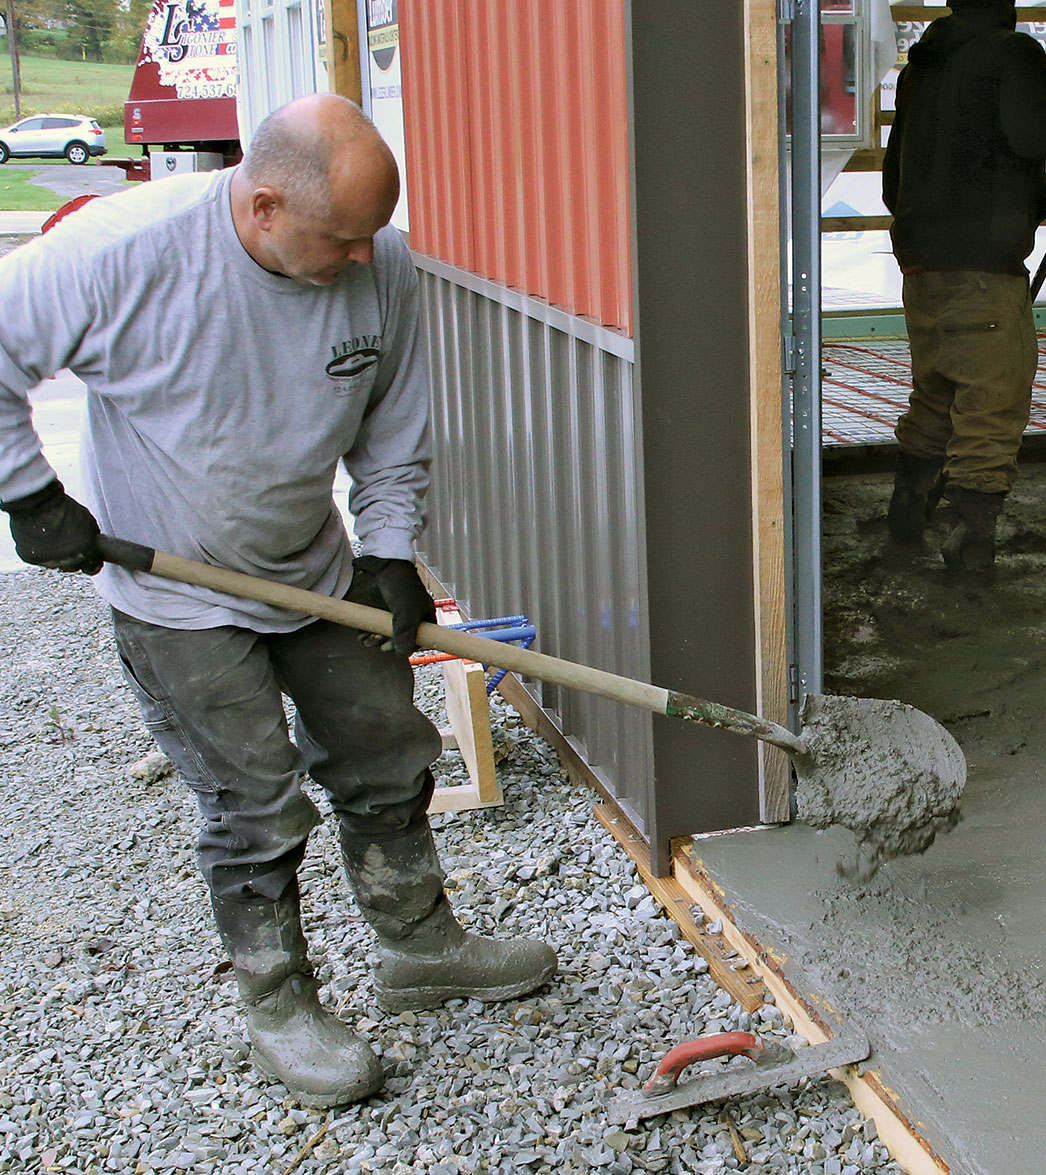
Radiant tubing for a warm floor

I worked in cold commercial buildings early in my career, and I’m done with that. I want warm floors in my wood and metal shops, and I want to be comfortable working on my equipment and vehicles. I chose in-floor radiant heat instead of a forced-air system because it’s quiet and the heat is comfortable and even, creating a place that’s nice to work in.

The radiant loops are 1⁄2-in. oxygen barrier PEX; common PEX used for potable water cannot be used for hydronics, and vice versa. My plumbing supply house, which has a hydronic designer on staff, will plan a loop layout based on the building plan and its heat loss for free if you purchase the piping and equipment from them.

The general guidance is to keep hydronic loops around 300 ft. each for maximum efficiency. I fastened the PEX directly to the foam using Malco’s PEX Foam Board Stapler, which uses proprietary plastic staples. The staples come in two different sizes depending on the foam thickness used, and the stapler has an autofeed magazine that holds 25 staples and is operated while the user is standing upright. It was a huge time- and back-saver. Three of us installed 1800 ft. of tubing in a few hours. I pressurized the system with 50 lb. of air and monitored a gauge on the manifold to make sure we didn’t create any leaks during the pour.

The right reinforcement and mix

Concrete can withstand much higher loads with steel reinforcement, and since I planned to store heavy machines on the slab, strength was of great importance. I chose welded wire mesh for reinforcing the concrete. I have family members involved in heavy highway construction, and their recommendation was the strong and reliable heavier-gauge “highway mat” wire mesh. Some folks might suggest fiber reinforcement, but it wouldn’t work with the smooth-troweled finish I wanted. Others might suggest #4 steel bars on a 2-ft. grid, but I think that’s overkill and needlessly costly.

We used 5-ft. by 10-ft. mats of the heavy steel mesh. We shook out the sheets, overlapped them all by one square, and tied them together with tie wire. Premade loops and Mister Twister tools made short work of the connections. I laid the wire loose on top of the PEX so it could be pulled up into the middle of the slab during the pour.

I chose 4000-lb. concrete mix, which was recommended by my concrete contractor for a building storing heavy equipment. At 5 in. thick, it took 38 cu. yd. total for the floor. A concrete truck can only haul 10 cu. yd. at a time, so we had to coordinate the delivery with several trucks. Because we were pumping the concrete, we could unload the trucks quickly, so we staggered them 15 minutes apart. I added 1% calcium chloride to speed the setting time so the steel-trowel finish wouldn’t take all day. With the recent boom in construction and lack of qualified concrete truck drivers, I had to schedule this pour three weeks in advance. And because the first run for concrete trucks is before dawn, I installed lighting so we wouldn’t have to work in the dark.

Big job, higher stakes

With the size of this pour, pumping was the only option. Besides that, it’s a bad idea to wheel concrete over PEX heating loops because wheelbarrows and power buggies can damage the tubing. In my area, the concrete pumping crew is a separate contractor. They brought a pumper trailer powered by a diesel motor. The concrete truck dumps directly into the pumper’s hopper, and the pumper distributes the concrete through 4-in. rubber hoses. The pumping company provides the equipment and two guys to move the hose during the pour. Pricing is based on the yards pumped and the amount of hose used. In my market, concrete costs almost $200 per cu. yd. You really need to take accurate measurements and make sure you have a consistent grade to order the right amount. In the days of $75-per-yd. concrete, dumping a couple of yards on the ground was no big deal; today the stakes are higher. There’s also an environmental cost to concrete, so you don’t want to waste it. You also don’t want to run short. Most companies have a 4-yd. to 6-yd. minimum per truck, so if you do run short, that extra yard is going to cost $800 to $1200. I cut this job a little closer than I intended; we had about one wheelbarrow load left over.
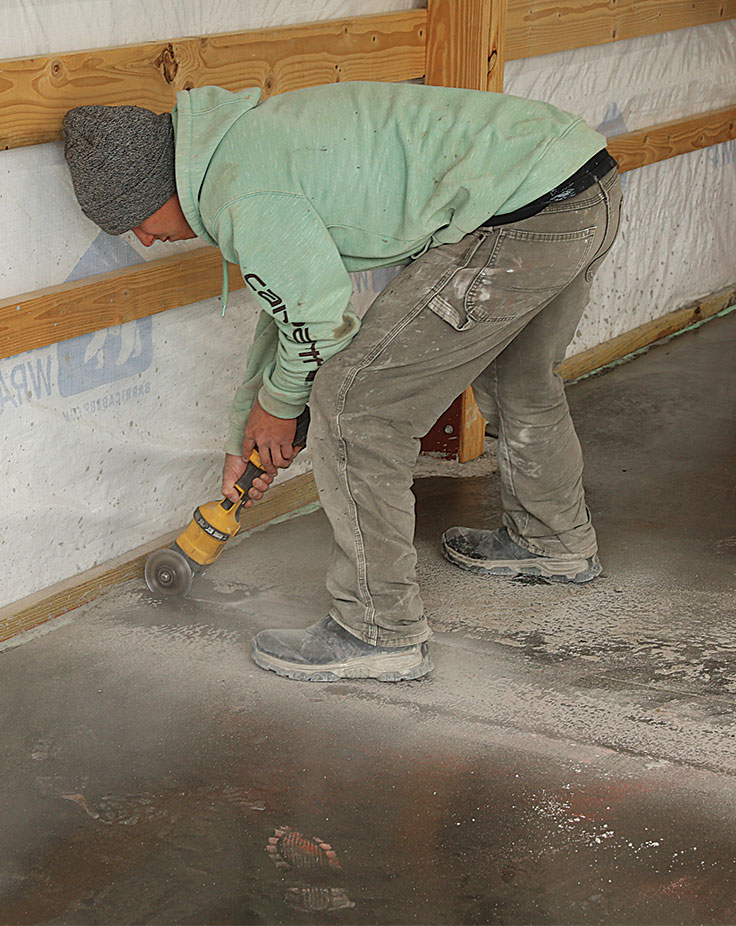
Slick finishing

After the bleed water (excess water to make the concrete workable) has evaporated on the first placed sections, the finishing work can begin. Finishing too soon can result in a weak, dusty surface. But waiting too long means the concrete will be too hard to trowel smooth.

One note when working with concrete: Concrete washwater from washing tools, wheelbarrows, and the mixer’s chute and hopper is caustic and can harm aquatic life and damage landscaping, so have a gravel pile or washout bag to contain the slurry while it hardens. Never put washout into streams, bodies of water, or storm drains.

Edges come first Bleed water often evaporates faster at openings because of sunshine. Once the surface has a matte finish, the crew will start finishing exposed edges, rounding the concrete corner by running the edger back and forth in 2-ft. to 3-ft. sections with the leading edge slightly raised.
Edges come first. Bleed water often evaporates faster at openings because of sunshine. Once the surface has a matte finish, the crew will start finishing exposed edges, rounding the concrete corner by running the edger back and forth in 2-ft. to 3-ft. sections with the leading edge slightly raised.
Float blades first Wide float blades or clip-on float pans spread the weight of the power trowel over a greater surface than trowel blades so the machine doesn’t sink into the soft concrete. Once the bleed water has evaporated from a section, the operator floats the surface, which smooths it and brings up a layer of cement paste for later troweling.
Float blades first. Wide float blades or clip-on float pans spread the weight of the power trowel over a greater surface than trowel blades so the machine doesn’t sink into the soft concrete. Once the bleed water has evaporated from a section, the operator floats the surface, which smooths it and brings up a layer of cement paste for later troweling.
Broom-finish aprons The garage-door apron is outside the building, so it gets a broom finish for traction in wet and icy conditions. A stiff-bristle brush or broom made for the job works better than an ordinary push broom, which has bristles that are too soft. The right bristles leave distinct ridges when the concrete is sufficiently set after the bleed water has evaporated.
Broom-finish aprons. The garage-door apron is outside the building, so it gets a broom finish for traction in wet and icy conditions. A stiff-bristle brush or broom made for the job works better than an ordinary push broom, which has bristles that are too soft. The right bristles leave distinct ridges when the concrete is sufficiently set after the bleed water has evaporated.

Troweling makes a slab smooth The narrower troweling blades exert greater pressure and burnish the finished concrete surface so it is easy to sweep and mop. The hard, smooth finish also makes it easy to move heavy objects and to roll around stools, floor jacks, and creepers.
Troweling makes a slab smooth. The narrower troweling blades exert greater pressure and burnish the finished concrete surface so it is easy to sweep and mop. The hard, smooth finish also makes it easy to move heavy objects and to roll around stools, floor jacks, and creepers.

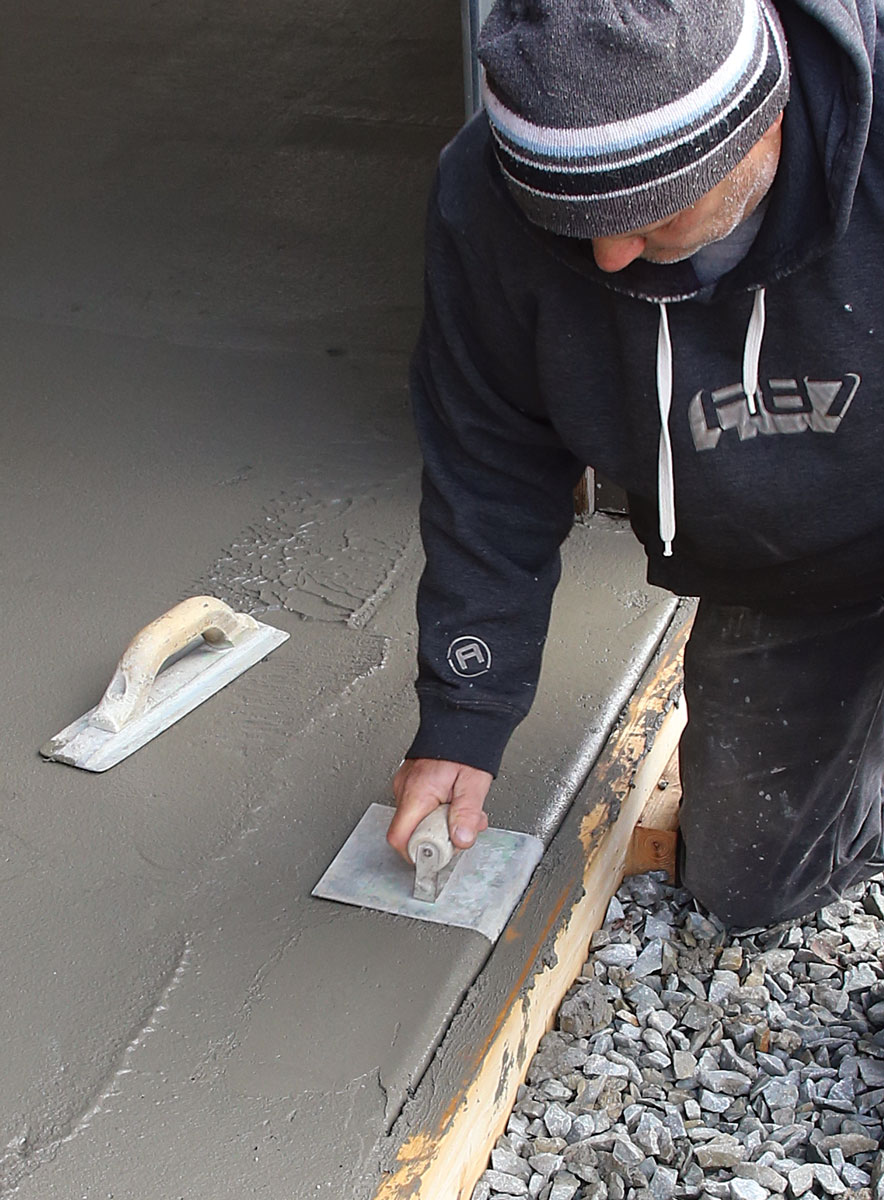
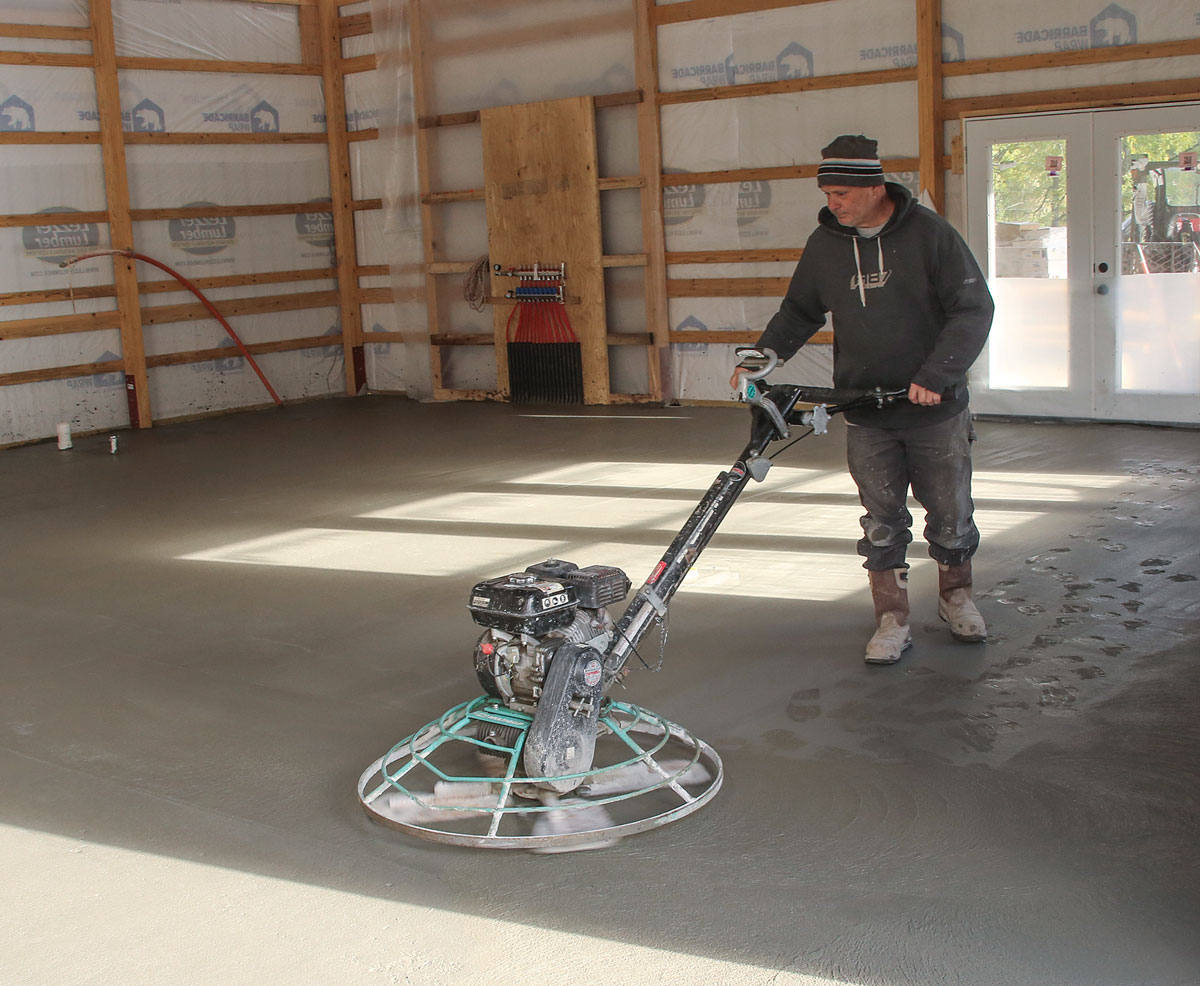
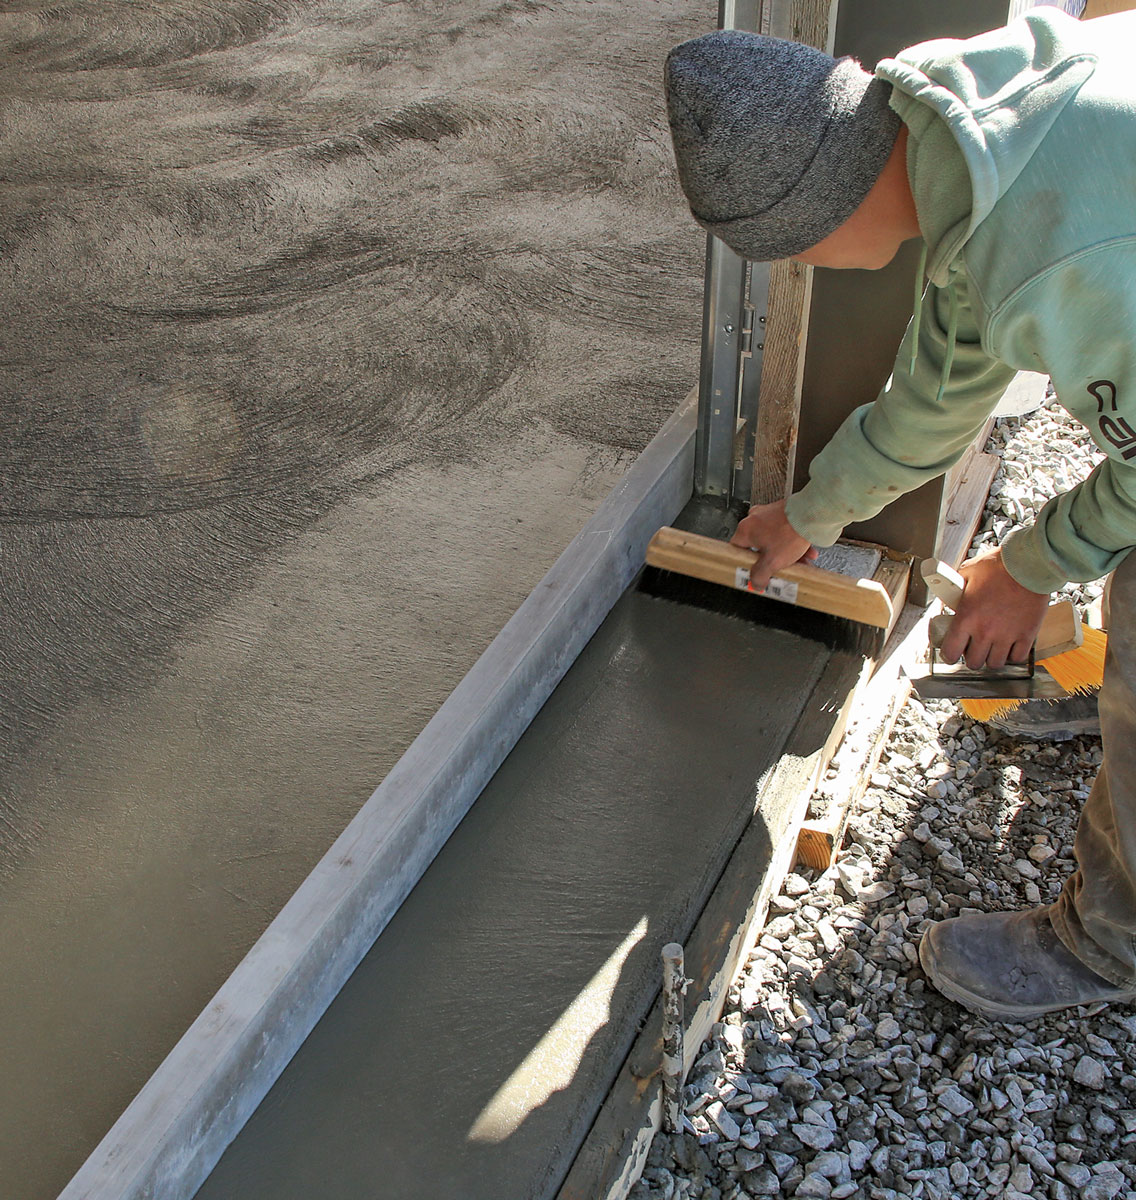
Find a skilled finisher

My finisher, George Leone, and his crew have been doing flatwork for me for 15 years. I met George through a batch-plant referral. Pouring a 2400-sq.-ft. floor is a big job, and not all concrete contractors are equipped or staffed for a job of that size. Before you hire one, visit past projects to look at the quality of the finish, because a cell phone picture doesn’t show you what you need to see, especially with steel-troweled floors. My crew and I have a lot of concrete experience and pour our own sidewalks and patios, and even some driveways, but we wouldn’t attempt a job of this scale.

From roughest to smoothest, the most common finishes are broom, sponge, mag or float, and steel trowel. Steel-trowel floors are burnished to an almost glasslike sheen. After the concrete is placed, screeded, and bull-floated, the concrete is polished with a walk-behind or ride-on finishing machine called a power trowel. I wanted a steel-trowel finish on my floor because it’s the smoothest finish available and is easy to sweep and mop. It’s also the most common finish for interior concrete floors. (And it’s the perfect finish when my building doubles as a roller disco for my kids and their friends.) People have asked me if the floor is slippery when it’s wet. It’s not. But because of the added labor, steel-trowel finishes are the most expensive, adding to between $0.50 to $1 per sq ft.

As you might imagine, placing and finishing a slab of this size is not a cheap undertaking. From the gravel under the concrete to the sealer on top, I spent about $24,000, or $10 per sq ft. Although it was a huge expense, this was not a time to cut corners. I could have skimmed an inch out of the gravel base or an inch off the floor depth and saved 10 tons of gravel and 9 cu. yd. of concrete, but the floor might have cracked under my heavy equipment.

I also could have used use bubble-pack insulation under the slab instead of sheet foam as I’ve seen locally, or I could have eliminated the in-floor heat, but my shop wouldn’t have been as comfortable. A strong, properly finished concrete floor isn’t cheap, but nothing is more expensive than failure when it comes to big concrete slabs.

Controlled cracking

Concrete shrinks as it cures, often leading to unsightly random cracks. Control joints encourage controlled cracking that’s hidden from view. The saw cuts provide a score line that’s later extended through shrinkage cracks.

control-joint layout Control joints should not intersect openings and should divide the space into relatively even sections. Joints should be spaced at distances equal to 24 to 30 times the slab thickness, according to the Portland Cement Association.
Control-joint layout. Control joints should not intersect openings and should divide the space into relatively even sections. Joints should be spaced at distances equal to 24 to 30 times the slab thickness, according to the Portland Cement Association.
Cut control joints right away Control joints should be cut as soon as possible. An early-entry saw like this one can make the cuts 1 to 4 hours after finishing. Regular concrete cutoff saws may have to wait 4 to 12 hours. Control-joint depth should be one-quarter of the slab thickness.
Cut control joints right away. Control joints should be cut as soon as possible. An early-entry saw like this one can make the cuts 1 to 4 hours after finishing. Regular concrete cutoff saws may have to wait 4 to 12 hours. Control-joint depth should be one-quarter of the slab thickness.

Grinder goes in tight spaces In small spaces and locations close to walls where the early-entry saw can’t reach, a 9-in. grinder with a diamond-abrasive wheel can be used for cutting control joints.
Grinder goes in tight spaces. In small spaces and locations close to walls where the early-entry saw can’t reach, a 9-in. grinder with a diamond-abrasive wheel can be used for cutting control joints.


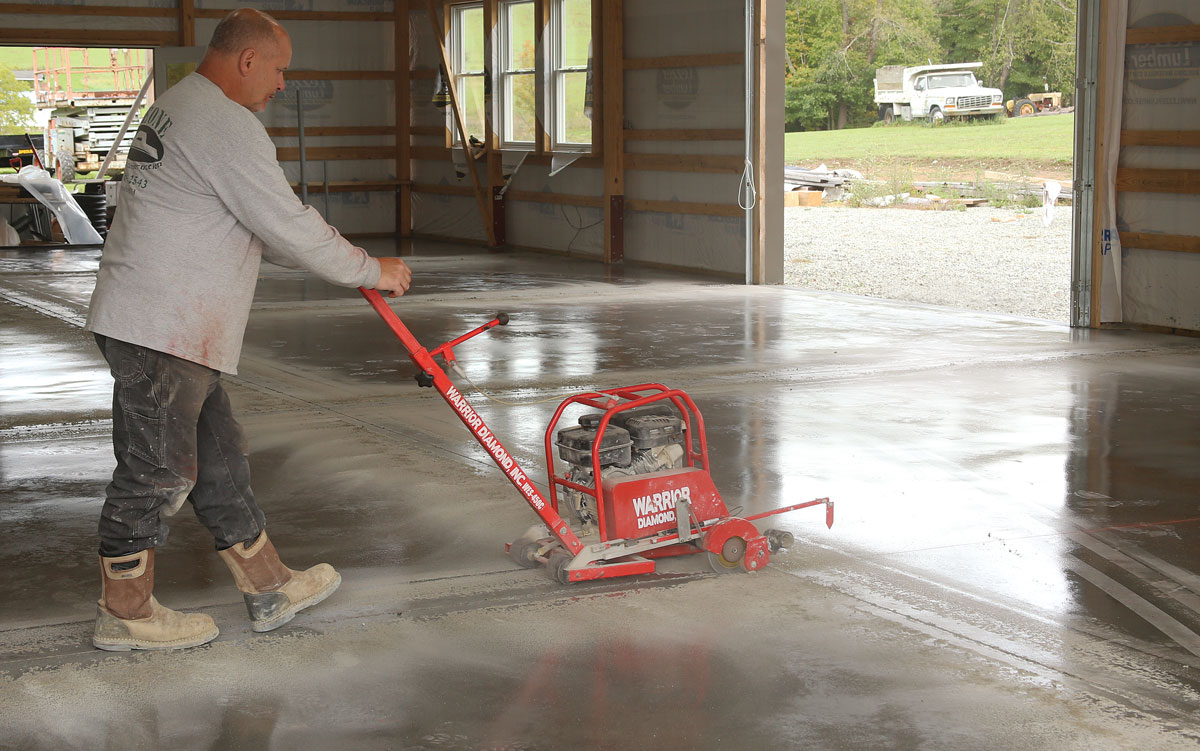
Andrew Grace is a roofer, builder, and remodeler in Ligonier, Pa.

Photos by Patrick McCombe.

From Fine Homebuilding #317


RELATED STORIES

  • Guide to Working With Concrete
  • Behind the Scenes of a Concrete Batch Plant
  • Must-Have Concrete Tools

Sign up for eletters today and get the latest how-to from Fine Homebuilding, plus special offers.

Signing you up...

This site is protected by reCAPTCHA and the Google Privacy Policy and Terms of Service apply.
See all newsletters
See all newsletters
View PDF
Previous: Pour Even Concrete Slabs Next: Reducing the Risk of Cracks in Concrete Slabs

Guide

Foundations and Masonry Work

Chapter

Building Foundations

Log in or create an account to post a comment.

Sign up Log in

Become a member and get full access to FineHomebuilding.com

Foundations and Masonry Work

Foundations and Masonry Work

Trusted, comprehensive guidance from the pros for working with concrete and masonry

View Project Guide

View All Project Guides »

Become a member and get unlimited site access, including the Foundations and Masonry Work Project Guide.

Start Free Trial

Concrete & Masonry Basics
  • Choosing & Mixing Concrete
  • Concrete & Masonry Tools & Techniques
Building Foundations
  • Foundation Basics
  • Foundation Footings
  • Insulated Concrete Forms (ICFs)
Waterproofing Foundations
  • Waterproofing Strategies
  • Foundation Drains
Retrofits and Add-ons
Masonry in the Landscape
  • Patios, Walkways, and Driveways
  • Retaining Walls
  • Dry Stone Walls
  • Fire Pits
Brick

Fine Home Building

Newsletter Sign-up

  • Fine Homebuilding

    Home building tips, offers, and expert advice in your inbox.

  • Green Building Advisor

    Building science and energy efficiency advice, plus special offers, in your inbox.

  • Old House Journal

    Repair, renovation, and restoration tips, plus special offers, in your inbox.

Signing you up...

This site is protected by reCAPTCHA and the Google Privacy Policy and Terms of Service apply.
See all newsletters

Follow

  • Fine Homebuilding

    Dig into cutting-edge approaches and decades of proven solutions with total access to our experts and tradespeople.

    Start Free Trial Now
    • Facebook
    • Instagram
    • X
    • LinkedIn
  • GBA Prime

    Get instant access to the latest developments in green building, research, and reports from the field.

    Start Free Trial Now
    • Facebook
    • YouTube
  • Old House Journal

    Learn how to restore, repair, update, and decorate your home.

    Subscribe Now
    • Facebook
    • Instagram
    • X

Membership & Magazine

  • Online Archive
  • Start Free Trial
  • Magazine Subscription
  • Magazine Renewal
  • Gift a Subscription
  • Customer Support
  • Privacy Preferences
  • About
  • Contact
  • Advertise
  • Careers
  • Terms of Use
  • Site Map
  • Do not sell or share my information
  • Privacy Policy
  • Accessibility
  • California Privacy Rights

© 2025 Active Interest Media. All rights reserved.

Fine Homebuilding receives a commission for items purchased through links on this site, including Amazon Associates and other affiliate advertising programs.

X
X
This is a dialog window which overlays the main content of the page. The modal window is a 'site map' of the most critical areas of the site. Pressing the Escape (ESC) button will close the modal and bring you back to where you were on the page.

Main Menu

  • How-To
  • Design
  • Tools & Materials
  • Video
  • Blogs
  • Forum
  • Project Guides
  • Reader Projects
  • Magazine
  • Members
  • FHB House

Podcasts

  • FHB Podcast
  • ProTalk

Webinars

  • Upcoming and On-Demand

Podcasts

  • FHB Podcast
  • ProTalk

Webinars

  • Upcoming and On-Demand

Popular Topics

  • Kitchens
  • Business
  • Bedrooms
  • Roofs
  • Architecture and Design
  • Green Building
  • Decks
  • Framing
  • Safety
  • Remodeling
  • Bathrooms
  • Windows
  • Tilework
  • Ceilings
  • HVAC

Magazine

  • Current Issue
  • Past Issues
  • Magazine Index
  • Subscribe
  • Online Archive
  • Author Guidelines

All Access

  • Member Home
  • Start Free Trial
  • Gift Membership

Online Learning

  • Courses
  • Project Guides
  • Reader Projects
  • Podcast

More

  • FHB Ambassadors
  • FHB House
  • Customer Support

Account

  • Log In
  • Join

Newsletter

Get home building tips, offers, and expert advice in your inbox

Signing you up...

This site is protected by reCAPTCHA and the Google Privacy Policy and Terms of Service apply.
See all newsletters
See all newsletters

Follow

  • X
  • YouTube
  • instagram
  • facebook
  • pinterest
  • Tiktok

Join All Access

Become a member and get instant access to thousands of videos, how-tos, tool reviews, and design features.

Start Your Free Trial

Subscribe

FHB Magazine

Start your subscription today and save up to 70%

Subscribe

We hope you’ve enjoyed your free articles. To keep reading, become a member today.

Get complete site access to expert advice, how-to videos, Code Check, and more, plus the print magazine.

Start your FREE trial

Already a member? Log in