FHB Logo Facebook LinkedIn Email Pinterest Twitter X Instagram Tiktok YouTube Plus Icon Close Icon Navigation Search Icon Navigation Search Icon Arrow Down Icon Video Guide Icon Article Guide Icon Modal Close Icon Guide Search Icon Skip to content
Subscribe
Log In
  • How-To
  • Design
  • Tools & Materials
  • Restoration
  • Videos
  • Blogs
  • Forum
  • Magazine
  • Members
  • FHB House
  • Podcast
Log In

Fine Homebuilding Project Guides

Framing

Guide Home
  • Introduction to Framing
  • Framing Tools, Techniques, and Materials
  • Framing Floors
  • Framing Walls
  • Framing Stairs
  • Framing Roofs
  • Efficient Framing Methods
  • Timber Framing
How-To

Shop-Built Housed-Stringer Stairs

Building in the shop makes assembly easier on the carpenter.

By Andy Engel Issue 278 - Oct/Nov 2018

Synopsis: Carpenter Andy Engel gives in-depth instructions for building housed-stringer stairs, beginning with laying out the stringers, then building the template for routing mortises in the stringers, positioning the template and routing the stringers, setting the treads, assembling and trimming the risers, and finally adding cove molding. The article includes details for special treatment of the top tread and riser at the upper-floor landing, in-depth drawings that showcase stringer layout, and a sidebar on determining riser height, tread depth, nosings, and stair width according to code requirements.


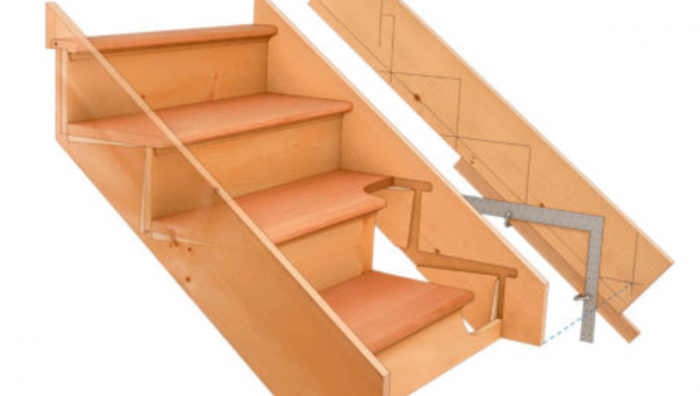
Forgive the pun, but housed-stringer stairs are a step up from standard notched-stringer stairs. Not only are they stronger and less likely to squeak, they’re essentially finished as soon as they’re assembled.

Housed-stringer stairs rely on mortises cut in the stringers to support the treads and risers. The backsides of these mortises taper, and wedges that match the taper are glued and driven in to lock the stairs into a cohesive unit. From the topside, the assembly looks like it grew together.

I usually build housed-stringer stairs in the comfort of my shop, where I can assemble them on a pair of sawhorses. With the stringers oriented face down at about waist height, it’s easy to control glue drips, and everything is reachable from a standing position. When assembling the same stairs in place on site, I have to work from below, which is especially uncomfortable for the lower treads and risers, and it’s usually not long before I’m spattered in glue drips.

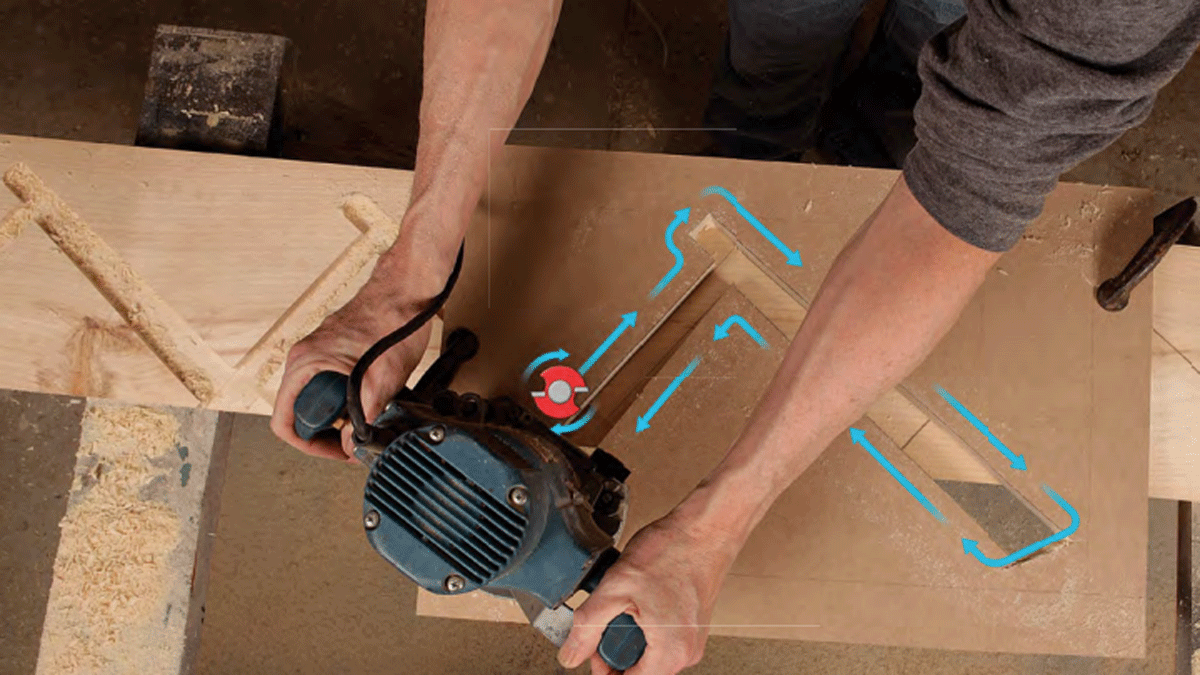
The keys to the process are a simple router template and a bearing- guided bit. You can make the template, and the 3⁄4-in. pattern router bit is commonly available.

rout the stringers

Stringer layout

I usually use 5/4×10 stock for the stringers, but 2x material also works. When I lay out the treads and risers, I try to locate defects such as knots where they won’t show in the completed stair. I usually use commercially available treads, but they’re easy enough to make. If you make your own, round the tread noses using a 3⁄8-in. roundover bit so the radius matches that from the 3⁄4-in. pattern bit. Risers are almost always cut from 1×10 boards. That said, the treads and risers can be almost any thickness—you just have to make a template to match.

The basics of rise and run don’t change from the more familiar notched-stringer stair. Measure the overall rise from finish floor to finish floor. If those aren’t installed yet, measure from subfloor to subfloor, then add the thickness of the upper flooring, and subtract the lower. To determine the number of risers, divide the overall height by your desired riser height, round to the nearest whole number, and then divide the overall height by that number to find the exact riser height. Then check that this height is code compliant.

When laying out a housed-stringer stair, this is key: You’re laying out where the tops of the treads and the faces of the risers will meet the stringers, and the layout happens from the bottom of the stringer.

To set up my framing square, I first draw a single step in pencil, carefully aligning the rise and run dimensions on the square with the edge of the stringer. It doesn’t matter where the step is; this is just for setting up. Once I’ve drawn the step, I slide the square about 1 1⁄2 in. forward and along the tread line, keeping it exactly on the line, and clamp a straight piece of scrap wood to the square to lock in the rise and run in this offset position. Moving the square forward moves the layout higher in the stringer, ensuring the backs of the treads and risers are fully housed and don’t protrude from the bottom edge of the stringer. To avoid confusion, erase that first step before proceeding.

Before laying out the treads and risers, I check the crowns of the stringers, and face them both up. Then, layout begins at the bottom. After drawing the first tread and riser on the first stringer, I lay out the level cut at the bottom, which is essentially what would have been the top of the next tread down. I lay out the plumb cut about 4 in. in front of the bottom riser, but that can vary if, for example, you want to match its height with the house’s base molding. Then I continue moving up the stringer, aligning the rise dimension on the square with the line I drew for the tread below. At the top, I draw plumb cuts flush with the back of the top riser, and with the back of the landing tread. A level cut along the bottom of the landing tread leaves an ear on the stringer that will extend onto the upper floor landing.

With the first stringer laid out, I place its bottom against the bottom of the second stringer, and use a square and a pencil to draw lines transferring the intersections of the backs of the treads and risers on the laid-out stringer to the blank stringer. These lines help keep the layout consistent between stringers. Then I repeat the layout process on the second stringer.

Shop-Built Housed-Stringer StairsTo view the entire article, please click the View PDF button below.

From Fine Homebuilding #278

Sign up for eletters today and get the latest how-to from Fine Homebuilding, plus special offers.

Signing you up...

This site is protected by reCAPTCHA and the Google Privacy Policy and Terms of Service apply.
See all newsletters
See all newsletters
View PDF
Previous: Build Like a Pro: Better Staircase Framing Next: How To Cut Stair Stringers

Guide

Framing

Chapter

Framing Stairs

Log in or create an account to post a comment.

Sign up Log in

Become a member and get full access to FineHomebuilding.com

Framing

Framing

Trusted, in-depth guidance from the pros for framing a durable, code-compliant house

View Project Guide

View All Project Guides »

Become a member and get unlimited site access, including the Framing Project Guide.

Start Free Trial

Introduction to Framing
  • House Framing Concepts, Tips, and More
Framing Tools, Techniques, and Materials
  • Tools
  • Techniques
  • Framing Lumber
  • Steel
Framing Floors
  • Floor Framing
  • Engineered Floors
  • Floor Sheathing
Framing Walls
  • Wall Framing Basics
  • Layout
  • Wall Assembly
  • Raising and Straightening Walls
  • Framing Rough Openings
  • Blocking
Framing Stairs
  • Stair Layout
  • Building Stairs
Framing Roofs
  • Roof-Framing Basics
  • Roof Design
  • Laying Out and Cutting Rafters
  • Framing Valleys
  • Working with Trusses
  • Dormers
  • Special Situations
Efficient Framing Methods
  • Advanced Framing
  • Double-Stud Walls
Timber Framing
  • Timber-Frame Construction
  • Timber-Frame Design

Fine Home Building

Newsletter Sign-up

  • Fine Homebuilding

    Home building tips, offers, and expert advice in your inbox.

  • Green Building Advisor

    Building science and energy efficiency advice, plus special offers, in your inbox.

  • Old House Journal

    Repair, renovation, and restoration tips, plus special offers, in your inbox.

Signing you up...

This site is protected by reCAPTCHA and the Google Privacy Policy and Terms of Service apply.
See all newsletters

Follow

  • Fine Homebuilding

    Dig into cutting-edge approaches and decades of proven solutions with total access to our experts and tradespeople.

    Start Free Trial Now
    • Facebook
    • Instagram
    • X
    • LinkedIn
  • GBA Prime

    Get instant access to the latest developments in green building, research, and reports from the field.

    Start Free Trial Now
    • Facebook
    • YouTube
  • Old House Journal

    Learn how to restore, repair, update, and decorate your home.

    Subscribe Now
    • Facebook
    • Instagram
    • X

Membership & Magazine

  • Online Archive
  • Start Free Trial
  • Magazine Subscription
  • Magazine Renewal
  • Gift a Subscription
  • Customer Support
  • Privacy Preferences
  • About
  • Contact
  • Advertise
  • Careers
  • Terms of Use
  • Site Map
  • Do not sell or share my information
  • Privacy Policy
  • Accessibility
  • California Privacy Rights

© 2025 Active Interest Media. All rights reserved.

Fine Homebuilding receives a commission for items purchased through links on this site, including Amazon Associates and other affiliate advertising programs.

X
X
This is a dialog window which overlays the main content of the page. The modal window is a 'site map' of the most critical areas of the site. Pressing the Escape (ESC) button will close the modal and bring you back to where you were on the page.

Main Menu

  • How-To
  • Design
  • Tools & Materials
  • Video
  • Blogs
  • Forum
  • Project Guides
  • Reader Projects
  • Magazine
  • Members
  • FHB House

Podcasts

  • FHB Podcast
  • ProTalk

Webinars

  • Upcoming and On-Demand

Podcasts

  • FHB Podcast
  • ProTalk

Webinars

  • Upcoming and On-Demand

Popular Topics

  • Kitchens
  • Business
  • Bedrooms
  • Roofs
  • Architecture and Design
  • Green Building
  • Decks
  • Framing
  • Safety
  • Remodeling
  • Bathrooms
  • Windows
  • Tilework
  • Ceilings
  • HVAC

Magazine

  • Current Issue
  • Past Issues
  • Magazine Index
  • Subscribe
  • Online Archive
  • Author Guidelines

All Access

  • Member Home
  • Start Free Trial
  • Gift Membership

Online Learning

  • Courses
  • Project Guides
  • Reader Projects
  • Podcast

More

  • FHB Ambassadors
  • FHB House
  • Customer Support

Account

  • Log In
  • Join

Newsletter

Get home building tips, offers, and expert advice in your inbox

Signing you up...

This site is protected by reCAPTCHA and the Google Privacy Policy and Terms of Service apply.
See all newsletters
See all newsletters

Follow

  • X
  • YouTube
  • instagram
  • facebook
  • pinterest
  • Tiktok

Join All Access

Become a member and get instant access to thousands of videos, how-tos, tool reviews, and design features.

Start Your Free Trial

Subscribe

FHB Magazine

Start your subscription today and save up to 70%

Subscribe

We hope you’ve enjoyed your free articles. To keep reading, become a member today.

Get complete site access to expert advice, how-to videos, Code Check, and more, plus the print magazine.

Start your FREE trial

Already a member? Log in