FHB Logo Facebook LinkedIn Email Pinterest Twitter X Instagram Tiktok YouTube Plus Icon Close Icon Navigation Search Icon Navigation Search Icon Arrow Down Icon Video Guide Icon Article Guide Icon Modal Close Icon Guide Search Icon Skip to content
Subscribe
Log In
  • How-To
  • Design
  • Tools & Materials
  • Restoration
  • Videos
  • Blogs
  • Forum
  • Magazine
  • Members
  • FHB House
  • Podcast
Log In

Fine Homebuilding Project Guides

Kitchens

Guide Home
  • Kitchen Planning & Design
  • Featured Kitchen Projects
  • Cabinets, Built-Ins, & Pantries
  • Kitchen Islands
  • Countertops & Flooring
  • Appliances, Fixtures, & Lighting
How-To

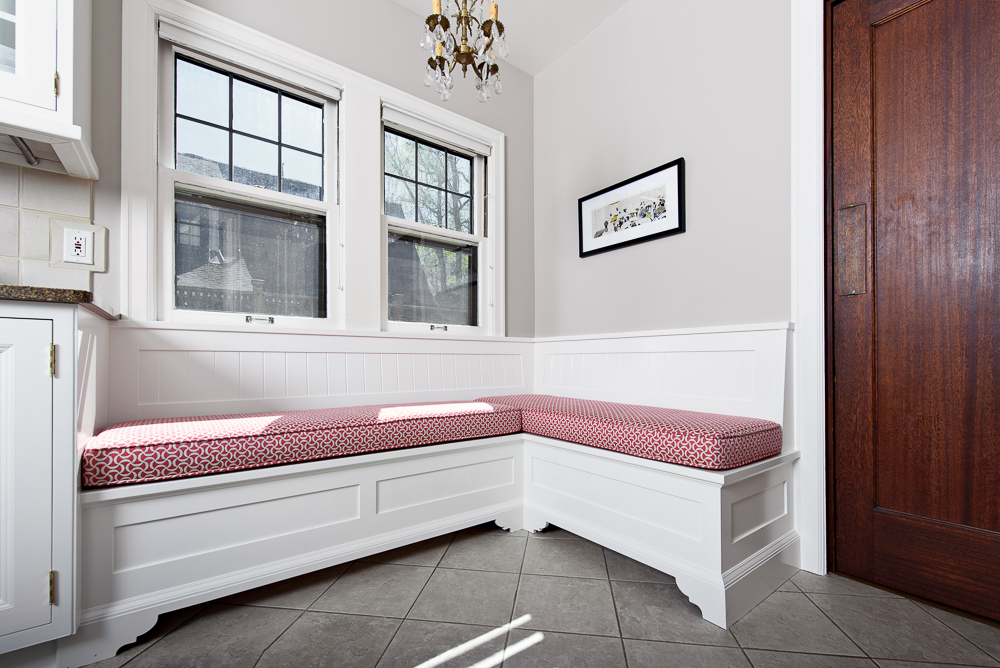
Make a Built-In Breakfast Nook

This custom-built bench offers seating, hidden storage, and a whole lot of charm.

By Andrew Young Issue 262 - Oct/Nov 2016

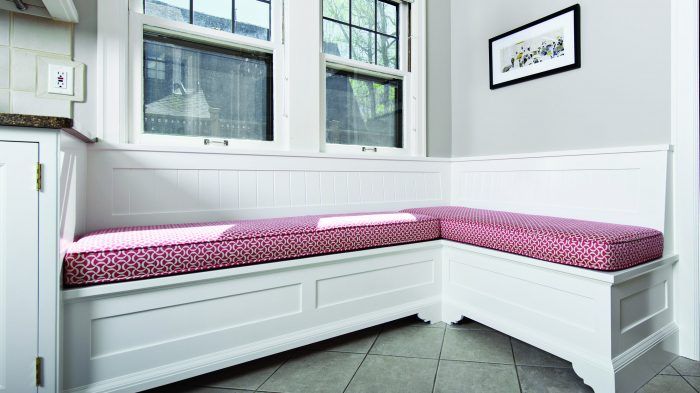
Built-ins add functionality to any space, but few types offer as much day-in and day-out utility as a breakfast nook. For this project, the client had a compact kitchen that didn’t leave much room for a table and chairs. It was a space just begging for a breakfast nook.

A breakfast nook allows at least half of the seating around the table to be flat against the wall, eliminating the space needed behind chairs. It also allows the table to be tucked closer to the corner, opening up floor space, improving flow, and making the room feel bigger, all while offering additional storage. Unlike bookcases and window seats, a breakfast nook is a built-in that is likely to get daily use and abuse. So besides needing to be aesthetically pleasing, it has to be functionally designed and built to take a beating.

Dimensions to know

Benchmark dimensions

I’ve built enough breakfast nooks over the years to have a basic formula for dimensions. I usually aim for an 18-in. finished seat height, which includes cushions. Standard thickness for foam is 4 in., and I allow for about 2 in. of compression, so I usually design the bench so that the plywood below the cushions is 16 in. above the finished floor. For seat depth, I like 18 in. from the front lip to the lowest portion of the angled backrest. My designs don’t typically include a cushioned backrest, but if yours does, you will need to adjust this number to account for the added thickness.

While a straight back is easier to build (especially in a corner bench), a slight angle — 7° is what I used here — adds quite a bit of comfort and visual interest. If I’m tucking the built-in below a window, I prefer to use the window stool height as the top edge of the backrest, which in this case worked out to a comfortable 18 in. from the seat.

It’s typical to include storage in this style of built-in — drawers in the side or end of the unit, or lids that lift off or are hinged. I find that drawers and slides eat up a lot of storage space, so I prefer hinged lids.

With the critical dimensions and site specifics noted, I can flesh out the design and then begin fabricating parts in the shop.

Shop fabrication

The heart of this assembly is the plywood carcases, which not only serve as the storage areas but are the main components onto which the rest of the assembly is fastened.

I like the interior to be as presentable as the exterior, so I use prefinished cabinet-grade maple plywood for the carcases — 3⁄4 in. thick for the sides and back, 1⁄2 in. thick for the bottom — which also eliminates the need for painting the interior. I break the carcases into at least two equal sections (more for long runs) to ensure ample support. I generally avoid going more than 48 in. without adding a vertical support; for this project, a single center divider was sufficient. In the case of a corner unit such as this one, you also need to decide which carcase is going to run long into the corner. I usually run the shorter of the two benches into the corner.

In order to maintain the illusion of a true furniture leg, I set a ­recessed base assembly 6 in. from the front face. That’s far enough back so that you can’t see it, but shallow enough so that you can reach dust bunnies and runaway Cheerios. The base assembly is made from 3⁄4-in. plywood but is later skinned over with 1⁄4-in. MDF, so it provides a good opportunity to use scrap that has accum­ulated in the shop.

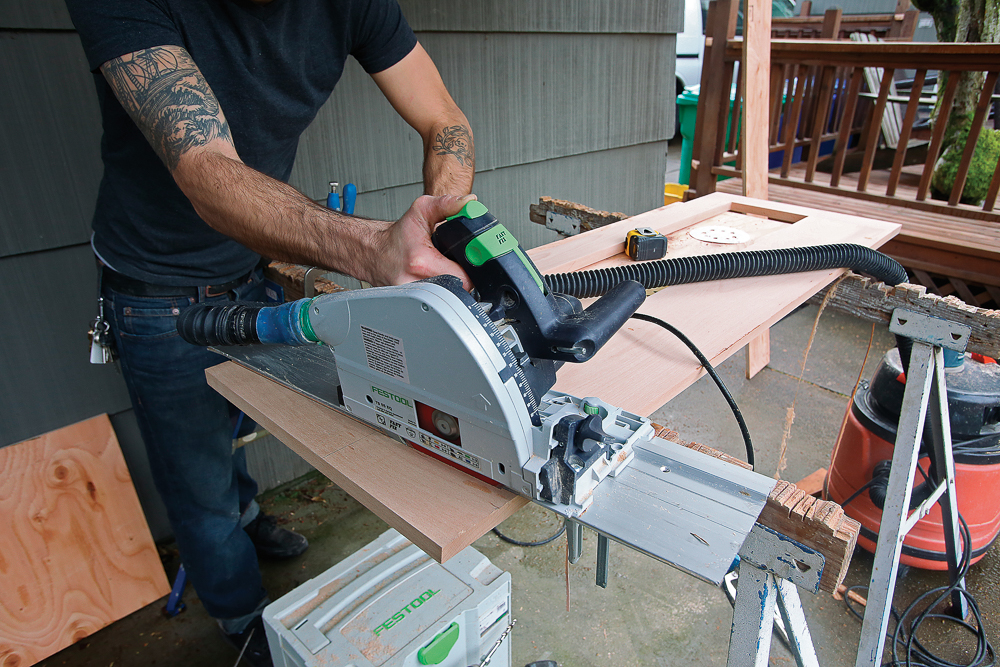
I build all of the bench-frame components with paint-grade European beech, which isn’t quite as soft as poplar but is easier to work than maple. Frames are assembled with pocket screws and are built a little oversize to allow for scribing and unknown site conditions. The same goes for the furniture legs; I cut the decorative curves in the shop but let the ends run long, leaving me wiggle room once I get to the site.

The frame-and-panel treatment on the front of the carcases includes a rabbet for the plywood panel, which goes up against the storage carcase and can therefore be glued and pinned to the frame rather than acting as a true floating panel.

To ensure purposeful reveals and proportions, I factor in the width of any moldings I plan to apply to the boxes once installed. For corner units, I need to consider which side of the front frame and furniture feet will overlap the other at the inside corner. I’ve learned that if I don’t address these matters during the design and shop-fabrication stages, those oversights will haunt me when I’m on-site.

At the job site

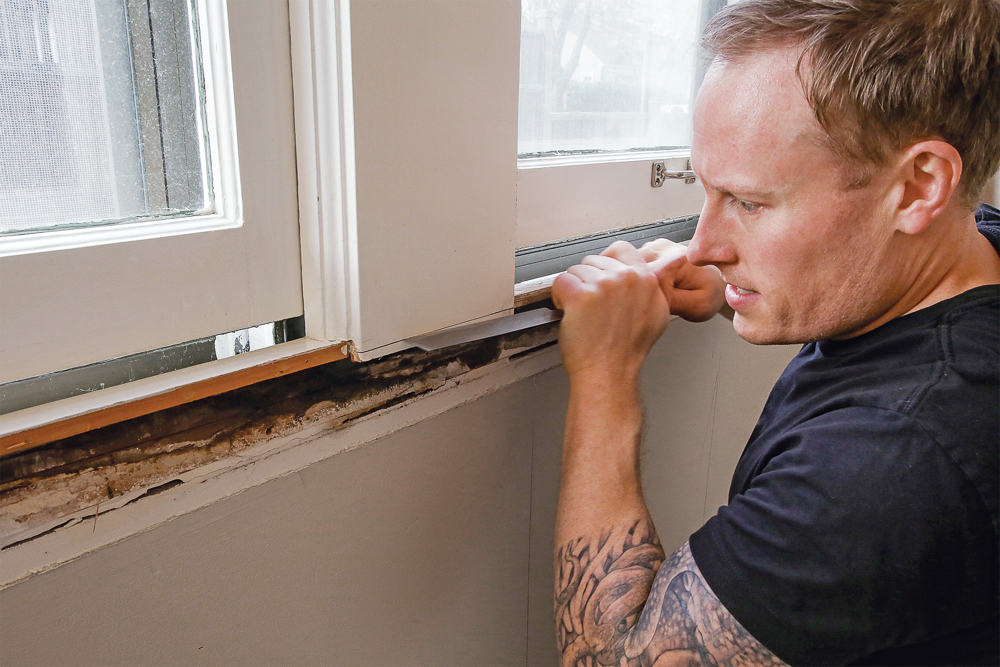
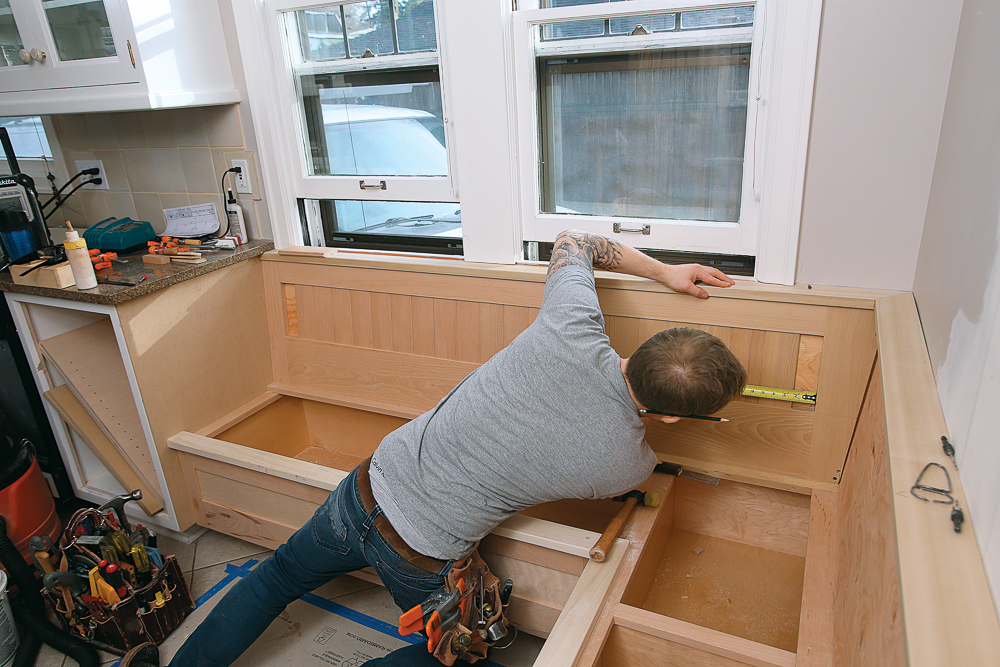
Once I’m on-site, my first step is to remove millwork and other obstacles, such as electrical devices, which are never OK to leave energized if they are to be buried behind a permanent piece of furniture. Next, I mark all the studs in the area by drawing vertical lines on the wall; this reduces the need to hunt them out one at a time later in the process. A little time on the front end saves me a lot in the long run.

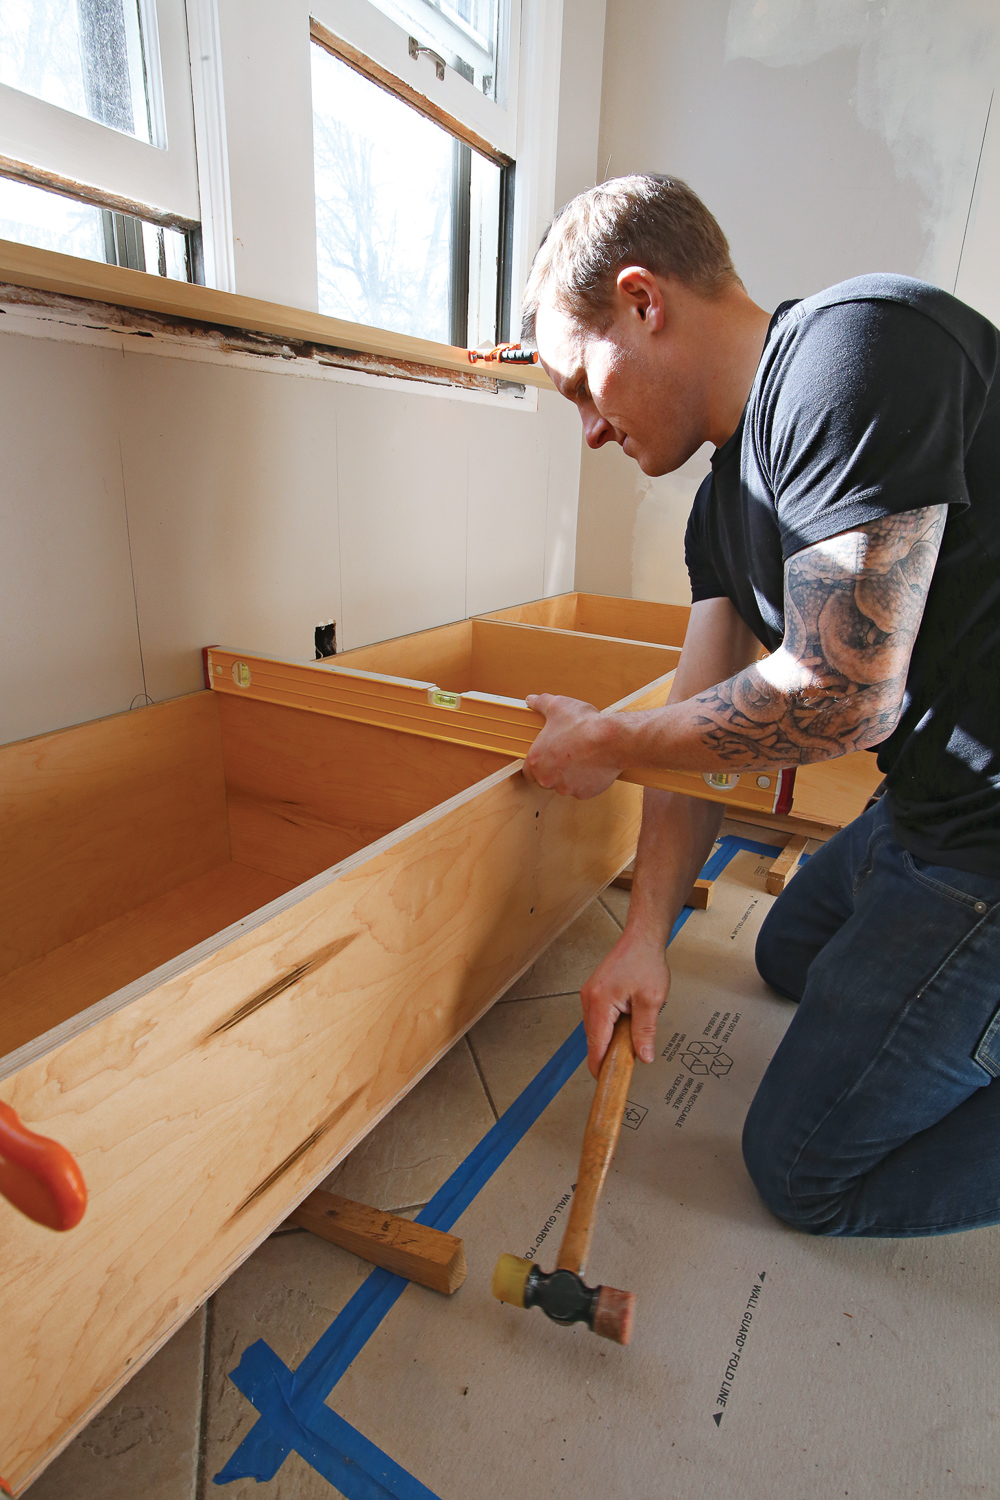
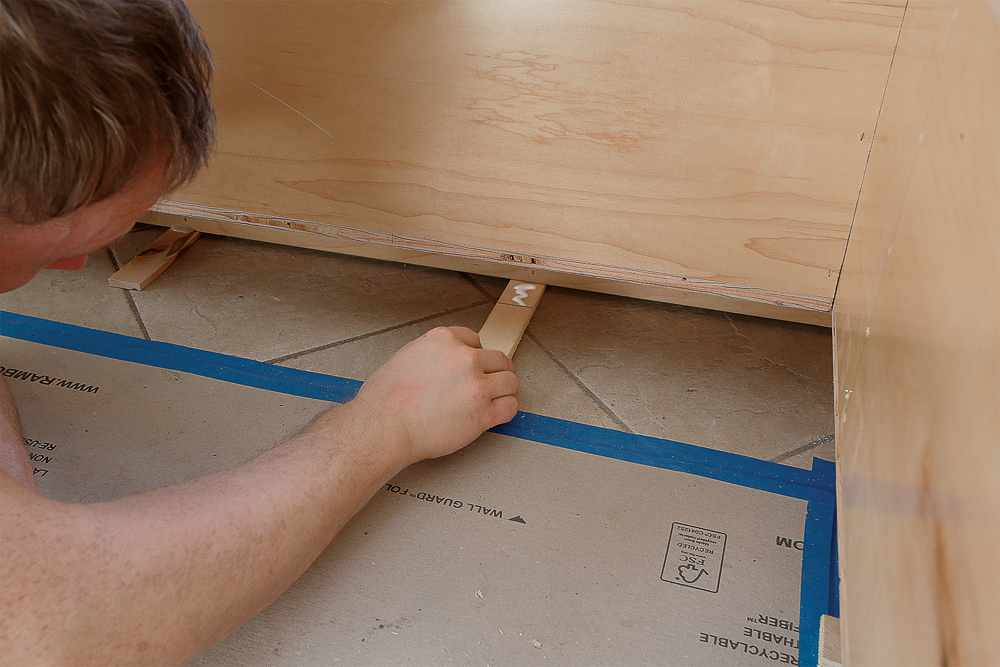
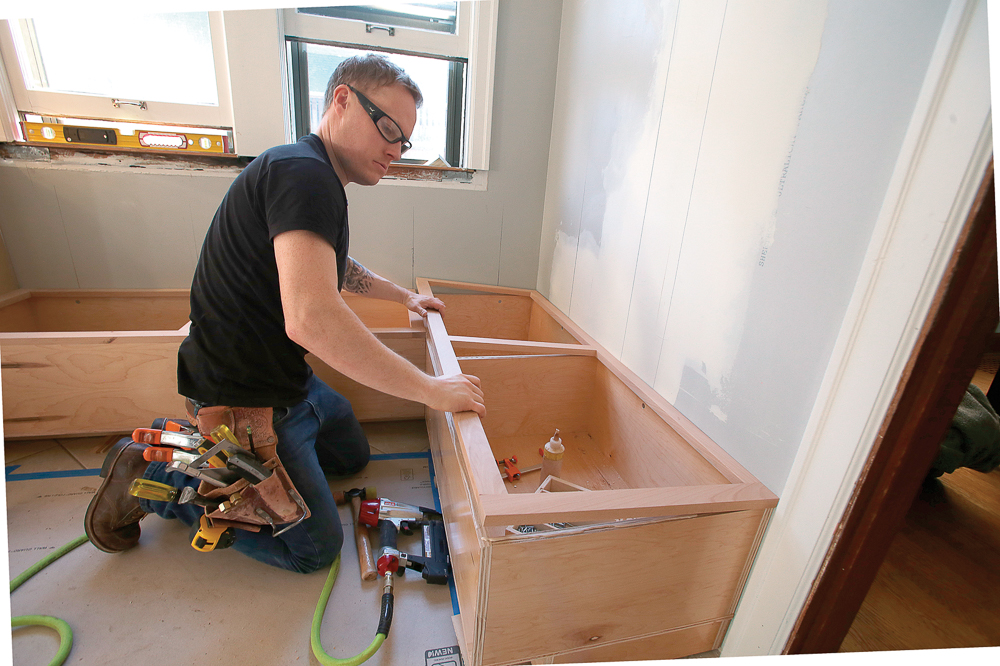
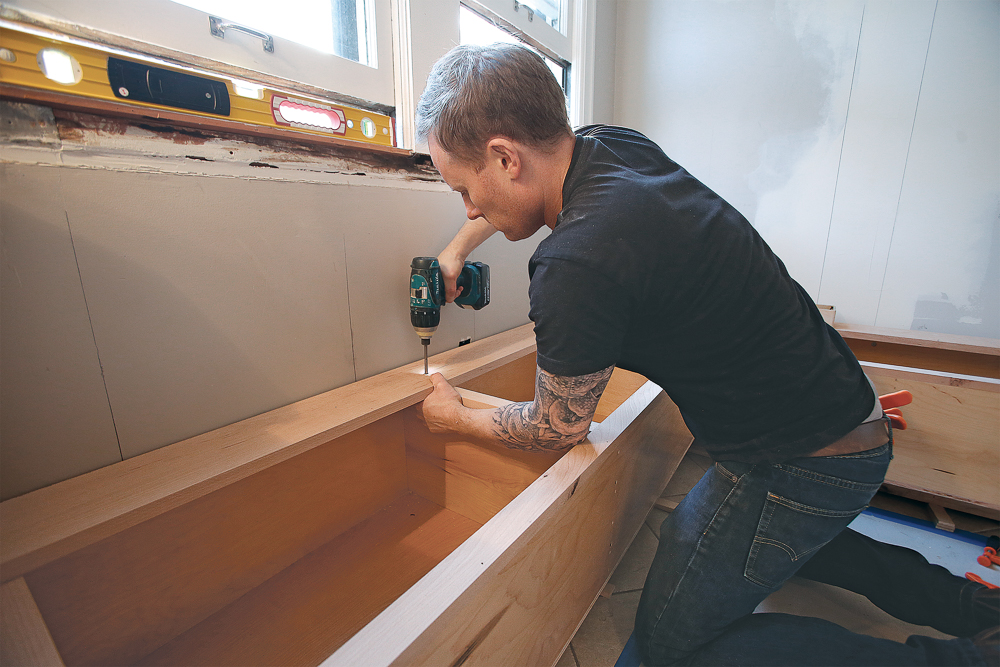
I start the actual installation with the storage carcases, which are assembled in the shop with the recessed bases attached. Since all components are built off these boxes, it’s imperative that they be installed dead level, plumb, and square to each other (in the case of a corner installation).

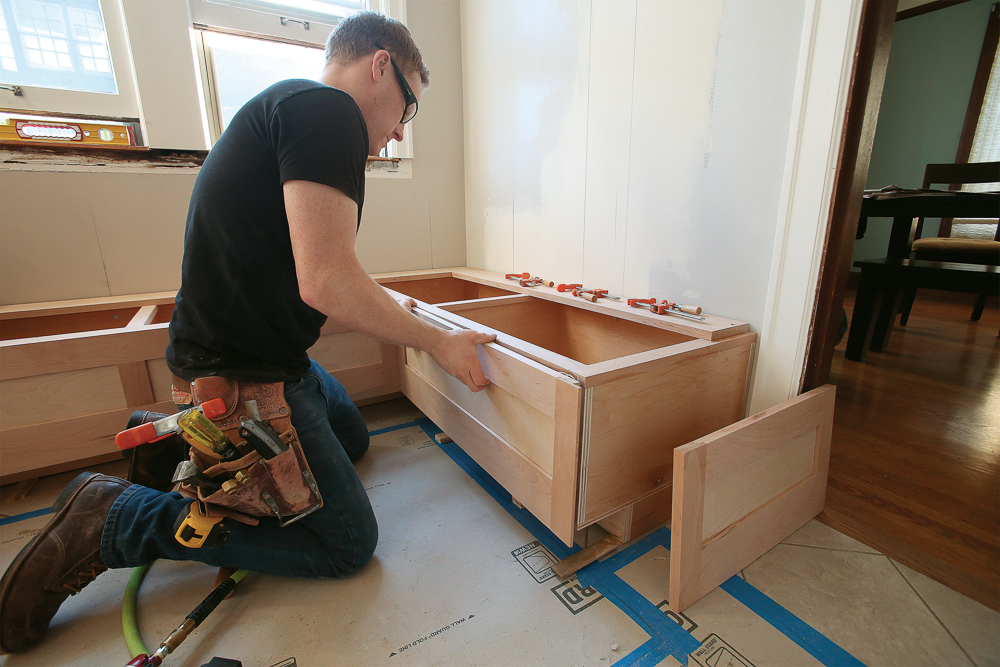
With the carcases in place, I add the solid-wood frame components—first the frame that will support the lids, and then the frames and panels that dress up the front and sides.

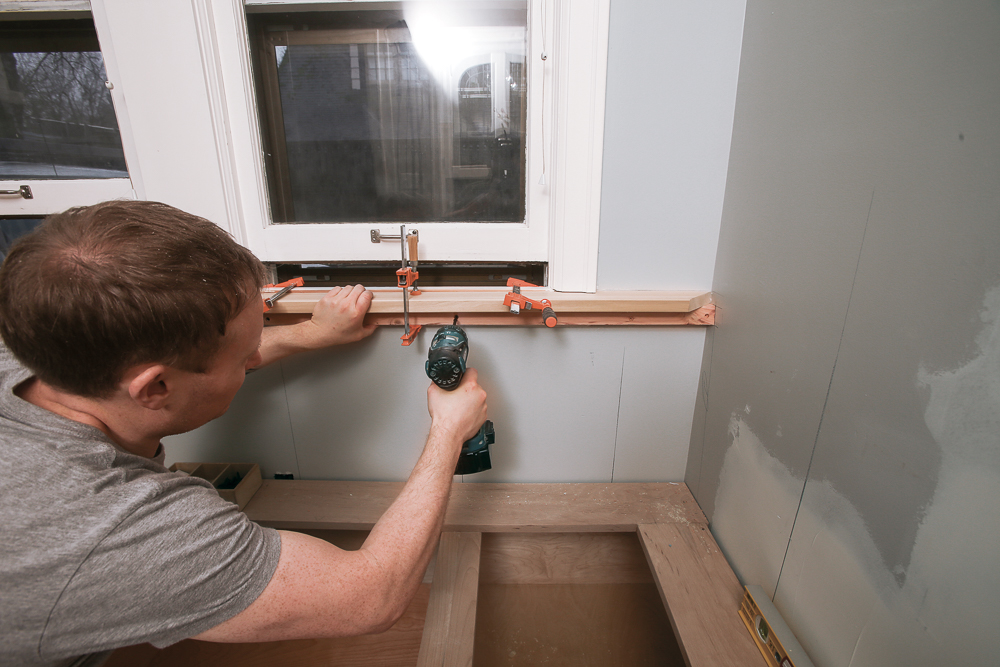
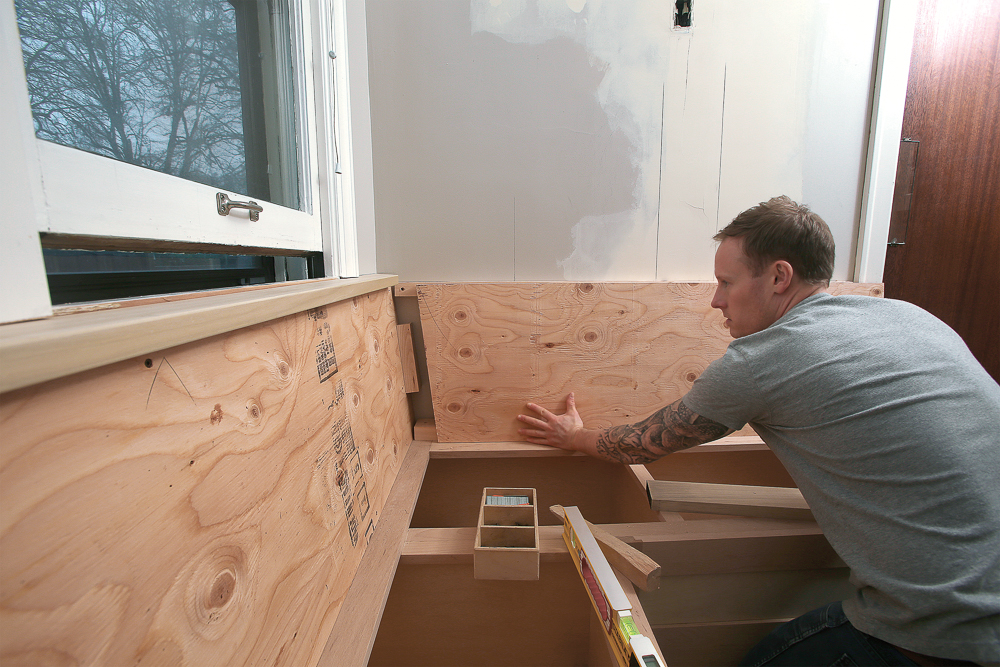
The 7° back assembly is supported by a pair of angled nailers cut from quality, kiln-dried 2x stock. The upper nailer is attached to the wall just below the sill, and the lower nailer is fastened to a lid cleat that’s on top of the carcases below. Spanning the nailers is 3⁄4-in. CDX plywood, which creates a stiff subbase for ­another pocket-screw frame that is then ­infilled with solid-wood tongue-and-groove paneling for a traditional look.

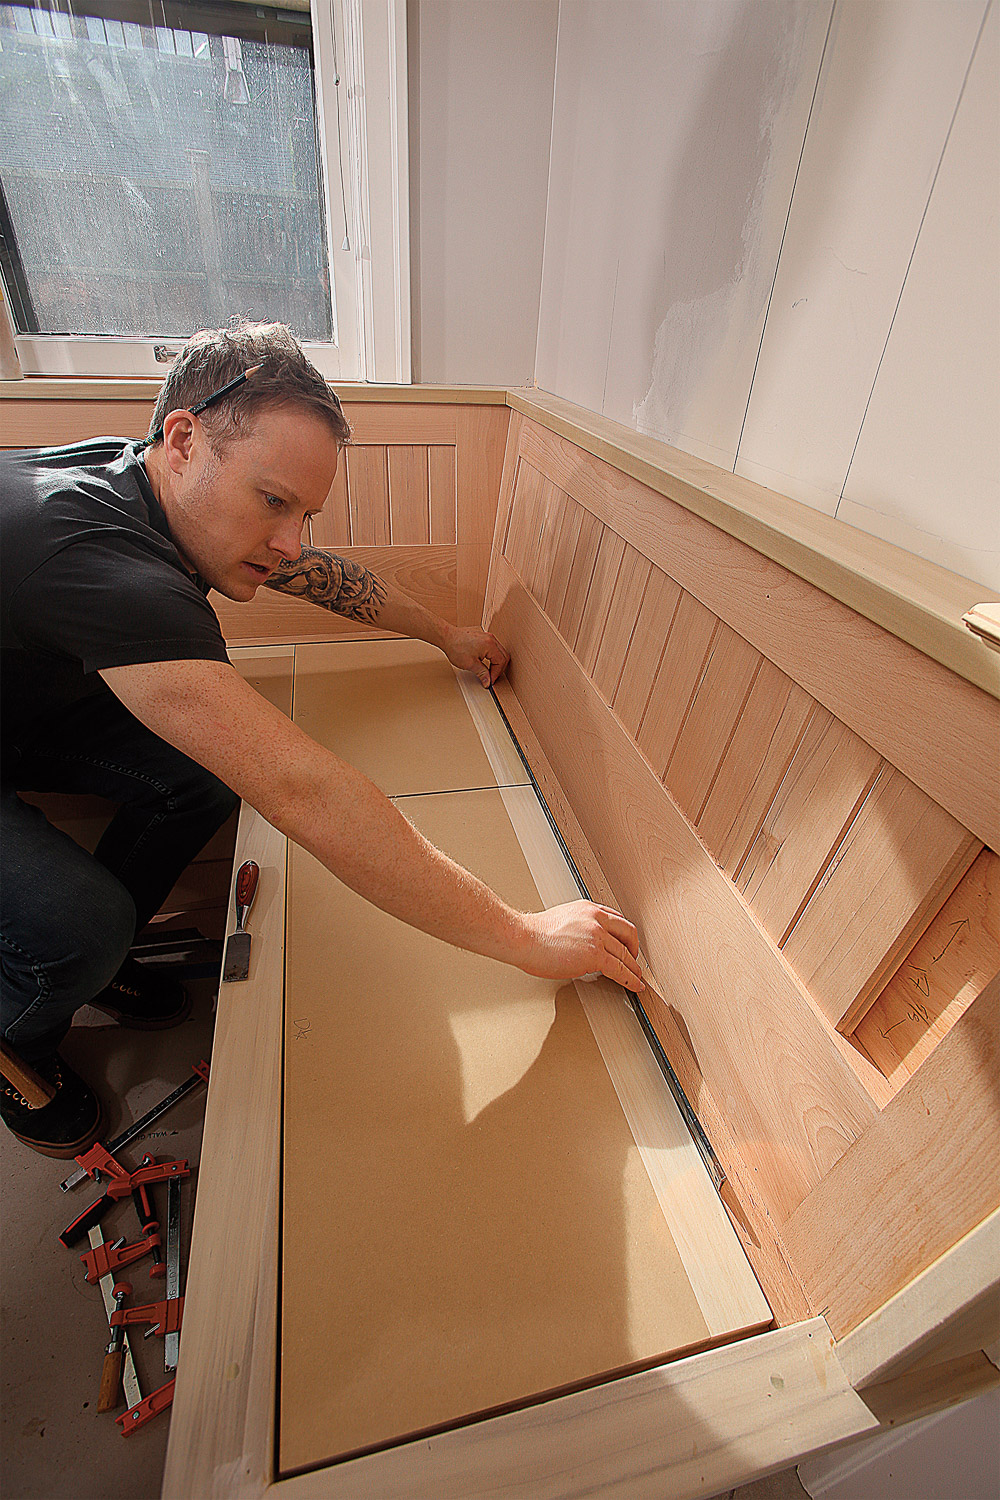
On the inside corner of the seatback, both stiles are cut at a 7° angle, with one piece lapping the other. I configure the seat-back frames so that they show 3 in. of stile at the narrowest point. The easiest approach to conquering this tricky layout is to draw a plumb line on the face of the plywood where you want the inside rail to stop and the paneling to begin (drawing above).

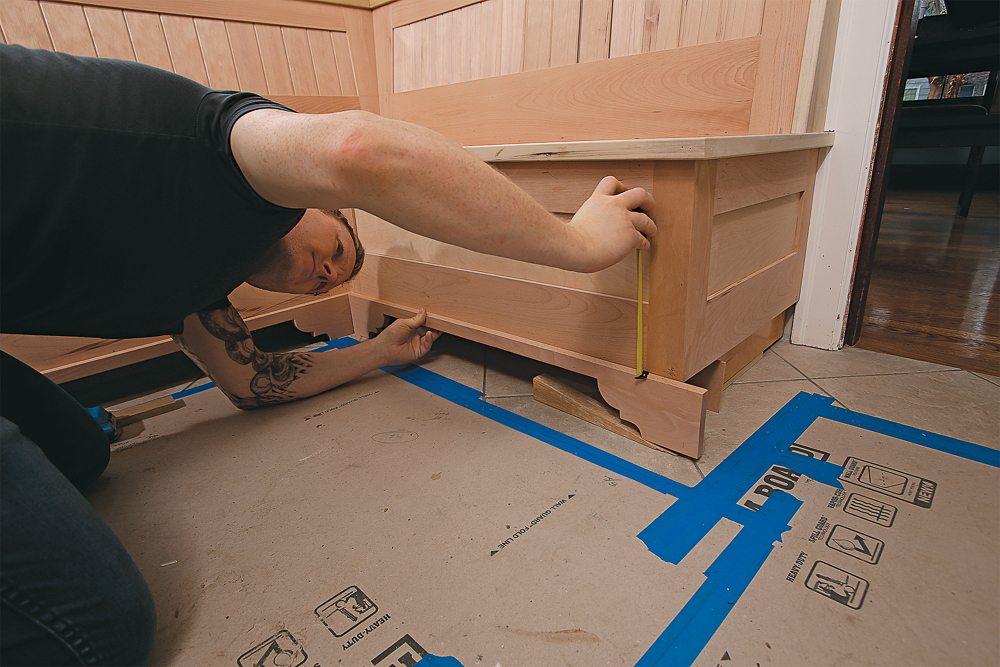
The edge cap on the bench should be 5/4 (nominal 1 in.) stock to match the backrest cap, and I like it to overhang the lower panel by 1 in. or so. This piece tends to see a lot of stress, so I like to glue, screw, and plug it.

Finally, I fabricate lids for the storage areas that also support the upholstered cushions. I use MDF with a biscuited and screwed solid-wood edge, which offers a stronger base for the piano-hinge screws than MDF alone. A simple finger hole through the top of each lid eliminates the need for hardware, and I rout all edges with an 1⁄8-in. radius bit to give them a nice feel.

The lids are best left loose until after the whole bench has been painted, which allows the painters access without having to work around the piano hinges.

Boxes create a foundation

As with any cabinet installation, time spent getting the assembled plywood carcases level, flush along their top edges, and square to each other at the corner pays dividends when installing the components that come afterward.

strike a level line across window casing
Make way for the cap. If tying the bench seat into a windowsill, strike a level line across the window casing. Cut along the line with a handsaw or multitool, and remove the molding.
getting carcases into position before shims are added.
Wedges before shims. Reusable oak wedges are larger and steeper than typical shims, making them ideal for quickly and temporarily getting carcases into position before shims are added.
removing shims and coating with glue.
Help shims stay put. Stack shims to fit, then remove and coat with glue. Reinsert the stacks, let the glue dry, and trim the stacks flush.
set top frames in glue
Flush it up. Set the top frames in glue, and align all outside edges flush to the face of the carcases before fastening with finish nails.
trim each front panel to length, and fasten to the carcase face with finish nails
Skin the boxes. Trim each front panel to length, and fasten it to the carcase face with finish nails.
1x6 supports backrest assembly and lid hinges.
Lid cleat does heavy lifting. This 1×6, referenced off the front edge of the carcase, supports the backrest assembly and the lid hinges.

Angled back support

I like to align the bench back with the windowsill, which usually means removing part of the existing casing and making a new, deeper stool.

screwing nailer to the wall at each stud location
Window locates the top nailer. Clamp the backrest cap in place to set the height of the angled top nailer, then screw the nailer to the wall at each stud location.
adjust the bottom nailer in or out at each screw location
Accurate angles. Adjust the bottom nailer in or out at each screw location until a digital level reads 83°­—a perfect 7° slope—before fastening the nailer to the lid cleat below.
Fastening CDX plywood with top and bottom bevels
Beveled backrest. To create a sturdy backrest subbase, fasten 3⁄4-in. CDX plywood with top and bottom bevels to the upper and lower nailers.
Cut the seat-back frame along the 7° line, adding a slight back bevel to ensure a tight fit along the show side of the joint.
Seven on a bevel. Cut the seat-back frame along the 7° line, adding a slight back bevel to ensure a tight fit along the show side of the joint.

The trick for a tapered stile

tricks for a tapered stile

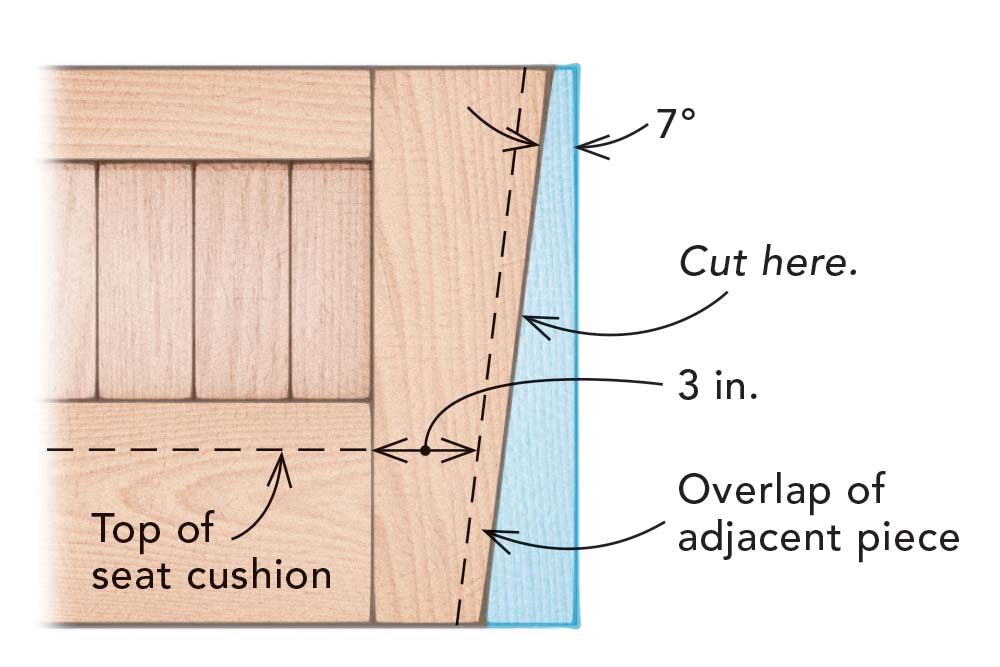
For the backrest panel frame, start with an extrawide stile on one end to allow for the tapered cut necessary to meet the adjacent piece in the corner. I prefer to see 3 in. of stile at the narrowest visible point, which matches the width of the straight-cut stiles. To get an accurate measurement for this tricky spot, do your layout and take your measurements on the plywood.

Finishing touches

To dress up the benches and enhance their built-in, furniture-type look, I apply tongue-and-groove paneling to the backs, traditional furniture-style legs to the lower boxes, and simple detail moldings to ease some of the transitions between pieces. After I fabricate the lids, the piece is ready for paint.

Shim up  and scab onto the bracket feet as necessary to keep an even reveal on  an out-of-level floor.
The base follows the box. Shim up and scab onto the bracket feet as necessary to keep an even reveal on an out-of-level floor.
Cut each piece of paneling with a 2° bevel at top and bottom to ensure a tight fit between rails, then dry-fit them and adjust the whole row of pieces until the gaps at the ends are equal.
Tongue-and-groove symmetry. Cut each piece of paneling with a 2° bevel at top and bottom to ensure a tight fit between rails, then dry-fit them and adjust the whole row of pieces until the gaps at the ends are equal. With the end pieces cut to width, fasten each board with pin nails.
Set the lids in their openings with the piano hinge slid into place at the rear, then check and adjust the gap at the sides and front.
The hinge sets the gap. After coming close to the final lid dimensions, set the lids in their openings with the piano hinge slid into place at the rear, then check and adjust the gap at the sides and front.
Once painted and fitted with cushions, the finished bench looks right at home, adding hidden storage, flexible seating, and increased flow to a busy kitchen.
A perfect fit. Once painted and fitted with cushions, the finished bench looks right at home, adding hidden storage, flexible seating, and increased flow to a busy kitchen.

Photos by Justin Fink and Nina Johnson. Drawings by Christopher Mills.


Related stories:

  • A Built-In Corner Seating Nook
  • Comfortable Dining Nooks
  • A Curvy Booth Improves a Kitchen

From Fine Homebuilding #262

For more photos, drawings, and details, click the View PDF button below:

Sign up for eletters today and get the latest how-to from Fine Homebuilding, plus special offers.

Signing you up...

This site is protected by reCAPTCHA and the Google Privacy Policy and Terms of Service apply.
See all newsletters
See all newsletters
View PDF
Previous: Build a Simple Jig to Drill Cabinet-Handle Holes Perfectly Next: Built-In Banquettes for a Kitchen or Dining Room

Guide

Kitchens

Chapter

Cabinets, Built-Ins, & Pantries

Log in or create an account to post a comment.

Sign up Log in

Become a member and get full access to FineHomebuilding.com

Kitchens

Kitchens

A complete resource for designing, building, or remodeling the kitchen of your dreams

View Project Guide

View All Project Guides »

Become a member and get unlimited site access, including the Kitchens Project Guide.

Start Free Trial

Kitchen Planning & Design
Featured Kitchen Projects
  • Kitchen Remodels
Cabinets, Built-Ins, & Pantries
  • Choosing Kitchen Cabinets
  • Installing Kitchen Cabinets
  • Cabinet Hardware
  • Breakfast Nooks
  • Pantries
Kitchen Islands
Countertops & Flooring
  • Countertops 101
  • Concrete Countertops
  • Kitchen Flooring
Appliances, Fixtures, & Lighting
  • Appliances
  • Range Hoods
  • Sinks & Faucets
  • Kitchen Lighting

Fine Home Building

Newsletter Sign-up

  • Fine Homebuilding

    Home building tips, offers, and expert advice in your inbox.

  • Green Building Advisor

    Building science and energy efficiency advice, plus special offers, in your inbox.

  • Old House Journal

    Repair, renovation, and restoration tips, plus special offers, in your inbox.

Signing you up...

This site is protected by reCAPTCHA and the Google Privacy Policy and Terms of Service apply.
See all newsletters

Follow

  • Fine Homebuilding

    Dig into cutting-edge approaches and decades of proven solutions with total access to our experts and tradespeople.

    Start Free Trial Now
    • Facebook
    • Instagram
    • X
    • LinkedIn
  • GBA Prime

    Get instant access to the latest developments in green building, research, and reports from the field.

    Start Free Trial Now
    • Facebook
    • YouTube
  • Old House Journal

    Learn how to restore, repair, update, and decorate your home.

    Subscribe Now
    • Facebook
    • Instagram
    • X

Membership & Magazine

  • Online Archive
  • Start Free Trial
  • Magazine Subscription
  • Magazine Renewal
  • Gift a Subscription
  • Customer Support
  • Privacy Preferences
  • About
  • Contact
  • Advertise
  • Careers
  • Terms of Use
  • Site Map
  • Do not sell or share my information
  • Privacy Policy
  • Accessibility
  • California Privacy Rights

© 2025 Active Interest Media. All rights reserved.

Fine Homebuilding receives a commission for items purchased through links on this site, including Amazon Associates and other affiliate advertising programs.

X
X
This is a dialog window which overlays the main content of the page. The modal window is a 'site map' of the most critical areas of the site. Pressing the Escape (ESC) button will close the modal and bring you back to where you were on the page.

Main Menu

  • How-To
  • Design
  • Tools & Materials
  • Video
  • Blogs
  • Forum
  • Project Guides
  • Reader Projects
  • Magazine
  • Members
  • FHB House

Podcasts

  • FHB Podcast
  • ProTalk

Webinars

  • Upcoming and On-Demand

Podcasts

  • FHB Podcast
  • ProTalk

Webinars

  • Upcoming and On-Demand

Popular Topics

  • Kitchens
  • Business
  • Bedrooms
  • Roofs
  • Architecture and Design
  • Green Building
  • Decks
  • Framing
  • Safety
  • Remodeling
  • Bathrooms
  • Windows
  • Tilework
  • Ceilings
  • HVAC

Magazine

  • Current Issue
  • Past Issues
  • Magazine Index
  • Subscribe
  • Online Archive
  • Author Guidelines

All Access

  • Member Home
  • Start Free Trial
  • Gift Membership

Online Learning

  • Courses
  • Project Guides
  • Reader Projects
  • Podcast

More

  • FHB Ambassadors
  • FHB House
  • Customer Support

Account

  • Log In
  • Join

Newsletter

Get home building tips, offers, and expert advice in your inbox

Signing you up...

This site is protected by reCAPTCHA and the Google Privacy Policy and Terms of Service apply.
See all newsletters
See all newsletters

Follow

  • X
  • YouTube
  • instagram
  • facebook
  • pinterest
  • Tiktok

Join All Access

Become a member and get instant access to thousands of videos, how-tos, tool reviews, and design features.

Start Your Free Trial

Subscribe

FHB Magazine

Start your subscription today and save up to 70%

Subscribe

We hope you’ve enjoyed your free articles. To keep reading, become a member today.

Get complete site access to expert advice, how-to videos, Code Check, and more, plus the print magazine.

Start your FREE trial

Already a member? Log in