
Hip-Roof Framing Made Easier
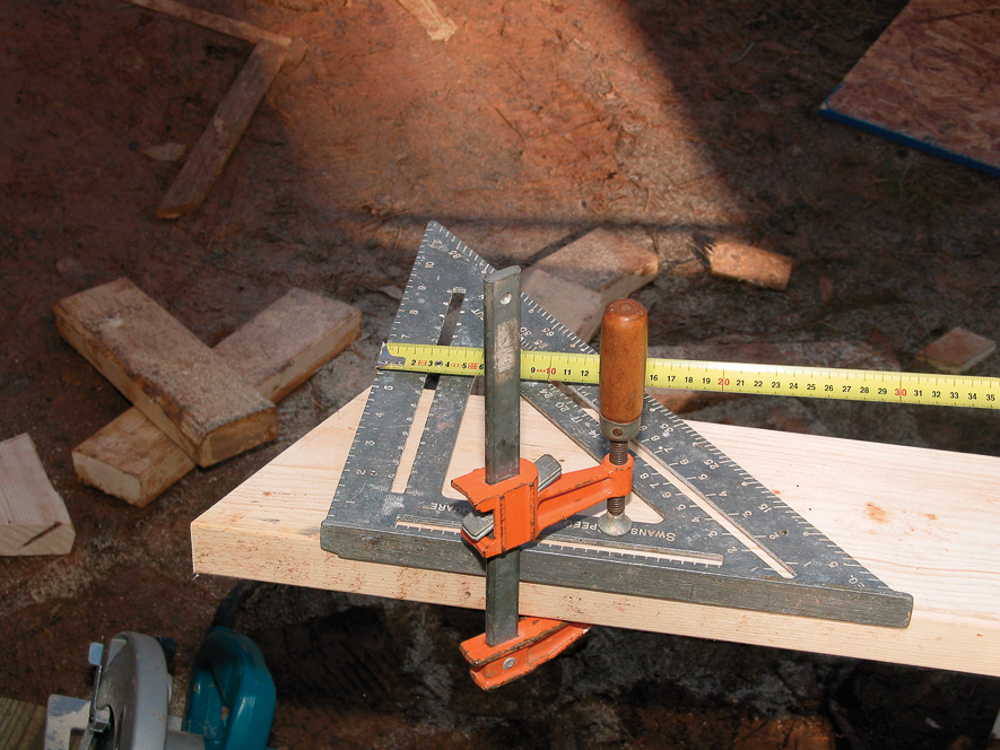
Measure from the rafter's bottom edge for exact layout.
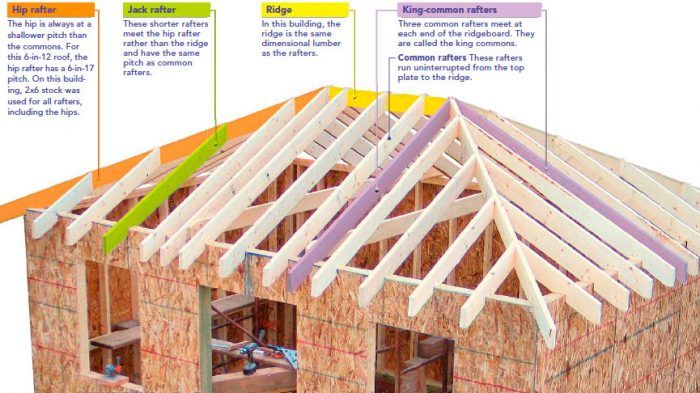
Synopsis: North Carolina builder John Carroll dissects the process of building a hip roof and discusses his technique for rethinking this complicated piece of construction. Using the roof of a small outbuilding as an example, Carroll first locates the six king common rafters, then uses a table of rafter multipliers to determine the common-rafter lengths. He then determines the run and length of the hip rafters and jack rafters. Full-color illustrations accompany the article, highlighting Carroll’s hip-roof process.
Framing a hip roof is a head-scratcher for most carpenters, but it doesn’t have to be. The process became a whole lot easier for me when I realized that the primary challenge in building a hip roof is one of layout, not math. And the key to layout is to know exactly where to begin and end measurements.
In my approach, all the measurements are along the bottom edge of the rafter, short point to short point. This is not the way I learned how to do it, but once I started thinking about the bottom plane of the rafters instead of the top (or instead of some theoretical middle line), everything fell into place. Because I measure and mark along the bottom of the rafters, where I measure to is where I cut from; and because there are fewer steps, there are fewer chances for mistakes.
Another advantage of my approach is that I don’t have to deal with dropping the hip because I use the same dimensional lumber for all the rafters and I align the bottom edges. On this roof, I used 2×6 lumber for the hips, jacks, and commons. This left the tops of the jacks ¼ in. above the hip, which allows the sheathing to clear the hip and allows air to flow over the hip and up to the ridge vent. If I had wanted to have both the bottom and top edges in plane, I could have ripped down a 2×8 to a width of 5-¾ in.
I also don’t have to make adjustments for measuring from the center of the board because I take all my measurements from the edge of the board.
The other thing I do that’s a little different is that I put down my English measuring tape when I finish framing the walls and pick up a metric tape to frame the roof. In my approach, the metric system is easier to use when math is involved because there are no fractions to deal with. The math itself is simple to calculate because every rafter position and measurement can be explained with right triangles and dimensions that are based on the Pythagorean theorem.
Before I consider any of this, though, the first thing I do on a new job site is get acquainted with the details and visualize how the parts fit together. The project shown here is a simple storage shed. Because the roof is small and all the framing is 2×6 dimensional lumber, I don’t have to make adjustments for a larger ridge beam or hip rafters.
Two tools make the job easier
First, I make a story stick out of a 2-in.-wide rip of plywood. I lay it on the top plate of the end wall and mark out the common-rafter run, the wall thickness (for the seat cut), and the eave overhang. The beauty of the story stick is that I can have all the initial measurements I need to frame the roof in one place. Then I can take the story stick down to the cut station and use it to make all the cuts without having to waste time running back and forth.
The second tool is a table of multipliers that give the ratio of hypotenuse to run for given roof pitches (sidebar above). One column is for common rafters, and one is for hip rafters. In other words, the table serves as my cheat sheet for figuring rafter lengths. The multiplier times the run is the rafter length. I write this table in my job-site notebook, but you also can find these values in any good roof-framing book.
If you’re on a roof that falls in between two values on the table, say, a 6 1⁄2-in-12 roof pitch, you can resort to the equation a2+b2=c2.
Tip: If math is really not your thing, try thinking of the equation in plain language; i.e., the run times itself plus the rise times itself is the rafter length squared.
Look at the roof in plan view
Laying out hip rafters is one of those situations where a 3-D image is not as clear as a two-dimensional drawing. If you look at the roof from a plan view, you can see that the hip-rafter run is the hypotenuse of a simple 90° triangle with equal sides.
Use a Speed Square to lay out both sides of the hip rafter on the plate. Establish point A where the layout line meets the inside edge of the top plate. Measure from point A to the layout of the nearest king-common rafter. Use this measurement to calculate first the run and then the length of the hip rafter.
Once you’ve got the hip rafter’s length, go back to thinking in 3-D. The rafter length just calculated represents a line along the bottom edge of the board from the short point of the double-bevel cut to the short point of the seat cut. For this roof, I worked through the seat cut and the tail in the same way as the common rafters except that instead of extending the seat cut far enough to clear the top plate, I notched the corner of the double top plate to get a clean fit and to strengthen the hip rafter’s tail.
Jack rafters have the common-rafter pitch
To keep the layout simple and 16 in. on center, I retain the layout from the sidewalls and use the story stick to create a mirror image on the end walls. This method will add some redundancy, but the important thing is to have each pair of jack rafters meeting at the same spot on the hip rafter.
A plan view shows that the distance from the short point of the hip rafter’s seat cut (point A) to the jack-rafter layout mark is also the run of the jack rafter to the short point of the bevel cut.
Use the common-rafter multiplier to calculate the lengths of the jack rafters, and lay out the seat cuts and tails exactly the same way as you figured out the common rafters. The plumb cut then is made with your saw set at a 45° bevel, creating the jack rafter’s bevel cut.
Locate the six king-common rafters
Finding the run of the common rafters allows you to locate the six king commons and establishes the length of the ridge. When viewed in plan, two king-common rafters and two exterior walls define a square at each corner of the building. Ultimately, a hip rafter will bisect each square diagonally, creating two right triangles.
Use a story stick rather than a tape to minimize errors
- On the end-wall top plate, mark the centerline. Then measure back half the thickness of the ridge (in this case, 3⁄4 in.), and mark the first king-common-rafter layout line.
- Align the end of the story stick with the king-common layout line you just made. At the other end of the story stick, mark the inside of the sidewall. This is the common-rafter run. Also mark the outside of the wall and the eave overhang. You’ll use this later to figure the tail length.
- Flip the story stick over onto the sidewall, and mark the rafter run from the inside corner of the top plate. This is the second king-common layout line.
- Repeat these steps in the three remaining corners. This will locate the end of the ridge and the king-common rafters.
Use a multiplier to find the common-rafter length
There are many ways to find a rafter length, but basically, you need to take the rafter run and convert it to the rafter length. You can use the Pythagorean theorem, or you can use the shortcut in the multiplier table. To use the multiplier, you need to know the run and the roof pitch.

- Measure the common-rafter run on your story stick. Find the multiplier on the table below that corresponds to the roof pitch. Multiply the run times the multiplier to get the rafter length.
- Measure the rafter length along the bottom edge of the rafter. In my approach, the rafter length is the distance from the short point of the ridge cut to the short point of the seat cut.
Figure hip-rafter run, then length
The hip rafter is a little different from a common rafter: It has a shallower pitch, a double-bevel ridge cut, a longer run, and typically a longer seat cut. Find the run first, then use the hip-rafter multiplier to get the rafter length and the tail length.
- Mark the hip-rafter layout on the top plate. Establish point A where the hip-rafter layout line intersects the inside of the top plate. Measure back to the nearest king common (this is the layout line you already made with the story stick). Multiply this distance by the square root of 2 (1.414) to get the hip-rafter run.
- Multiply the hip-rafter run times the multiplier to get the hip-rafter length.
- To lay out the hip-rafter tail, multiply the common-rafter tail run you already calculated times the square root of 2 (1.414). Then use the multiplier to get the hip-rafter tail length, measured from the short point of the seat cut to the short point of the double-bevel tail cut.
Find the jack-rafter run, then get the length with the common-rafter multiplier
- Lay out the jack rafters on the top plate. I like to stack them over the studs of the sidewall, then transfer that same layout to the end wall with my story stick. Find the jack-rafter runby measuring from point A to the jack-rafter layout mark. This measurement is equal to the run of the jack rafter.
- Multiply the jack-rafter run by the common-rafter multiplier to get the jack-rafter length (the short point of the bevel to the short point of the seat cut). Cut the tail exactly like the common-rafter tails.
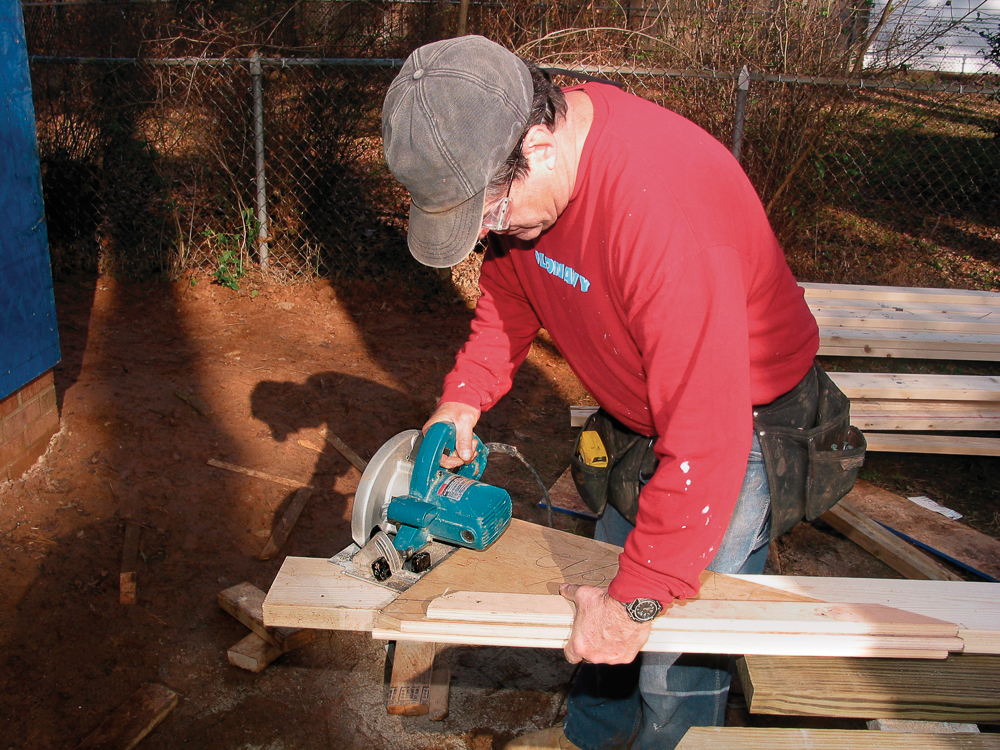
Use a jig to mark and cut the rafters
Once you’ve taken all the measurements and written them on the story stick, you’re ready to cut common rafters, hip
rafters, and jack rafters. Make this layout jig and cutting guide from a piece of plywood that has a square factory corner. For the common-rafter jig, just double the roof pitch in inches. For a 6-in-12 roof, mark 12 in. on one side for the rise and 24 in. on
the other edge for the run. Connect the marks to complete the triangle. After cutting the plywood, affix a 1×2 fence to the long side. When you finish the jig, write the multiplier on it in red. For the hip-rafter jig, the rise is 6 in., but the run is 17 in. Instead of doubling the rise and run for the hip-rafter jig, multiply them by 1.5, which makes the jig easier to handle.
Metric vs. English system
Lumber is sized and sold based on the English system, so it makes sense to build with an English tape measure—most of the time. However, when I’m doing a framing project that involves complicated math, I like to use the metric system because it’s easier to add, subtract, and multiply. When I first started using a metric tape measure, I thought there would be an adjustment period. But there wasn’t: Most of us are used to looking at units divided into 10 equal increments, like the degree scale on a miter saw. Metric tapes are sold at most hardware stores or online.
Photos by John Carroll, Krysta S. Doerfler, and Bill Phillips; drawings by Toby Welles
RELATED LINKS
Fine Homebuilding Recommended Products
Fine Homebuilding receives a commission for items purchased through links on this site, including Amazon Associates and other affiliate advertising programs.
Flashing Boot Repair
Portable Wall Jack

Guardian Fall Protection Pee Vee
