FHB Logo Facebook LinkedIn Email Pinterest Twitter X Instagram Tiktok YouTube Plus Icon Close Icon Navigation Search Icon Navigation Search Icon Arrow Down Icon Video Guide Icon Article Guide Icon Modal Close Icon Guide Search Icon Skip to content
Subscribe
Log In
  • How-To
  • Design
  • Tools & Materials
  • Restoration
  • Videos
  • Blogs
  • Forum
  • Magazine
  • Members
  • FHB House
  • Podcast
Log In

Fine Homebuilding Project Guides

Kitchens

Guide Home
  • Kitchen Planning & Design
  • Featured Kitchen Projects
  • Cabinets, Built-Ins, & Pantries
  • Kitchen Islands
  • Countertops & Flooring
  • Appliances, Fixtures, & Lighting
How-To

Custom Built-in Cabinets Made Easy

A standardized approach, quick-to-install hardware, and a simplified design make building custom casework cost-effective.

By Tim Snyder Issue 310 - October 2022
Featured in Old House Journal

Synopsis: There are some things that factory-made cabinetry cannot provide, and creating a customized solution might be an option that best fits your client’s needs. Coming up with a solid plan and equipping yourself with the right tools and hardware are a few ways that woodworker Tim Snyder creates and installs custom paint-grade built-ins.


Making and installing paint-grade built-ins is a specialty I developed to help clients who can’t get what they need from factory-made cabinetry. My built-in repertoire has come to include bookshelves, cabinets, seats, closet organizers, and desks. Although every project is unique, the goal is always the same: to create a customized solution that makes better use of the space than stock cabinetry. To keep my work somewhat affordable, I developed a process that makes building and installing built-in cabinetry as efficient as possible without sacrificing the look of the finished product.

Part of my efficiency gains have come from learning to maximize my time in the shop and minimize my time in a client’s house, which is always a good thing. I don’t need to offload a bunch of tools and set up a major workspace in someone’s garage. Just as importantly, I can work where noise, sawdust, and occasional profanity won’t cause problems.

Tool up to make the job easier

If you’re set up to do trim carpentry, then you already have most of the tools required for built-in projects. I rely on a track saw for cutting panels to size and for ripping straight, square reference edges on the poplar boards that I use to make face frames. The track saw also comes in handy for fine-tuning the fit of the inset doors I install on many cabinetry projects. To drill pin holes for adjustable shelving, I use a jig made by Milescraft; similar jigs are available from Rockler and Woodcraft.

I used to rely on pocket-screw joinery to assemble face frames, and I still use pocket screws on occasion. But today I wouldn’t want to tackle a cabinetry project without my Festool Domino DF 500 mortiser. You could certainly argue that buying an expensive tool to make basic cabinets doesn’t make sense, but hear me out. Festool’s floating tenon joinery system is stronger, faster, and easier than pocket joinery, and it has some very useful flexibility. A variety of tenon sizes enable you to accommodate different stock dimensions. What’s more, by milling a mortise slightly wider than the tenon, you gain a small amount of wiggle room to get joints perfectly aligned during glue-up. Of course, the Domino’s utility extends beyond face frames, into door construction and other woodworking applications. It’s been a game-­changing tool in my shop; read more about it on p. 28.

To build paint-grade cabinets, I use hardwood plywood and 3⁄4-in.-thick poplar for face frames and trim. Quality of material varies greatly. That’s why I include a couple of hours for material selection in every estimate.

Start with a site inspection

To the site I bring a tape rule, a laser measuring tool, and my phone to take pictures—often with my tape in the photo. I bring graph paper for sketches and notes. It’s critical to not just measure, but to also take stock of the angles and surfaces where the built-ins will be installed. When irregularities in flat, level, square, and plumb are minor (less than 1⁄4 in. over 4 ft.), these details can be recorded on your drawings and accommodated by making allowances for shimming or scribe-fitting during installation.

If I encounter greater variances, I’ll often make a template from 1⁄4-in. plywood. It’s easy to mark a scribe line on a strip of plywood placed against a bowed wall, shape the strip to fit with my block plane, and transfer the scribe to the workpiece back in my shop. Gluing strips of plywood together with hot-melt adhesive enables me to create a template for a corner that’s badly out of square.

Before heading back to the workshop, I use a stud finder to locate the framing for fastening. The site visit also includes a check for HVAC registers, electrical outlets, light switches, and thermostats in the location of the built-ins. In some cases, I’ve been able to relocate a receptacle or extend an HVAC register in the baseboard of a built-in. In others, I’ve had to call in an electrician or HVAC tech to relocate these elements. It’s also important to measure doorways, hallways, and any other choke point that could prevent you from getting the cabinet into the space.

cutaway sketcHAim for simplified design

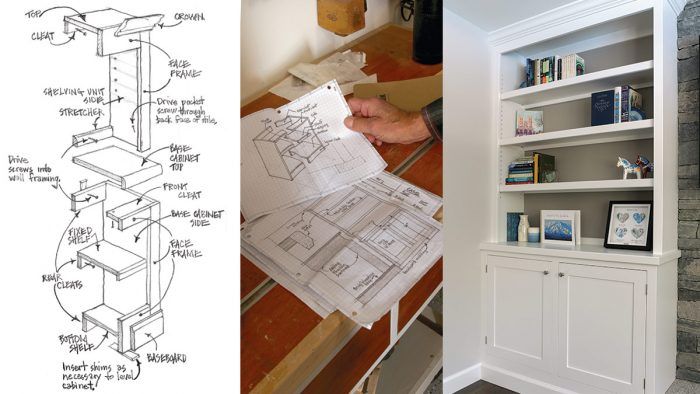
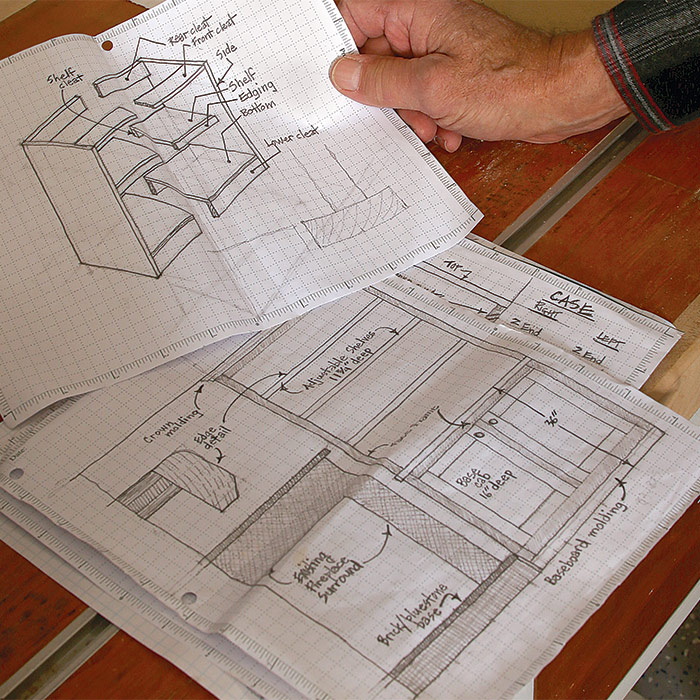
Large-scale built-ins need to be divided into manageable modules to fit into my minivan and through doorways at the client’s house. I take time to make plan, elevation, and detail drawings of every built-in project. The drawings help me optimize material and become part of the estimate I present to the client.

START WITH A SOLID PLAN: If you’re fitting cabinetry into a niche or corner, allow 1⁄8 in. to 3⁄16 in. of clearance between the face frame and existing walls for easy installation and manageable caulk joints. During your site inspection, take note of walls, floors, and ceilings that are uneven, out of level or plumb, or out of square in the installation area. Also identify HVAC registers, thermostats, and electrical switches and outlets that may need relocating.

I always try to simplify the construction details of built-in cabinetry, since this reduces material costs and build time. Back panels aren’t required on cabinets and shelves that will be installed against existing walls. I like ordering cabinet doors rather than building them myself. Suppliers like The Cabinet Door Store offer a variety of door styles, and will size your doors to 1⁄16 in. I sometimes end up building doors myself, if they’re large in size or unusual in design. Otherwise, it’s more cost-effective for me to order out.

Draw before you build
Draw before you build: Clients like to look at plan and elevation views because they show what the finished project will look like. You can produce these quickly on graph paper or with design software. A cutaway sketch like the one shown above doesn’t have to be done to scale, and it’s especially useful to the builder. It shows how parts overlap and fit together, informing the construction process.

Make face frames first — then build boxes to match

Standard practice in cabinet construction is to assemble the casework and then fabricate and attach the face frame. But for many built-in projects, I’ve found that it makes more sense to make the face frame in advance of the casework, especially if the case fits inside a three-sided space as with many bath vanities. In these situations, I make a template to fit the space where the face frame will go, then use the template to make the face frame. If I’m really worried about the fit, I can take the completed face frame to the job site for a final test-fit before building the cabinet boxes.

Center the mortise
Center the mortise: The Domino floating tenon joinery system is faster and stronger than the pocket screws I used to rely on for face-frame assembly. The fence adjusts to center the bit in the stock.

Leave some wiggle room
Leave some wiggle room: Selecting the middle setting for mortise length provides some extra clearance to tap the joint into perfect alignment during glue-up.
Mortise stiles and rails
Mortise stiles and rails: I mark the center of the joint and then mortise the stiles and the rails for the Domino slip tenons.

driving the tenon into the mortise
Be sure to remove all the chips before gluing the tenon and driving it into the mortise.

Assemble, then adjust
Assemble, then adjust: After gluing and lightly clamping the face frame together, I take advantage of the extra mortise width to tap joints into perfect alignment and square up the entire assembly.

Drill shelf pin holes
Drill shelf pin holes: My favorite jig and matching drill bit for making shelf pin holes is from Milescraft. It has a fence and indexing pin for making accurate rows of shelf pin holes for any size of case.

Assemble the case
Assemble the case: I tack plywood parts together with a brad nailer, then strengthen the connections with 2-in. trim-head screws. Both fasteners leave small holes that are easy to fill. Then I attach the face frame with a brad nailer. This strategy works on cabinets as well as on open-shelving units.


Construct the shelves

Whenever possible, I have the lumberyard cut plywood case parts to a rough size so the pieces are easier to handle on my own. Back in the workshop, I can use my track saw to cut everything to final size. For identical parts, like shelves, I clamp two layers together and cut both parts at the same time.

Ease the edges
Ease the edges: Poplar edging improves the appearance and strength of plywood shelves. I use a 1⁄8-in.-radius roundover bit in the router table to profile the two outside corners of my edging stock.

Glue and nail
Glue and nail: I rely on a right-angle jig and a couple of clamps to hold each plywood shelf upright as I attach edging strips. The Glu Bot makes it easy to apply a thin bead.
attach strips


Fit the doors

I order cabinet doors online to the exact size of the face-frame openings where they will be installed. This allows me to trim off just enough material for 1⁄16-in. margins around door edges. After a test fit, I start by cutting 1⁄16 in. off the top of the door. If the opening is slightly out of square, I might need to shave tiny amounts from the two sides as well. I can do this quickly with my track saw, working in increments as small as 1⁄32 in. When trimming the closing edge of the door, I cut at a 3° bevel so the door can close.

Thin shims make even reveals
Thin shims make even reveals: I make door-fitting shims (inset photo) by sandwiching a 1⁄16-in.-thick ipe strip between a pair of plywood “handles.” Placing a pair of shims between one door edge and the face frame enables me to mark the opposite door edge for trimming.

Trim with the track saw
Trim with the track saw: Once I fit the door top to bottom using the shim-and-trim method, I shim the hinge side of the door and mark the opposite side for trimming. The track saw makes these cuts quickly and accurately.


No-fuss hardware makes installing doors simple

To keep cabinet construction affordable for clients, I save time and frustration with non-mortise hinges for most built-in projects. The Lee Valley hinges are sturdy and reliable and eliminate the time-consuming process of cutting hinge mortises. I primarily use magnet catches to hold doors closed, because they’re easy to install and their pull helps keep doors from warping.

Make pilot holes in two steps: Holding the hinge in place, I start pilot holes with a self-centering drill bit, then deepen them with a smaller-diameter bit. The door’s maple frame makes it easy to snap a screw or break a drill bit. Conscientious predrilling prevents both.

Fasten the hinges to the door
Fasten the hinges to the door: These hinges have small steel screws that won’t strip if you drill pilot holes and drive at slow speed. I avoid brass screws; the softer metal increases the likelihood of a stripped head or broken shank.

Mount the door on the case
Mount the door on the case: I center the door in its opening using the 1⁄16-in.-thick shims, mark the hinge locations on the face frame, then extend them to the door opening with a small square.

Mount the door on the case
Finally, I drill pilot holes for the screws and carefully support the door while screwing the hinges to the face frame.


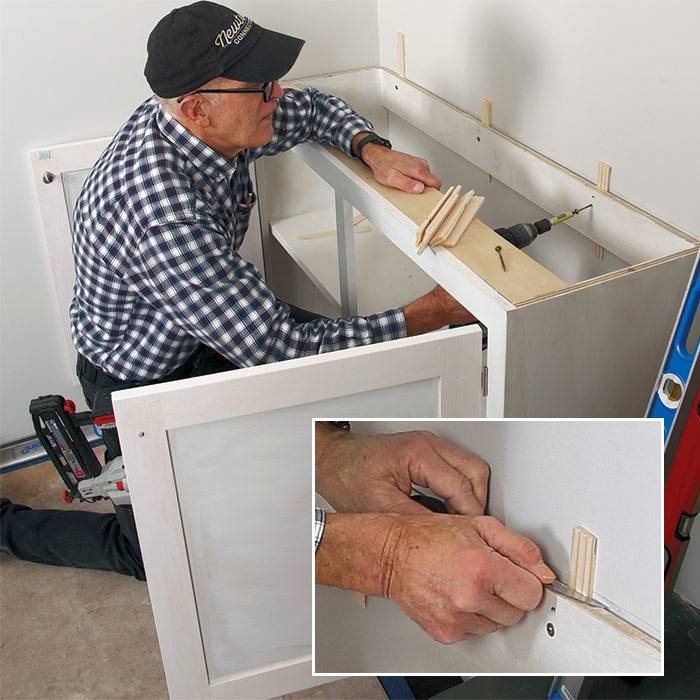
Stack components for a smooth installation

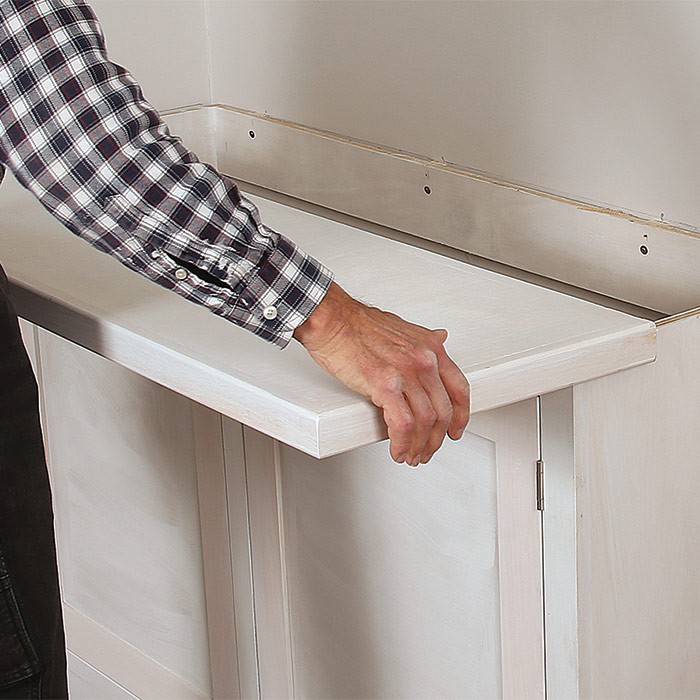
I start with the lowest parts of the built-in, leveling and shimming the boxes and securely fastening them to the wall. I make the top for the base cabinets separately, which allows me to easily scribe the top to adjacent walls for a tight fit. A few finish nails though the top into the cabinet sides holds it in place. Finally, the shelf unit is placed on the base cabinets and fastened in place. On this job, the crown was installed by the general contractor after the stone-veneer fireplace surround (see “Crown on Cabinets,” FHB #309).

Fasten to studs
Fasten to studs: Sometimes built-ins hold hundreds of pounds of books, and young kids may climb the furniture, so shelf units and boxes must be securely attached to the framing. I shim the boxes plumb and level before fastening them to the framing with cabinet screws.

Leave off the top
Leave off the top: When my built-in base cabinets have a wood top as part of the construction, I build the top, but I don’t attach it in the shop. This makes installing the cabinet easier and I can scribe the top to adjacent walls and surfaces.

Go floor-to-ceiling in two pieces
Go floor-to-ceiling in two pieces: I build floor-to-ceiling cabinets in two pieces, so I can move them around the shop myself and to make final installation easier. Always leave 1 in. to 2 in. of space at the top of upper cabinets and shelving units, because ceilings are seldom truly flat. A crown molding or other trim detail hides the gap.

Hide fasteners when you can…
Hide fasteners when you can… Screws driven through pocket holes behind the face frame help secure the shelving unit to the base and are hidden from view. I don’t like to leave screw heads for filling, because many painters use light-weight fillers and the filled holes end up looking bad.

use a stud finder to make sure the finish nails are holding securely.
Use a stud finder to make sure the finish nails will hold securely.

attach the shelf cabinet with my 16-ga. finish nailer.
I attach the shelf cabinet with my 16-ga. finish nailer.
attach the shelf cabinet with my 16-ga. finish nailer
…use small fasteners when you can’t: I want this shelving unit attached to the studs, but I don’t want to fill the big holes left by screw heads, so I attach the shelf cabinet with my 16-ga. finish nailer. I use a stud finder to make sure the finish nails are holding securely.

Prep for a perfect paint job

The last bit of work before installation is important. I give sharp corners a couple of strokes with a block plane, then sand all surfaces with 120-grit and then 180-grit paper. Large, flat areas can be sanded with a random-­orbit sander; otherwise I work by hand or with a sanding block. A coat of primer makes everything look uniform. I like water-based Kilz 2 all-purpose primer, but I’ve also had good luck with other water-based primers.

On this project we had Magnitude Painting of Bethel, Conn., do an amazing paint job that included caulking the casework to the walls and ceiling. I also want to thank Caetano’s Masonry for the stonework around the firebox, which helps my cabinets pop.

— Tim Snyder; a woodworker in Newtown, Conn. Photos by Patrick McCombe.

From Fine Homebuilding #310

RELATED STORIES

  • Maximize Space With Thoughtful Built-ins
  • Built-ins for Odd Spaces
  • A Smart Way to Paint Cabinets and Built-ins

Originally published September, 2022.

Sign up for eletters today and get the latest how-to from Fine Homebuilding, plus special offers.

Signing you up...

This site is protected by reCAPTCHA and the Google Privacy Policy and Terms of Service apply.
See all newsletters
See all newsletters
Previous: Foolproof Inset Cabinet Doors Next: How to Install Flat-Pack Kitchen Cabinets

Guide

Kitchens

Chapter

Cabinets, Built-Ins, & Pantries

Log in or create an account to post a comment.

Sign up Log in

Become a member and get full access to FineHomebuilding.com

Kitchens

Kitchens

A complete resource for designing, building, or remodeling the kitchen of your dreams

View Project Guide

View All Project Guides »

Become a member and get unlimited site access, including the Kitchens Project Guide.

Start Free Trial

Kitchen Planning & Design
Featured Kitchen Projects
  • Kitchen Remodels
Cabinets, Built-Ins, & Pantries
  • Choosing Kitchen Cabinets
  • Installing Kitchen Cabinets
  • Cabinet Hardware
  • Breakfast Nooks
  • Pantries
Kitchen Islands
Countertops & Flooring
  • Countertops 101
  • Concrete Countertops
  • Kitchen Flooring
Appliances, Fixtures, & Lighting
  • Appliances
  • Range Hoods
  • Sinks & Faucets
  • Kitchen Lighting

Fine Home Building

Newsletter Sign-up

  • Fine Homebuilding

    Home building tips, offers, and expert advice in your inbox.

  • Green Building Advisor

    Building science and energy efficiency advice, plus special offers, in your inbox.

  • Old House Journal

    Repair, renovation, and restoration tips, plus special offers, in your inbox.

Signing you up...

This site is protected by reCAPTCHA and the Google Privacy Policy and Terms of Service apply.
See all newsletters

Follow

  • Fine Homebuilding

    Dig into cutting-edge approaches and decades of proven solutions with total access to our experts and tradespeople.

    Start Free Trial Now
    • Facebook
    • Instagram
    • X
    • LinkedIn
  • GBA Prime

    Get instant access to the latest developments in green building, research, and reports from the field.

    Start Free Trial Now
    • Facebook
    • YouTube
  • Old House Journal

    Learn how to restore, repair, update, and decorate your home.

    Subscribe Now
    • Facebook
    • Instagram
    • X

Membership & Magazine

  • Online Archive
  • Start Free Trial
  • Magazine Subscription
  • Magazine Renewal
  • Gift a Subscription
  • Customer Support
  • Privacy Preferences
  • About
  • Contact
  • Advertise
  • Careers
  • Terms of Use
  • Site Map
  • Do not sell or share my information
  • Privacy Policy
  • Accessibility
  • California Privacy Rights

© 2025 Active Interest Media. All rights reserved.

Fine Homebuilding receives a commission for items purchased through links on this site, including Amazon Associates and other affiliate advertising programs.

X
X
This is a dialog window which overlays the main content of the page. The modal window is a 'site map' of the most critical areas of the site. Pressing the Escape (ESC) button will close the modal and bring you back to where you were on the page.

Main Menu

  • How-To
  • Design
  • Tools & Materials
  • Video
  • Blogs
  • Forum
  • Project Guides
  • Reader Projects
  • Magazine
  • Members
  • FHB House

Podcasts

  • FHB Podcast
  • ProTalk

Webinars

  • Upcoming and On-Demand

Podcasts

  • FHB Podcast
  • ProTalk

Webinars

  • Upcoming and On-Demand

Popular Topics

  • Kitchens
  • Business
  • Bedrooms
  • Roofs
  • Architecture and Design
  • Green Building
  • Decks
  • Framing
  • Safety
  • Remodeling
  • Bathrooms
  • Windows
  • Tilework
  • Ceilings
  • HVAC

Magazine

  • Current Issue
  • Past Issues
  • Magazine Index
  • Subscribe
  • Online Archive
  • Author Guidelines

All Access

  • Member Home
  • Start Free Trial
  • Gift Membership

Online Learning

  • Courses
  • Project Guides
  • Reader Projects
  • Podcast

More

  • FHB Ambassadors
  • FHB House
  • Customer Support

Account

  • Log In
  • Join

Newsletter

Get home building tips, offers, and expert advice in your inbox

Signing you up...

This site is protected by reCAPTCHA and the Google Privacy Policy and Terms of Service apply.
See all newsletters
See all newsletters

Follow

  • X
  • YouTube
  • instagram
  • facebook
  • pinterest
  • Tiktok

Join All Access

Become a member and get instant access to thousands of videos, how-tos, tool reviews, and design features.

Start Your Free Trial

Subscribe

FHB Magazine

Start your subscription today and save up to 70%

Subscribe

We hope you’ve enjoyed your free articles. To keep reading, become a member today.

Get complete site access to expert advice, how-to videos, Code Check, and more, plus the print magazine.

Start your FREE trial

Already a member? Log in