FHB Logo Facebook LinkedIn Email Pinterest Twitter X Instagram Tiktok YouTube Plus Icon Close Icon Navigation Search Icon Navigation Search Icon Arrow Down Icon Video Guide Icon Article Guide Icon Modal Close Icon Guide Search Icon Skip to content
Subscribe
Log In
  • How-To
  • Design
  • Tools & Materials
  • Restoration
  • Videos
  • Blogs
  • Forum
  • Magazine
  • Members
  • FHB House
  • Podcast
Log In

Fine Homebuilding Project Guides

Siding & Exterior Trim

Guide Home
  • Choosing Siding
  • Installing Siding
  • Choosing Exterior Trim
  • Installing Exterior Trim
  • Repairing Siding & Trim
Mastered in a Minute

How to Install Faux Stone-Veneer Siding Panels

This type of modular masonry siding is easily fastened with screws or nails, and doesn't require any adhesives or mortar.

By Matthew Millham

Sponsored by Versetta Stone

Stone-veneer siding adds the look of stone to wood-framed walls without having to use mortar or other adhesives. These products, like the Boral Versetta Stone shown here, attach with screws or nails, so they can be installed by a siding contractor rather than a mason.

We’ve included a summary of the installation process below, but requirements differ slightly depending on the type of wall you are installing the panels on, so be sure to refer to the manufacturers instructions for specific weatherproofing and fastening requirements. Plus, a high-quality water-resistive barrier (WRB) should precede any siding project to protect your walls from moisture.

What you will need

  • Corrosion-resistant fasteners (screws or nails) capable of penetrating framing by at least an inch
  • Drill/driver with bits to match your fasteners (or a hammer, if using nails)
  • Saw and/or angle grinder with a masonry blade
  • Respirator (cutting creates dust containing silica)
  • Spirit level and/or laser level
  • All materials and accessories for of the stone-veneer siding system

Stone-veneer siding installation process

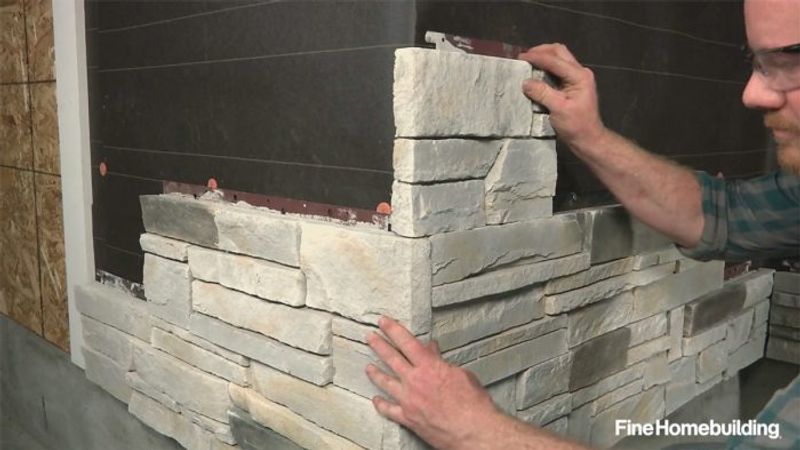
Versetta panels come in two types: flat panels, which are used in the field of the wall, and universal corners, which provide a finished look to outside corners and a tight fit in inside corners. There’s also a starter strip that’s attached level at the bottom of the wall to secure the lower edges of the first course of panels. A special J-channel can be used around windows, doors, and other terminations, though it’s not required.

Start by attaching the starter strip at the bottom of the wall, ensuring it’s level, and lap the WRB over the strip’s nail flange. Leave a 1/4-in. gap at butt joints and a 1/2-in. gap at corners. Place screws or nails in the center of the nail slots, and don’t drive them tight—leave a 1/32-in. gap to allow for movement.

Install stone-veneer panels from the bottom up, with the nail flange up, staggering joints at least 8 in. from one course to the next. Flat panels have tongues and grooves on all four edges to help them lock together. Make sure the panels are level, that the tongues and grooves seat completely, and fasten with corrosion-resistant nails or screws. Drive screws through the holes in the nail flange; drive nails directly through the flange. Drive the fasteners into framing whenever possible. Full-size panels require four fasteners, at least two into framing. End fasteners must be within 3 in. of the end of the panel, and at least 1/2 in. from the edge.

Where corner panels are used, cut them in two to create a left and a right corner out of a single panel, and alternate left and right corners from one course to the next. Cut the corner pieces at random lengths of at least 8 in. long to aid in staggering joints in the field of the wall. Install corner pieces with the cut edge away from the corner. Trim the tongue off of flat panels where necessary to fit neatly against corner pieces.

Installations around windows—especially below windows—can be much more involved and may require the use of metal lath and special adhesives. There are also other pieces available beyond what’s shown here—notably a wainscot cap and trim stone.

Check the manufacturer requirements for framing, sheathing, and WRBs before installation. Framing for Versetta Stone must be 16 in. on center, and sheathing must be at least 7/16-in. OSB or minimum 1/2-in. plywood. At least one layer of #15 felt is recommended for a WRB, and a second layer is advised at corners for additional protection. The WRB should lap over the nail flange of the starter strip, and each layer should extend at least 16 in. beyond corners in both directions. This product has an integral rainscreen gap to provide a capillary break between the siding and WRB and promote drying. If attaching with screws, choose ones that are threaded all the way up to the head so they grab tight even when they don’t hit framing.

Sign up for eletters today and get the latest how-to from Fine Homebuilding, plus special offers.

Signing you up...

This site is protected by reCAPTCHA and the Google Privacy Policy and Terms of Service apply.
See all newsletters
See all newsletters
Previous: Tips for Installing Stone Veneer Next: Essential Details for Stucco and Masonry Siding

Guide

Siding & Exterior Trim

Chapter

Installing Siding

Log in or create an account to post a comment.

Sign up Log in

Become a member and get full access to FineHomebuilding.com

Siding & Exterior Trim

Siding & Exterior Trim

Trusted, comprehensive guidance from the pros for choosing, installing, and repairing siding and exterior trim

View Project Guide

View All Project Guides »

Become a member and get unlimited site access, including the Siding & Exterior Trim Project Guide.

Start Free Trial

Choosing Siding
  • Materials
  • Design Options
Installing Siding
  • Siding Basics
  • Lap Siding
  • Shingle Siding
  • Board & Batten
  • Fiber Cement and Composite Siding
  • Vinyl Siding
  • Masonry Claddings
Choosing Exterior Trim
  • Trim Materials
  • Trim Design
Installing Exterior Trim
  • Trim Basics
  • Roof Eaves Trim
  • Corner Boards
  • Corbels & Brackets
  • Window & Door Trim
Repairing Siding & Trim
  • Trim Repairs
  • Siding Repairs

Fine Home Building

Newsletter Sign-up

  • Fine Homebuilding

    Home building tips, offers, and expert advice in your inbox.

  • Green Building Advisor

    Building science and energy efficiency advice, plus special offers, in your inbox.

  • Old House Journal

    Repair, renovation, and restoration tips, plus special offers, in your inbox.

Signing you up...

This site is protected by reCAPTCHA and the Google Privacy Policy and Terms of Service apply.
See all newsletters

Follow

  • Fine Homebuilding

    Dig into cutting-edge approaches and decades of proven solutions with total access to our experts and tradespeople.

    Start Free Trial Now
    • Facebook
    • Instagram
    • X
    • LinkedIn
  • GBA Prime

    Get instant access to the latest developments in green building, research, and reports from the field.

    Start Free Trial Now
    • Facebook
    • YouTube
  • Old House Journal

    Learn how to restore, repair, update, and decorate your home.

    Subscribe Now
    • Facebook
    • Instagram
    • X

Membership & Magazine

  • Online Archive
  • Start Free Trial
  • Magazine Subscription
  • Magazine Renewal
  • Gift a Subscription
  • Customer Support
  • Privacy Preferences
  • About
  • Contact
  • Advertise
  • Careers
  • Terms of Use
  • Site Map
  • Do not sell or share my information
  • Privacy Policy
  • Accessibility
  • California Privacy Rights

© 2025 Active Interest Media. All rights reserved.

Fine Homebuilding receives a commission for items purchased through links on this site, including Amazon Associates and other affiliate advertising programs.

X
X
This is a dialog window which overlays the main content of the page. The modal window is a 'site map' of the most critical areas of the site. Pressing the Escape (ESC) button will close the modal and bring you back to where you were on the page.

Main Menu

  • How-To
  • Design
  • Tools & Materials
  • Video
  • Blogs
  • Forum
  • Project Guides
  • Reader Projects
  • Magazine
  • Members
  • FHB House

Podcasts

  • FHB Podcast
  • ProTalk

Webinars

  • Upcoming and On-Demand

Podcasts

  • FHB Podcast
  • ProTalk

Webinars

  • Upcoming and On-Demand

Popular Topics

  • Kitchens
  • Business
  • Bedrooms
  • Roofs
  • Architecture and Design
  • Green Building
  • Decks
  • Framing
  • Safety
  • Remodeling
  • Bathrooms
  • Windows
  • Tilework
  • Ceilings
  • HVAC

Magazine

  • Current Issue
  • Past Issues
  • Magazine Index
  • Subscribe
  • Online Archive
  • Author Guidelines

All Access

  • Member Home
  • Start Free Trial
  • Gift Membership

Online Learning

  • Courses
  • Project Guides
  • Reader Projects
  • Podcast

More

  • FHB Ambassadors
  • FHB House
  • Customer Support

Account

  • Log In
  • Join

Newsletter

Get home building tips, offers, and expert advice in your inbox

Signing you up...

This site is protected by reCAPTCHA and the Google Privacy Policy and Terms of Service apply.
See all newsletters
See all newsletters

Follow

  • X
  • YouTube
  • instagram
  • facebook
  • pinterest
  • Tiktok

Join All Access

Become a member and get instant access to thousands of videos, how-tos, tool reviews, and design features.

Start Your Free Trial

Subscribe

FHB Magazine

Start your subscription today and save up to 70%

Subscribe

We hope you’ve enjoyed your free articles. To keep reading, become a member today.

Get complete site access to expert advice, how-to videos, Code Check, and more, plus the print magazine.

Start your FREE trial

Already a member? Log in