FHB Logo Facebook LinkedIn Email Pinterest Twitter X Instagram Tiktok YouTube Plus Icon Close Icon Navigation Search Icon Navigation Search Icon Arrow Down Icon Video Guide Icon Article Guide Icon Modal Close Icon Guide Search Icon Skip to content
Subscribe
Log In
  • How-To
  • Design
  • Tools & Materials
  • Restoration
  • Videos
  • Blogs
  • Forum
  • Magazine
  • Members
  • FHB House
  • Podcast
Log In

Fine Homebuilding Project Guides

Decks

Guide Home
  • Design & Planning
  • Tools & Materials
  • Footings & Foundations
  • Framing a Deck
  • Installing Decking
  • Installing Railings
  • Deck Stairs
  • Custom Details
  • Finishes, Repairs, and Maintenance
  • Complete Deck Builds
How-To

How to Install Composite Decking

Builder Clemens Jellema details the process of finishing a custom deck using capstock planks and hidden fasteners.

By Clemens Jellema

Click here to enlarge the illustration.

The decking is the finish that everyone notices, so the material choice, installation, and design are important. First, it should provide a durable finish for the deck. After years of trial and error, I’ve decided that capstock composite decking is the best. (Capstock has a thin skin of tough plastic applied to its surface. Capping makes the surface last longer and increases its resistance to staining and fading.) We used Fiberon’s Horizon decking on this job, but I also like the capped products made by Trex, Azek, and EverGrain. They often cost $1 to $2 per ft. more than regular composite decking.

The Fiberon decking is installed with hidden fasteners, which give the deck a clean look. We screwed and plugged the perimeter and accent boards, which couldn’t be securely attached with the hidden fasteners.

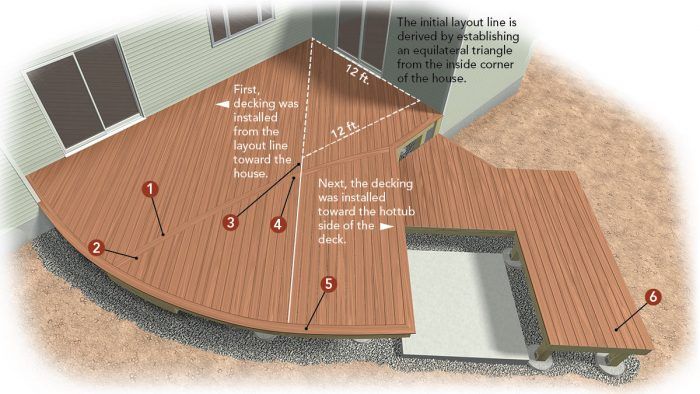
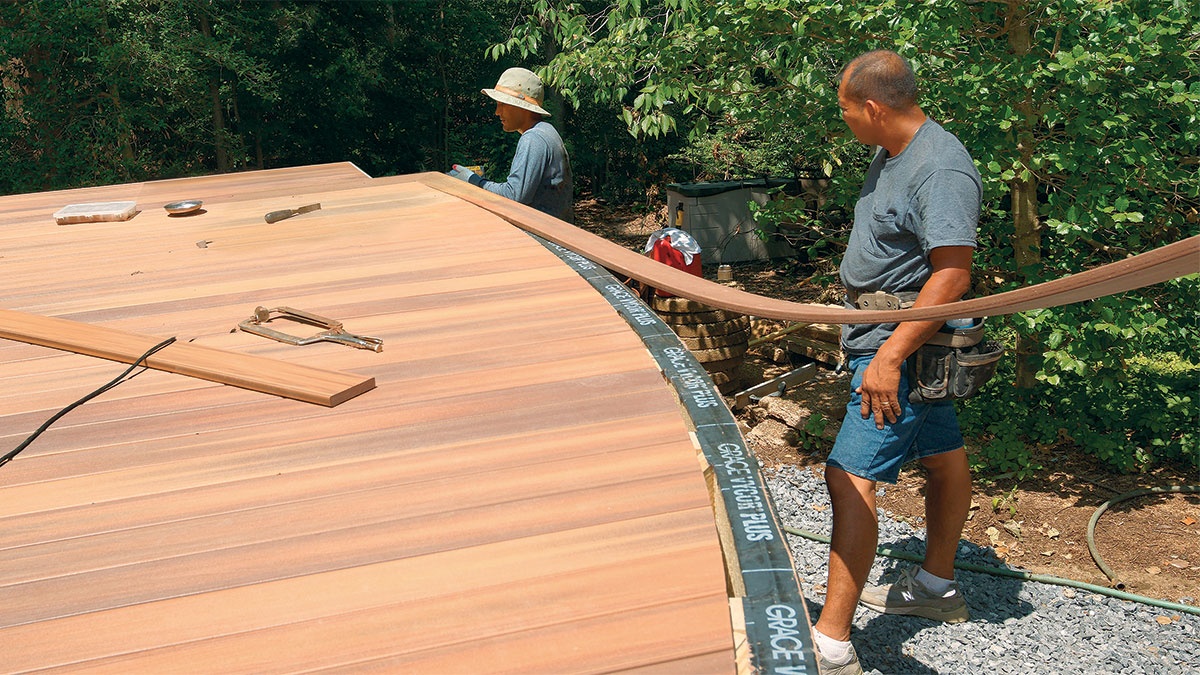
The homeowners didn’t want to see any field joints in the decking, but that meant board lengths would exceed the 20-ft. pieces available. I decided to use a one-board outer perimeter of a darker color, and then run an accent board bent in the same radius across the center of the deck. The accent board provides a clean break in the decking and lends some flair to the field.

1. Trace the accent

trace a deck accent

Template for blocking. The easiest way to locate the blocking for the curved accent is to lay the board in place and mark its position (sidebar a bottom).


2. Blocking comes next

blocking for deck accent

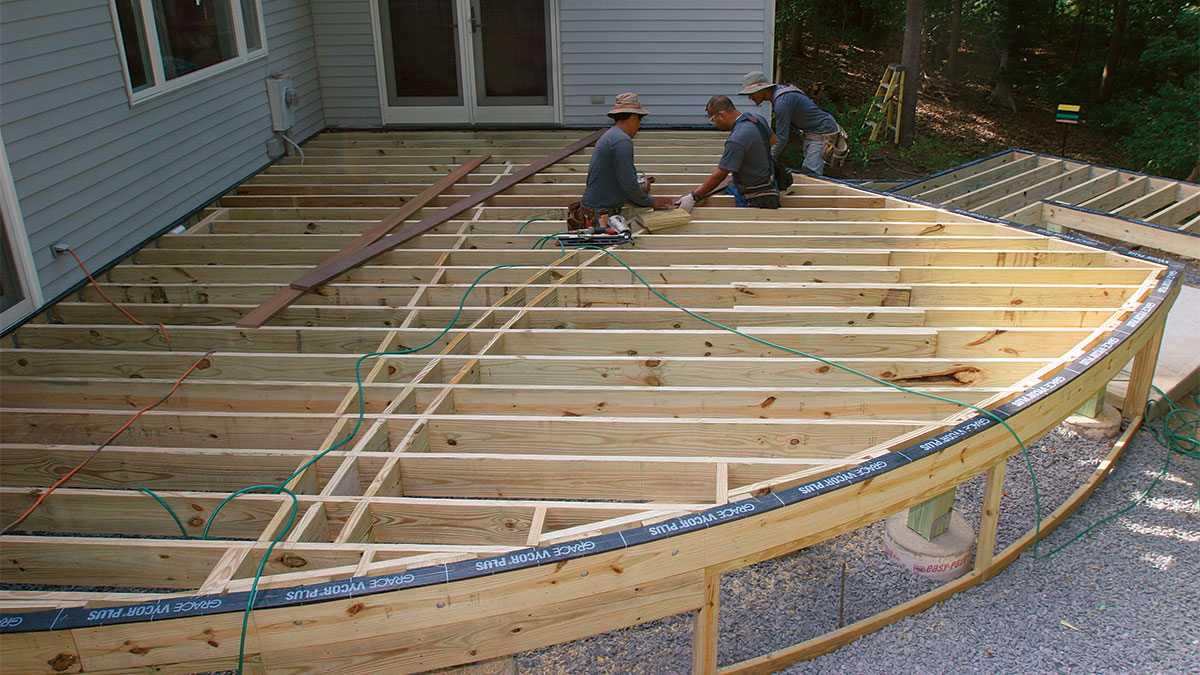
Proper support counts. Workers cut and nail blocking on each side of the accent strip to provide a nail base for the decking ends that terminate against the strip.


3. Decking is laid out

lay out decking

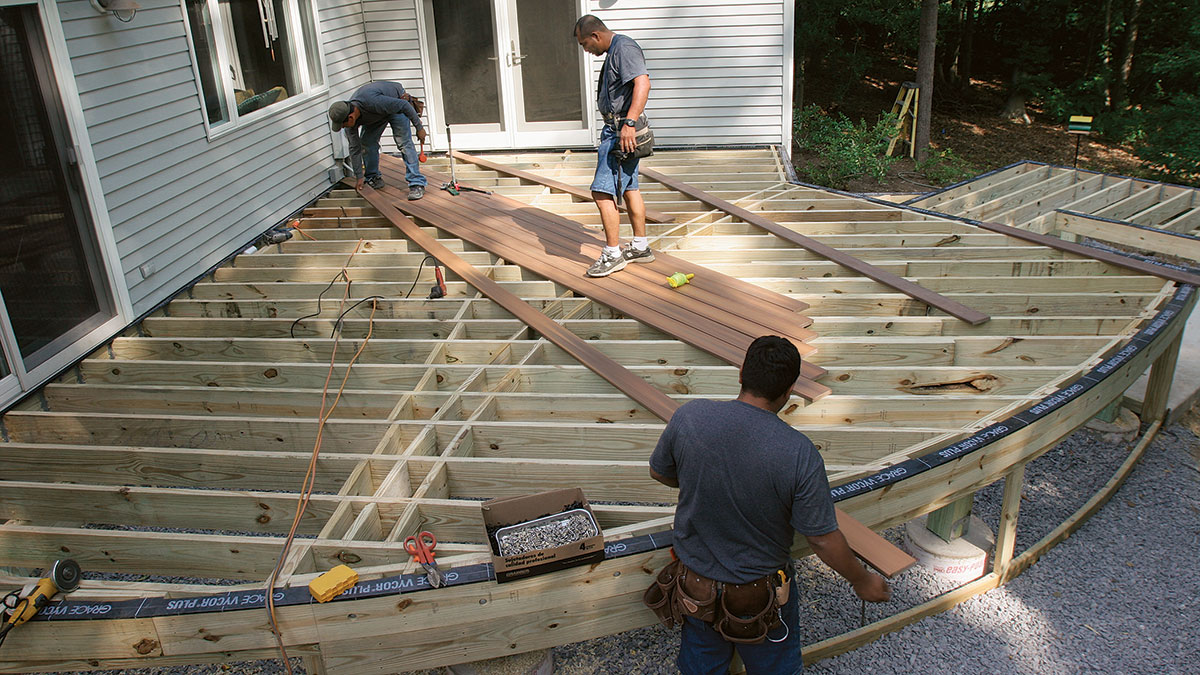
Diagonal layout starts from the corner. To add visual interest, the decking is installed at a 45° angle. After snapping a reference line at the deck’s midpoint, the crew works toward the house, then back toward the hot-tub deck.


4. Trim creates an accent

trim deck accent

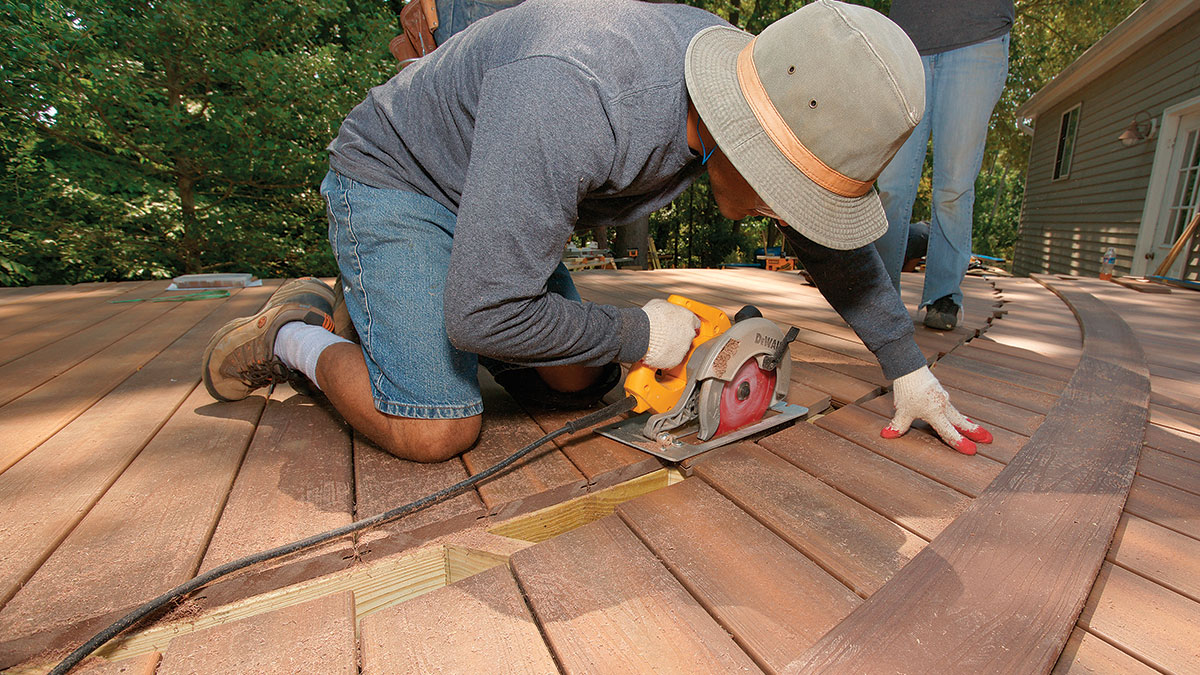
A long, careful cut. After the decking is installed and rough-cut to end at the decorative strip, the curved accent strip is scribed onto the decking. The line is then cut with a saw set to a shallow depth.


5. Wrap the perimeter

wrap deck perimeter

Perimeter goes on last. Once the decking is run past the edge, the perimeter board is scribed in place. The decking ends are trimmed, and the board is installed with screws and plugs.


6. Be sure to keep decking parallel

keeping decking parallel

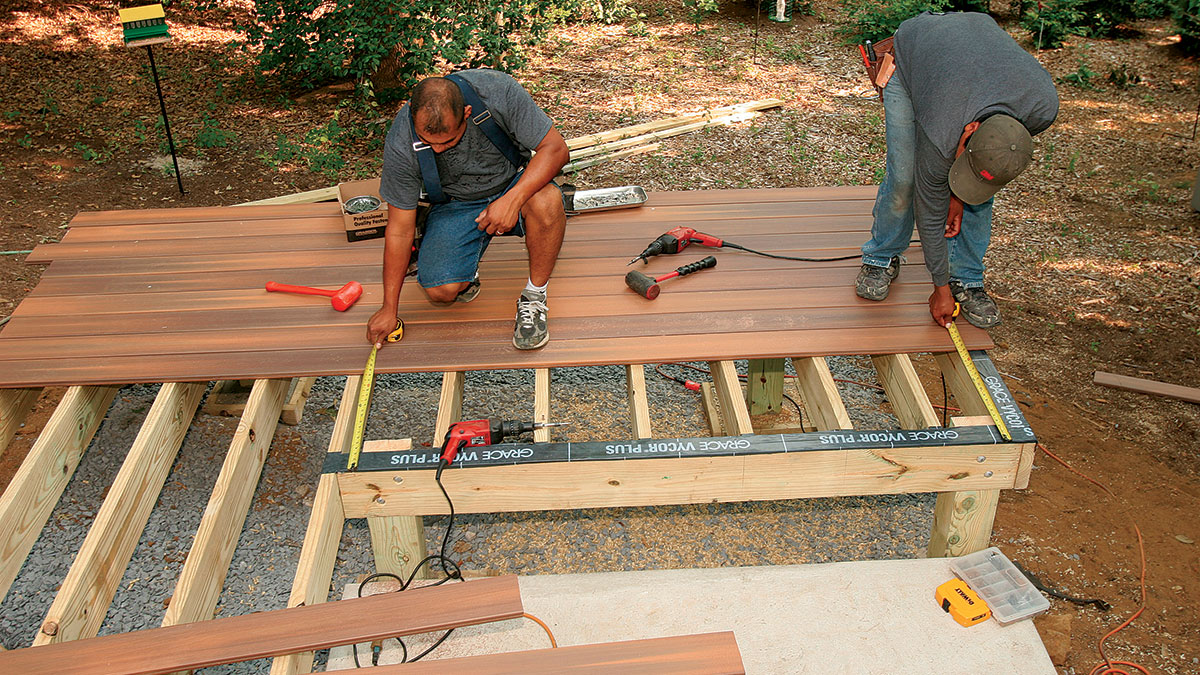
Don’t assume perfection. Despite the fact that the decking is factory-made, the layout can get off track due to inconsistencies in the material and the hidden fasteners. Checking the measurements every three or four boards keeps the layout under control.


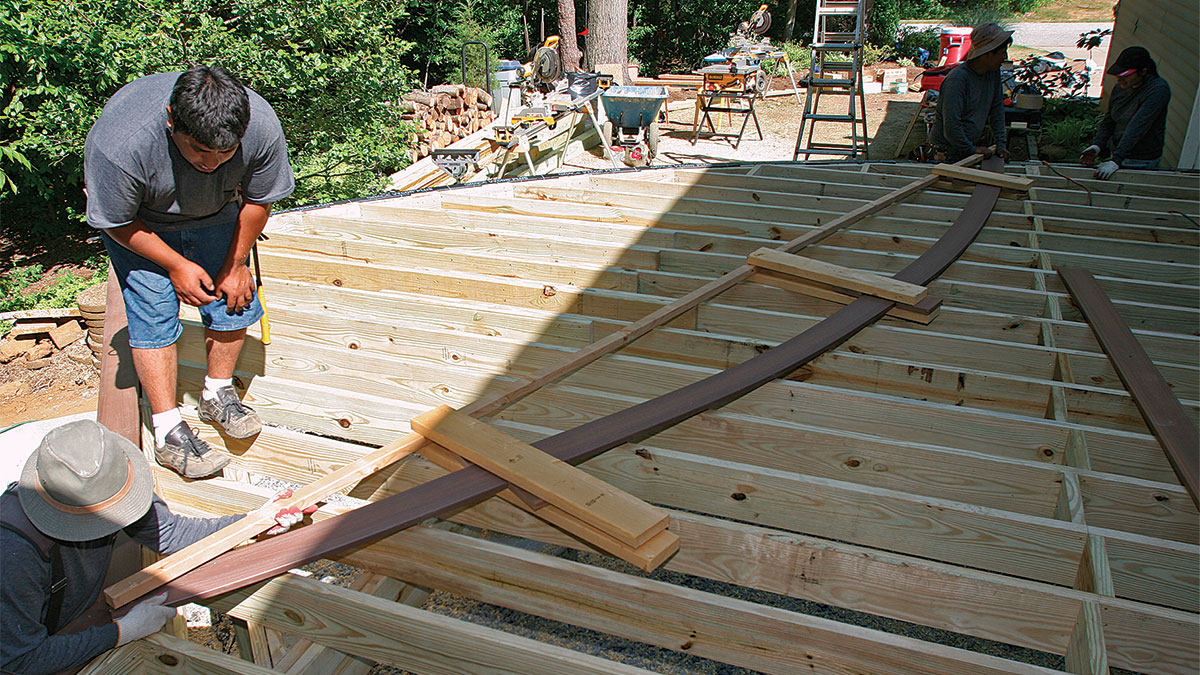
Low-tech bending techniques

low-tech wood bending

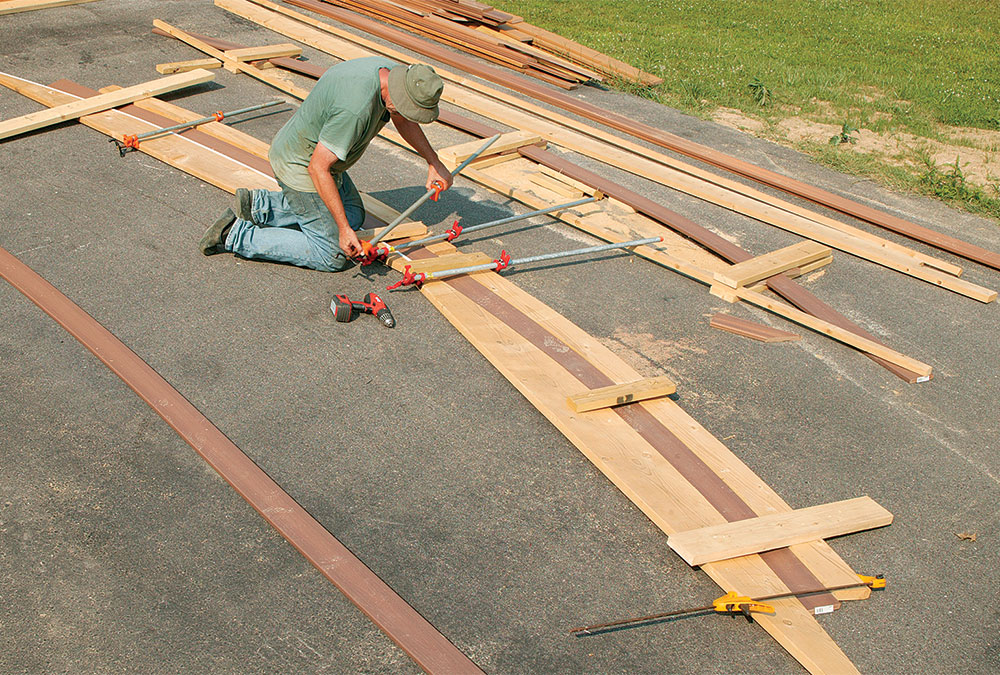
We couldn’t kerf the decking as we did the rim because the required bend was across the flat, not the edge. Luckily, we needed to bend only three boards, they were made of plastic, and it was summer. First, I cut a template of the curve from a pair of 2x12s laid end to end. On a hot day, I laid a 16-ft. length of decking on the driveway. After a few hours, the decking was about 120°F and limp as a noodle. I clamped it between both sides of the template, screwing a brace across the top every few feet. I cooled the board with cold water, bringing down the temperature enough to keep the correct radius in place. I reinforced the curve by keeping the board in a brace until I was ready to use it.


To see how we built this entire deck, read the article:
The Complete Guide to Building a Multi-Level Deck

Fine Homebuilding Recommended Products

Fine Homebuilding receives a commission for items purchased through links on this site, including Amazon Associates and other affiliate advertising programs.

Flashing and Joist Tape

Flashing joists is a great way to prolong the life of a deck frame — after all, moisture management is key to longevity.
Buy at Amazon

Cepco BoWrench Decking Tool

This tool makes straightening deck boards a breeze during installation.
Buy at Amazon

Standard Marking Chalk

We like white chalk because it’s non-permanent and wears off easily — this is especially helpful when marks are exposed and need to disappear.
Buy at Amazon

Sign up for eletters today and get the latest how-to from Fine Homebuilding, plus special offers.

Signing you up...

This site is protected by reCAPTCHA and the Google Privacy Policy and Terms of Service apply.
See all newsletters
See all newsletters
Previous: Decking on the Diagonal Next: Butt Joints in Decking

Guide

Decks

Chapter

Installing Decking

View Comments

  1. CT_Yankee | Jun 30, 2022 07:15pm | #1

    If the intent of the decking layout is to bisect the angle between the house wall and the small wing to the right (i.e. decking is oriented at 45° to each wall), the whoever anointed the first photo must have flunked geometry - that is NOT an equilateral triangle (which is 3 equal length sides). It is a right triangle with equal length legs each side of the 90° corner. The longer leg's length would be just short of 17'.

  2. fenceanddeckconnectioninc | Nov 14, 2023 12:30am | #2

    I've some suggestions to share based on my recent experience. The step-by-step approach helped the process smoothly. Planning the layout was key – took a bit of time, but totally worth it for the polished finish. I opted for hidden fasteners, and the result is a sleek, screw-free surface. Plus, the low-maintenance aspect is a game-changer.

Log in or create an account to post a comment.

Sign up Log in

Become a member and get full access to FineHomebuilding.com

Decks

Decks

Hundreds of articles and videos by top deck-building pros on how to design and build a beautiful, sturdy, and safe deck

View Project Guide

View All Project Guides »

Become a member and get unlimited site access, including the Decks Project Guide.

Start Free Trial

Design & Planning
  • Basic Design Options
  • Generating Plans
  • Calculating Deck Loads
  • Code Compliance
Tools & Materials
  • Deck Building Tools
  • Foundation and Framing Materials
  • Decking Materials
  • Fasteners and Hardware
Footings & Foundations
  • Choosing a Foundation
  • Sizing and Laying Out Footings
  • Excavation
  • Pouring the Foundation
Framing a Deck
  • Framing Overview
  • Installing the Ledger
  • Setting Posts and Beams
  • Installing Joists
Installing Decking
  • Decking Basics
  • Installation Process
  • Adding Fascia and Other Decorative Elements
Installing Railings
  • Installing Deck Railing Posts
  • Building Wood Rails and Balustrades
  • Non-Wood Railing Options
  • Installing Nonwood Balustrades
Deck Stairs
  • Deck Stairs Overview
  • Laying Out, Cutting, and Installing the Stringers
  • Installing Treads, Risers, and Stair Railings
Custom Details
  • Benches, Planters, and Privacy Features
  • Pergolas
  • Lighting
Finishes, Repairs, and Maintenance
  • Deck Finishes
  • Cleaning and Refinishing
  • Inspection and Repair
Complete Deck Builds
  • Grade-Level Decks
  • Raised Decks

Fine Home Building

Newsletter Sign-up

  • Fine Homebuilding

    Home building tips, offers, and expert advice in your inbox.

  • Green Building Advisor

    Building science and energy efficiency advice, plus special offers, in your inbox.

  • Old House Journal

    Repair, renovation, and restoration tips, plus special offers, in your inbox.

Signing you up...

This site is protected by reCAPTCHA and the Google Privacy Policy and Terms of Service apply.
See all newsletters

Follow

  • Fine Homebuilding

    Dig into cutting-edge approaches and decades of proven solutions with total access to our experts and tradespeople.

    Start Free Trial Now
    • Facebook
    • Instagram
    • X
    • LinkedIn
  • GBA Prime

    Get instant access to the latest developments in green building, research, and reports from the field.

    Start Free Trial Now
    • Facebook
    • YouTube
  • Old House Journal

    Learn how to restore, repair, update, and decorate your home.

    Subscribe Now
    • Facebook
    • Instagram
    • X

Membership & Magazine

  • Online Archive
  • Start Free Trial
  • Magazine Subscription
  • Magazine Renewal
  • Gift a Subscription
  • Customer Support
  • Privacy Preferences
  • About
  • Contact
  • Advertise
  • Careers
  • Terms of Use
  • Site Map
  • Do not sell or share my information
  • Privacy Policy
  • Accessibility
  • California Privacy Rights

© 2025 Active Interest Media. All rights reserved.

Fine Homebuilding receives a commission for items purchased through links on this site, including Amazon Associates and other affiliate advertising programs.

X
X
This is a dialog window which overlays the main content of the page. The modal window is a 'site map' of the most critical areas of the site. Pressing the Escape (ESC) button will close the modal and bring you back to where you were on the page.

Main Menu

  • How-To
  • Design
  • Tools & Materials
  • Video
  • Blogs
  • Forum
  • Project Guides
  • Reader Projects
  • Magazine
  • Members
  • FHB House

Podcasts

  • FHB Podcast
  • ProTalk

Webinars

  • Upcoming and On-Demand

Podcasts

  • FHB Podcast
  • ProTalk

Webinars

  • Upcoming and On-Demand

Popular Topics

  • Kitchens
  • Business
  • Bedrooms
  • Roofs
  • Architecture and Design
  • Green Building
  • Decks
  • Framing
  • Safety
  • Remodeling
  • Bathrooms
  • Windows
  • Tilework
  • Ceilings
  • HVAC

Magazine

  • Current Issue
  • Past Issues
  • Magazine Index
  • Subscribe
  • Online Archive
  • Author Guidelines

All Access

  • Member Home
  • Start Free Trial
  • Gift Membership

Online Learning

  • Courses
  • Project Guides
  • Reader Projects
  • Podcast

More

  • FHB Ambassadors
  • FHB House
  • Customer Support

Account

  • Log In
  • Join

Newsletter

Get home building tips, offers, and expert advice in your inbox

Signing you up...

This site is protected by reCAPTCHA and the Google Privacy Policy and Terms of Service apply.
See all newsletters
See all newsletters

Follow

  • X
  • YouTube
  • instagram
  • facebook
  • pinterest
  • Tiktok

Join All Access

Become a member and get instant access to thousands of videos, how-tos, tool reviews, and design features.

Start Your Free Trial

Subscribe

FHB Magazine

Start your subscription today and save up to 70%

Subscribe

We hope you’ve enjoyed your free articles. To keep reading, become a member today.

Get complete site access to expert advice, how-to videos, Code Check, and more, plus the print magazine.

Start your FREE trial

Already a member? Log in