FHB Logo Facebook LinkedIn Email Pinterest Twitter X Instagram Tiktok YouTube Plus Icon Close Icon Navigation Search Icon Navigation Search Icon Arrow Down Icon Video Guide Icon Article Guide Icon Modal Close Icon Guide Search Icon Skip to content
Subscribe
Log In
  • How-To
  • Design
  • Tools & Materials
  • Restoration
  • Videos
  • Blogs
  • Forum
  • Magazine
  • Members
  • FHB House
  • Podcast
Log In

Fine Homebuilding Project Guides

Decks

Guide Home
  • Design & Planning
  • Tools & Materials
  • Footings & Foundations
  • Framing a Deck
  • Installing Decking
  • Installing Railings
  • Deck Stairs
  • Custom Details
  • Finishes, Repairs, and Maintenance
  • Complete Deck Builds
Drawing Board

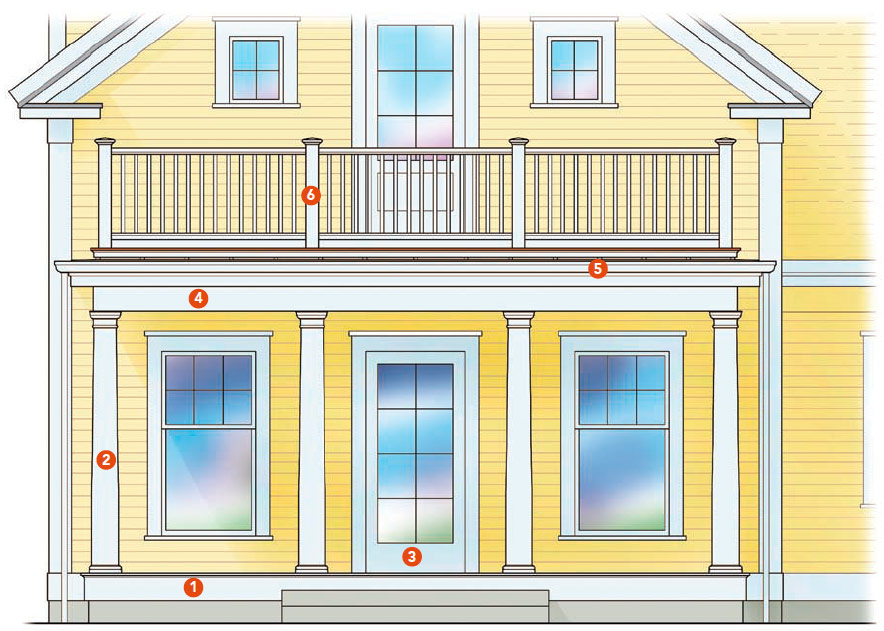
A Porch with a Rooftop Deck

Designer Michael Maines identifies 12 areas to focus on when designing a porch with a deck above it.

By Michael Maines Issue 246 - Oct/Nov 2014

Covered porches are great places to enjoy the outdoors while being protected from the weather. The views, however, are often better from the porch roof. If built properly, the porch structure is substantial enough to support outdoor living space above, so why not take advantage of it and build a rooftop deck? In “Decking Over a Roof” (FHB #246), Emanuel Silva shows how to build such a structure. Here, I show how to get the design right. To illustrate the rules of thumb I follow, I’ve designed a porch and deck for a one-and-a-half-story farmhouse, a home that’s popular in many parts of the country. As with any other project, the ideal situation doesn’t always exist, so I offer some alternatives where appropriate.

A porch with a roof-top deck

1. Layout— Long, shallow porches typically look best. A depth of 8 ft. is a comfortable target. However, porches deeper than 8 ft. should be given boxy, roomlike dimensions instead—10×14 or 12×16, for example.

2. Columns: size and shape— Don’t be afraid to use generously sized columns, but keep in mind that square columns appear wider than round columns because of their diagonal cross section. Round or turned columns usually look best with a gentle curve that narrows at the top, referred to as an entasis. Square columns can be straight, have entases, or be tapered.

3. Columns: spacing— Place columns so that they create an opening that relates to the shape of the house. For example, a tall, narrow house looks best with closely spaced columns that create vertically oriented rectangular openings. Try to keep the columns evenly spaced and with an odd number of openings. Align these openings with windows and doors when possible.

4. Beams— The beams, more correctly called lintels, should match the width of the top of round columns. If square columns are used, the beam can overhang the columns slightly; in this case, the beam should extend beyond the columns 3/4 in. on each side. In general, the face of the beam should be about one-and- a-half times as tall as the beam is wide.

5. Gutters— The roof can drain into conventionally installed gutters or concealed gutters built into the roof, or the runoff can be allowed to spill out freely and be picked up (or not) by ground gutters. In warm climates, internal drains may work, but they’re not recommended in cold climates, where they may clog with ice.

6. Posts— Railing posts should be one-half to two-thirds the width of the columns. Posts should align with the columns below and have similar or less-elaborate trim. Match square columns with square posts. If the columns are round, the posts can be round or square.

Cross-section of a porch with a roof-top deck

7. Pilasters— The beams supporting the roof and the deck above can be supported visually by pilasters where they meet the house, or by freestanding columns placed a few inches away from the siding. Pilasters are more classically correct.

8. Roof— The roof should be sloped at least 1/4 in. per ft. It’s common to put a deck above a low-pitched shed roof. However, if the roof is deeper than 4 ft., it typically looks better to create a shallow hipped roof so that the eaves on all three sides are a consistent dimension.

9. Decking— The deck boards should be attached to pressure-treated 2x sleepers, tapered to offset the roof pitch so that the deck surface is level. If the deck boards are installed as removable panels, cleaning the surface under them is much easier.

10. Trim— A fascia board can hide the sleepers, but a 1/2-in. drainage gap must be maintained between the fascia and the porch roof. The outside face of the fascia should be in line with the outside face of the beam below.

11. Railings— If the porch below has railings, match them or use a scaled-down version of them above. If the porch has no railings, the deck railings should be as visually light as possible. Where the railing meets the house, there should be a wall at least as tall as the railing. The railing can terminate directly into the wall, but it looks best when it ends at a postlike pilaster or a post held 2 in. to 3 in. from the siding.

12. Ceiling— Ideally, the porch ceiling is in the same plane as the porch-roof soffit. The depth of the porch-roof overhang should match the overhang on the house or be reduced by one-third.

Drawings: Michael Maines

Fine Homebuilding Recommended Products

Fine Homebuilding receives a commission for items purchased through links on this site, including Amazon Associates and other affiliate advertising programs.

Drill Driver/Impact Driver

Whether you're pre-drilling holes or driving screws, this Milwaukee® compact cordless driver is the way to go when it comes to building decks.
Buy at Amazon

Standard Marking Chalk

We like white chalk because it’s non-permanent and wears off easily — this is especially helpful when marks are exposed and need to disappear.
Buy at Amazon

MicroFoam Nitrile Coated Work Gloves

These gloves are comfortable and have a good grip, making for splinter-free work.
Buy at Amazon

Sign up for eletters today and get the latest how-to from Fine Homebuilding, plus special offers.

Signing you up...

This site is protected by reCAPTCHA and the Google Privacy Policy and Terms of Service apply.
See all newsletters
See all newsletters
Previous: Second-Story Decks Next: How Big Should Your Deck Be?

Guide

Decks

Chapter

Design & Planning

View Comments

  1. user-7857715 | Mar 01, 2025 04:13pm | #1

    Hi, thanks for the article. When laying the sleepers, how do you fasten them to the sloped roof, and keep them from damaging the roofing membrane?

Log in or create an account to post a comment.

Sign up Log in

Become a member and get full access to FineHomebuilding.com

Decks

Decks

Hundreds of articles and videos by top deck-building pros on how to design and build a beautiful, sturdy, and safe deck

View Project Guide

View All Project Guides »

Become a member and get unlimited site access, including the Decks Project Guide.

Start Free Trial

Design & Planning
  • Basic Design Options
  • Generating Plans
  • Calculating Deck Loads
  • Code Compliance
Tools & Materials
  • Deck Building Tools
  • Foundation and Framing Materials
  • Decking Materials
  • Fasteners and Hardware
Footings & Foundations
  • Choosing a Foundation
  • Sizing and Laying Out Footings
  • Excavation
  • Pouring the Foundation
Framing a Deck
  • Framing Overview
  • Installing the Ledger
  • Setting Posts and Beams
  • Installing Joists
Installing Decking
  • Decking Basics
  • Installation Process
  • Adding Fascia and Other Decorative Elements
Installing Railings
  • Installing Deck Railing Posts
  • Building Wood Rails and Balustrades
  • Non-Wood Railing Options
  • Installing Nonwood Balustrades
Deck Stairs
  • Deck Stairs Overview
  • Laying Out, Cutting, and Installing the Stringers
  • Installing Treads, Risers, and Stair Railings
Custom Details
  • Benches, Planters, and Privacy Features
  • Pergolas
  • Lighting
Finishes, Repairs, and Maintenance
  • Deck Finishes
  • Cleaning and Refinishing
  • Inspection and Repair
Complete Deck Builds
  • Grade-Level Decks
  • Raised Decks

Fine Home Building

Newsletter Sign-up

  • Fine Homebuilding

    Home building tips, offers, and expert advice in your inbox.

  • Green Building Advisor

    Building science and energy efficiency advice, plus special offers, in your inbox.

  • Old House Journal

    Repair, renovation, and restoration tips, plus special offers, in your inbox.

Signing you up...

This site is protected by reCAPTCHA and the Google Privacy Policy and Terms of Service apply.
See all newsletters

Follow

  • Fine Homebuilding

    Dig into cutting-edge approaches and decades of proven solutions with total access to our experts and tradespeople.

    Start Free Trial Now
    • Facebook
    • Instagram
    • X
    • LinkedIn
  • GBA Prime

    Get instant access to the latest developments in green building, research, and reports from the field.

    Start Free Trial Now
    • Facebook
    • YouTube
  • Old House Journal

    Learn how to restore, repair, update, and decorate your home.

    Subscribe Now
    • Facebook
    • Instagram
    • X

Membership & Magazine

  • Online Archive
  • Start Free Trial
  • Magazine Subscription
  • Magazine Renewal
  • Gift a Subscription
  • Customer Support
  • Privacy Preferences
  • About
  • Contact
  • Advertise
  • Careers
  • Terms of Use
  • Site Map
  • Do not sell or share my information
  • Privacy Policy
  • Accessibility
  • California Privacy Rights

© 2025 Active Interest Media. All rights reserved.

Fine Homebuilding receives a commission for items purchased through links on this site, including Amazon Associates and other affiliate advertising programs.

X
X
This is a dialog window which overlays the main content of the page. The modal window is a 'site map' of the most critical areas of the site. Pressing the Escape (ESC) button will close the modal and bring you back to where you were on the page.

Main Menu

  • How-To
  • Design
  • Tools & Materials
  • Video
  • Blogs
  • Forum
  • Project Guides
  • Reader Projects
  • Magazine
  • Members
  • FHB House

Podcasts

  • FHB Podcast
  • ProTalk

Webinars

  • Upcoming and On-Demand

Podcasts

  • FHB Podcast
  • ProTalk

Webinars

  • Upcoming and On-Demand

Popular Topics

  • Kitchens
  • Business
  • Bedrooms
  • Roofs
  • Architecture and Design
  • Green Building
  • Decks
  • Framing
  • Safety
  • Remodeling
  • Bathrooms
  • Windows
  • Tilework
  • Ceilings
  • HVAC

Magazine

  • Current Issue
  • Past Issues
  • Magazine Index
  • Subscribe
  • Online Archive
  • Author Guidelines

All Access

  • Member Home
  • Start Free Trial
  • Gift Membership

Online Learning

  • Courses
  • Project Guides
  • Reader Projects
  • Podcast

More

  • FHB Ambassadors
  • FHB House
  • Customer Support

Account

  • Log In
  • Join

Newsletter

Get home building tips, offers, and expert advice in your inbox

Signing you up...

This site is protected by reCAPTCHA and the Google Privacy Policy and Terms of Service apply.
See all newsletters
See all newsletters

Follow

  • X
  • YouTube
  • instagram
  • facebook
  • pinterest
  • Tiktok

Join All Access

Become a member and get instant access to thousands of videos, how-tos, tool reviews, and design features.

Start Your Free Trial

Subscribe

FHB Magazine

Start your subscription today and save up to 70%

Subscribe

We hope you’ve enjoyed your free articles. To keep reading, become a member today.

Get complete site access to expert advice, how-to videos, Code Check, and more, plus the print magazine.

Start your FREE trial

Already a member? Log in